Onboarding is the process of adding a device into the cnMaestro account by creating the appropriate access credentials and setting up the network connection parameters.
This section includes the following:
| | Onboarding Overview |
| | Claiming Devices |
| | Onboarding Overview |
| | Zero-Touch Configuration |
| | Onboarding Examples |
| | Miscellaneous Onboarding Issues |
| | Device-Specific Onboarding Instructions |
Onboarding is the process through which a device is added to Cloud Management. The onboarding flow includes claiming the device (which maps it to the correct management account) and optionally pre-provisioning the device by updating its software image and configuration. It also allows setting onboarding options such as Device Name, Location, target firmware version, target configuration, etc to apply as part of the onboarding process. When the onboarding process is complete, the device will be under full Cloud administration.
The Onboarding queue holds 60 GHz cnWave E2E Networks before they are added to the account until the user approves the E2E Controller Network to complete the onboard process by accessing through the Onboard page or Tree menu.
Once the onboarding process is approved and it can be managed by cnMaestro.

|
|
If Auto Generate IPv6 Addresses is enabled, E2E Controller fetches the IPv6 addresses automatically. |
To Onboard the E2E controller Network through Manage page:
| 1. | Navigate to Manage > Network > select 60 GHz cnWave E2E Controller |
| 2. | Click Approve and 60 GHz cnWave – Network Onboardwindow pops-up. |
.png)
| 3. | By default Auto-assign is selected User can select either Auto-assign or Manual to update IPv6 address in E2E Network and wait for a while utill IPv6 address gets updated. |
| 4. | After the updation, user can Enable Layer 2 Bridge which is optional. |
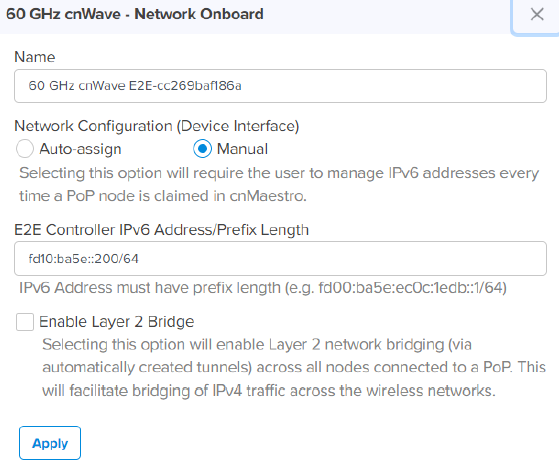
| 5. | Click Apply. |
| 6. | Wait for a while till network onboard is successful. |
.png)
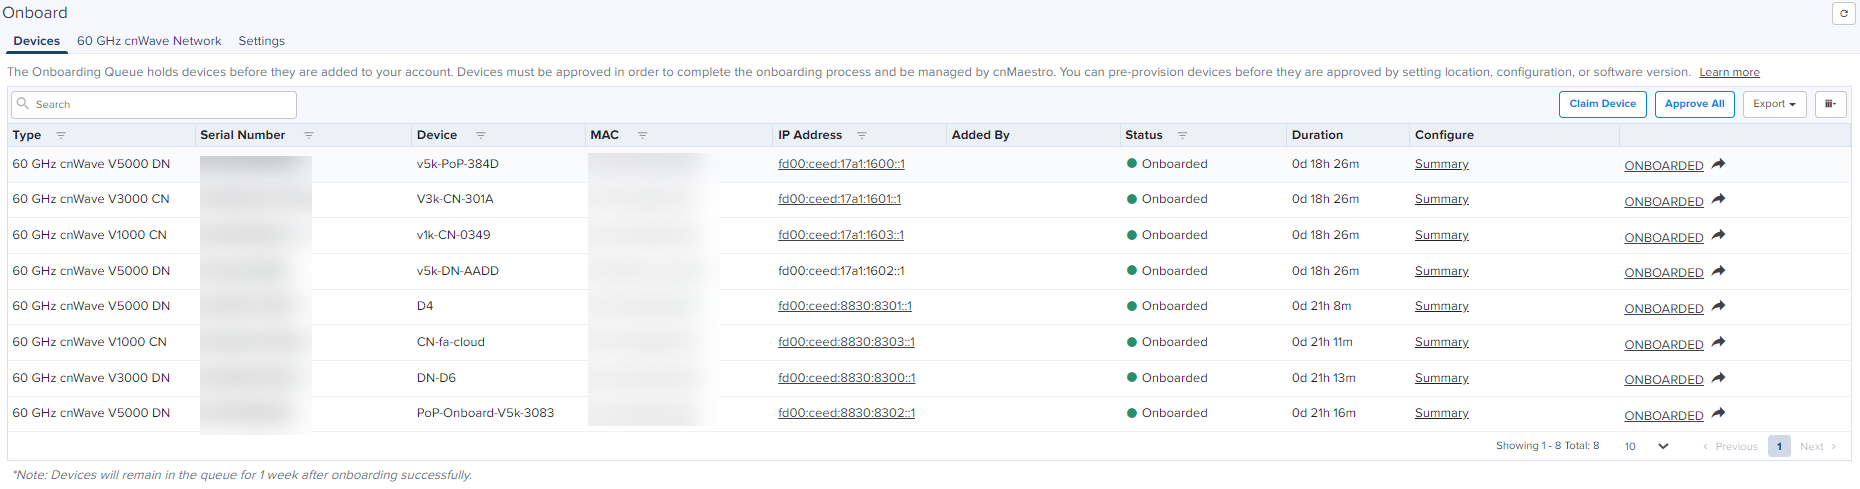
| 7. | Once it is successfully onboarded, the E2E Network UI shows the Dashboard of the network as shown below: |
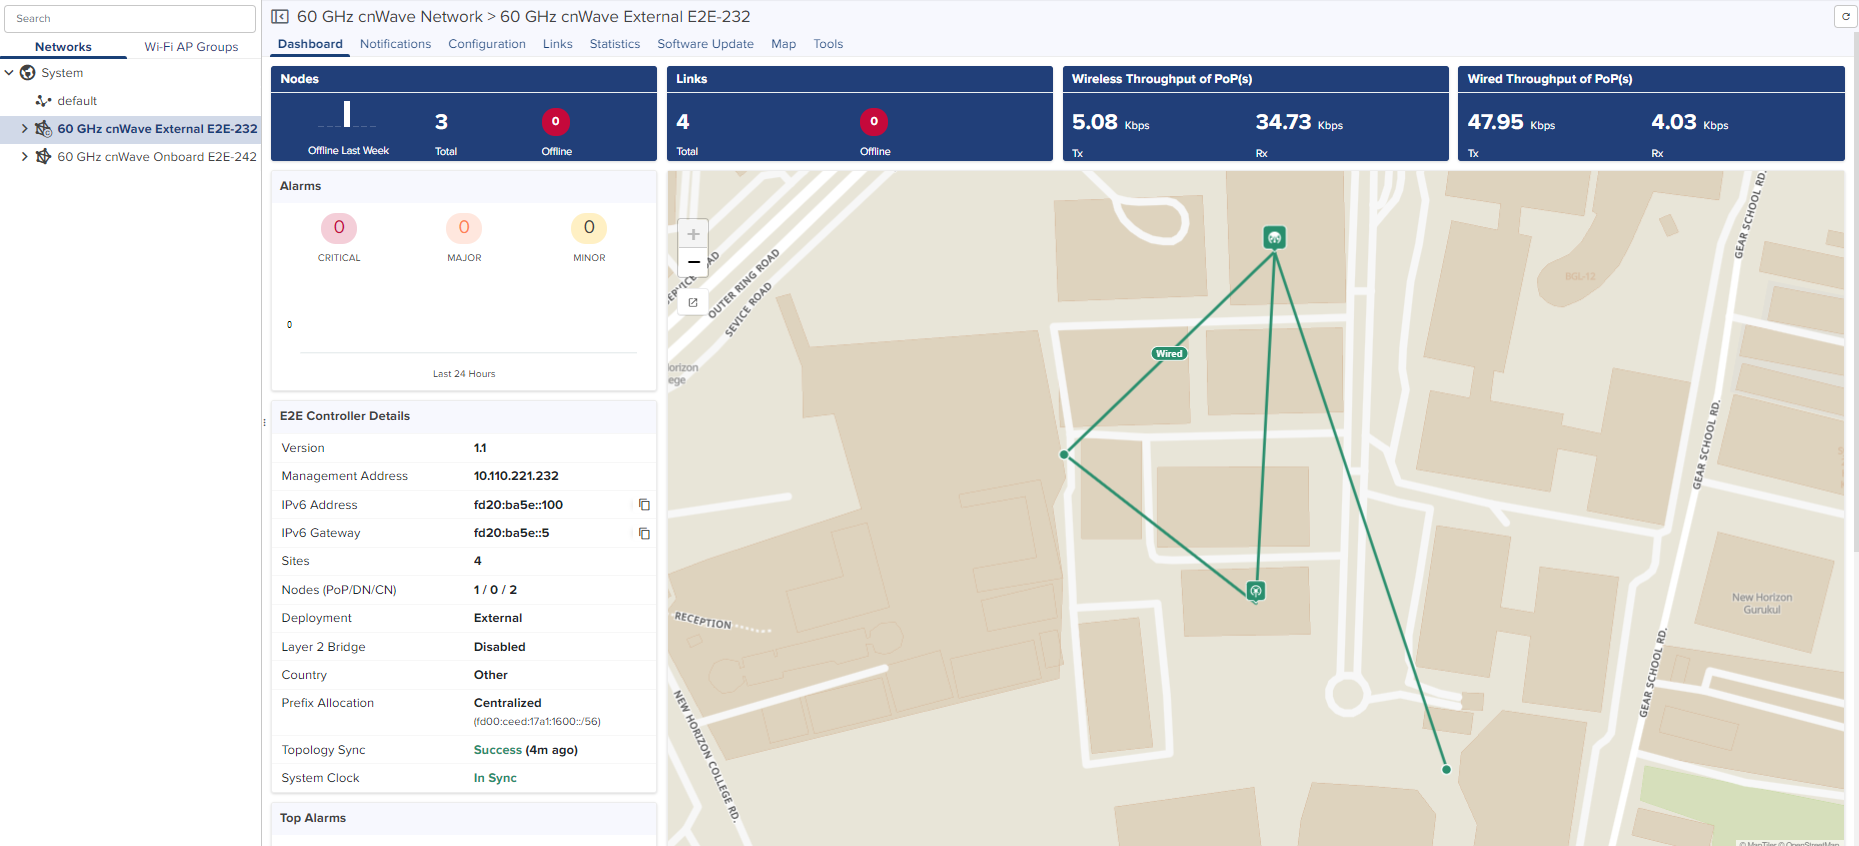
External E2E Controller network icon will be indicated with icon  as shown below:

Once cnMaestro remote management details are configured through onboard E2E controller. The E2E controller network will be discovered in the cnMaestro.
To approve proceed as follows:
| 1. | Navigate to Manage > Network > select 60 GHz cnWave E2E Network. |
| 2. | Click Approve and 60 GHz cnWave-Network Onboard window appears and provides option to Edit Network name. |
.png)
| 3. | click Save. |
.png)
| 4. | Wait for a while till network onboard is successful. |
.png)
| 5. | After the successful Onboard E2E Network, it can be managed through cnMaestro. |
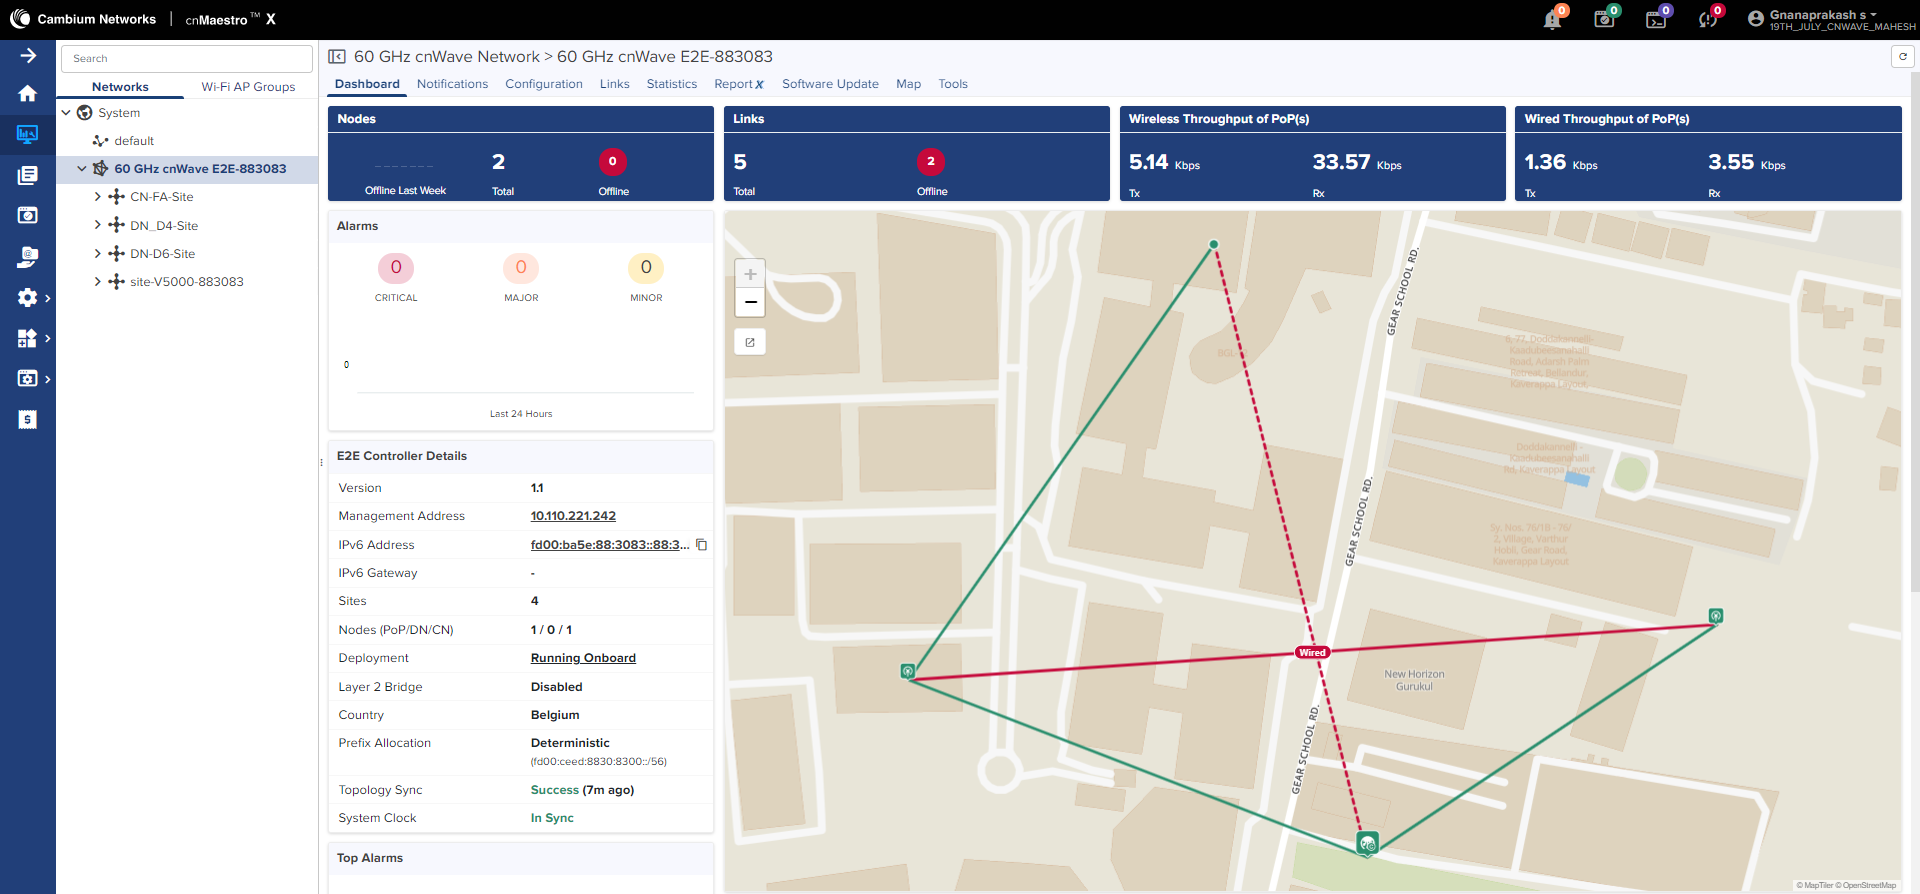
If PoP Node is running the Onboard E2E Controller then the PoP icon will be indicated with icon  as shown below:

A device is claimed when it is explicitly added to Cloud Management using the serial number or Cambium ID. The difference between the two is that the serial number is entered through the Cloud Management UI and Cambium ID is entered via the Device UI or through SNMP.
|
|
|
All claimed devices are placed in the Onboarding Queue. The devices need to be get approved before being added to the account and becoming fully managed.
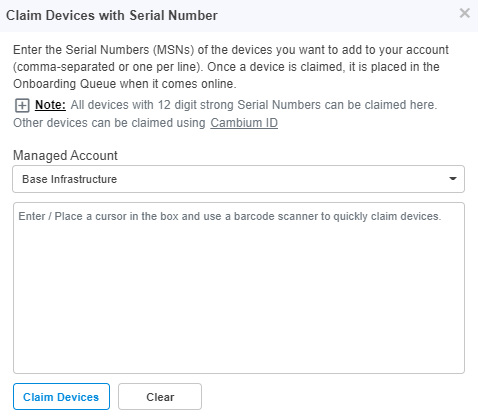
Claiming with a serial number is as easy as entering the serial numbers of devices, one per line, and clicking the button. The system prompts the user to validate the devices before applying them. When complete, they will be placed into the Onboarding Queue, where they can be pre-provisioned to update software or configuration before onboarding.
Figure 1 Claiming Devices with Serial Number
To claim a device using the serial number:
| 1. | Navigate to page > click . |
| 2. | with Serial Number window pops-up. |
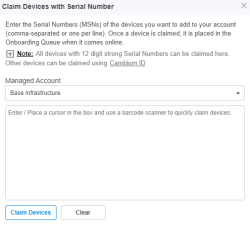
| 3. | Enter the serial number of the device. |
| 4. | Click |
| | After clicking , if there is any slot deficit it displays the following errors: |
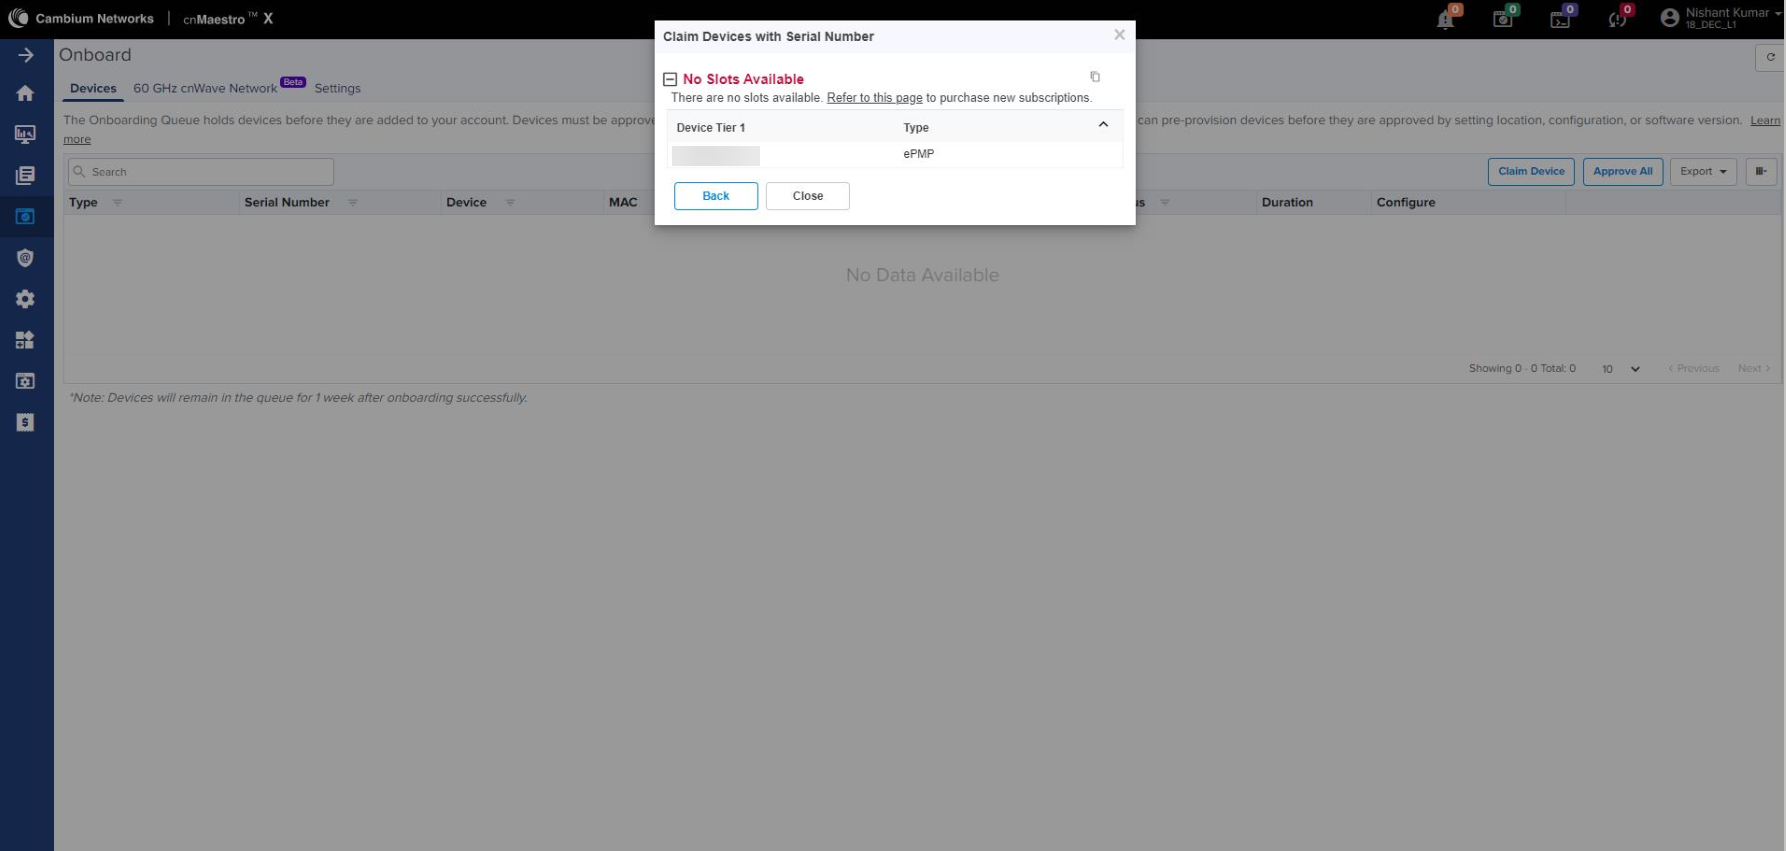
| n | No Slots Available: |
If there are no slots available while claiming the new devices, it pops-up the No Slots Available window as shown below:
The User needs to purchase a new subscription with the required slots and retry the claiming devices.
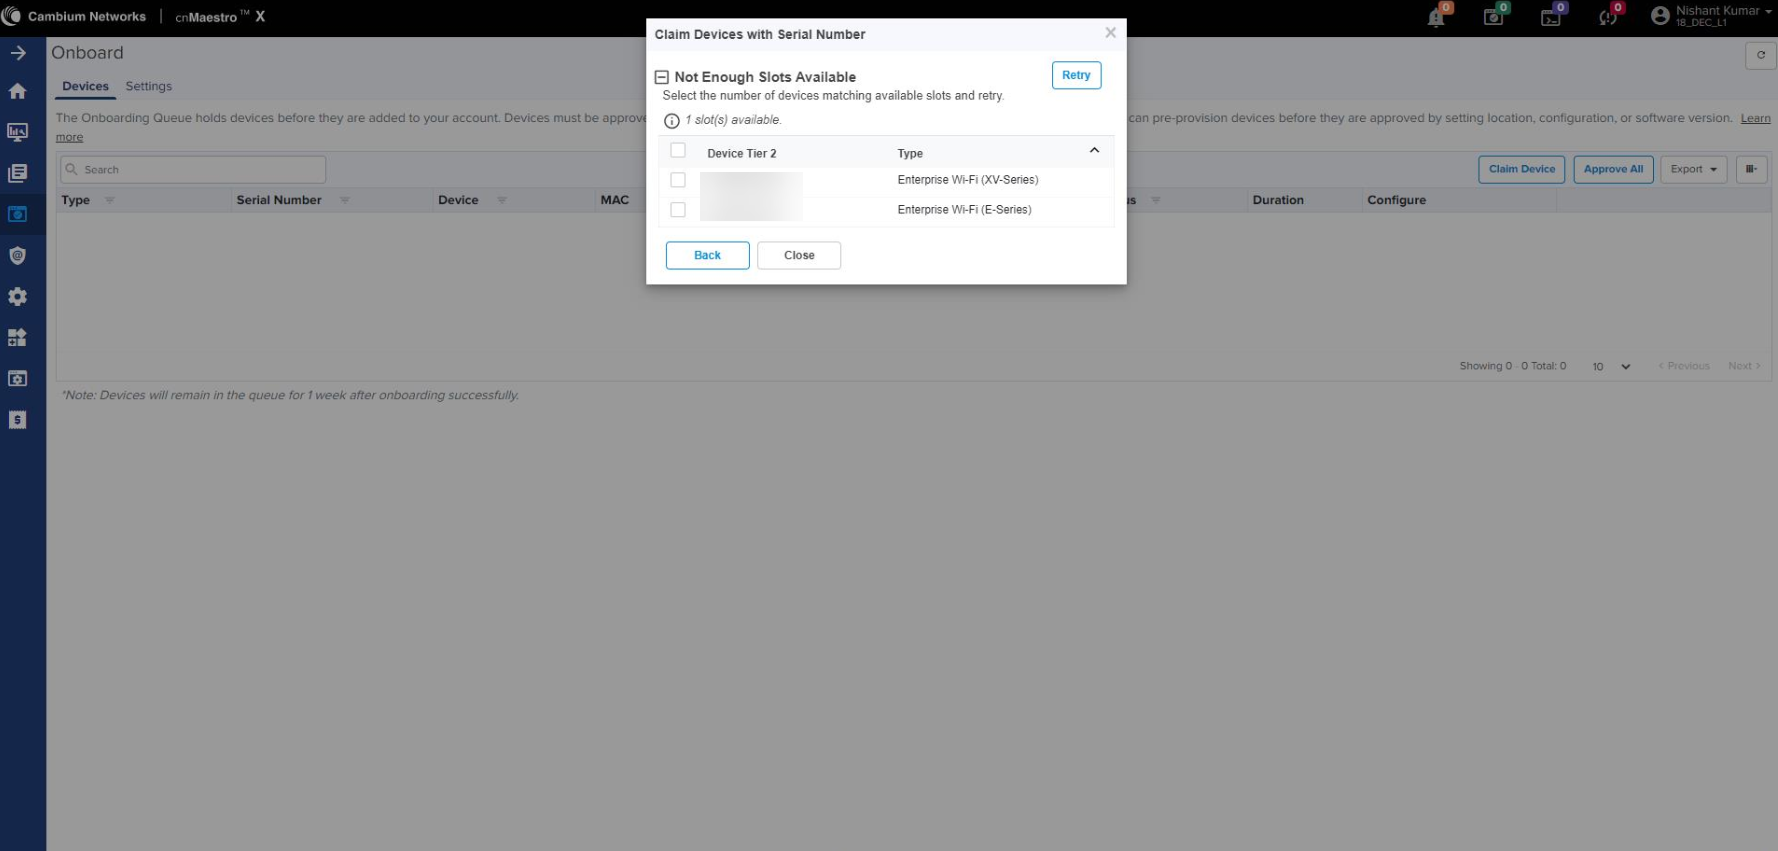
| n | Not Enough Slots Available: |
If user tries to claim the devices more than the available slots, it pops-up the Not Enough Slots Available window as shown below:
User will be provided with an option to select the devices from the list according to the available slots.
Select the devices and click Retry.
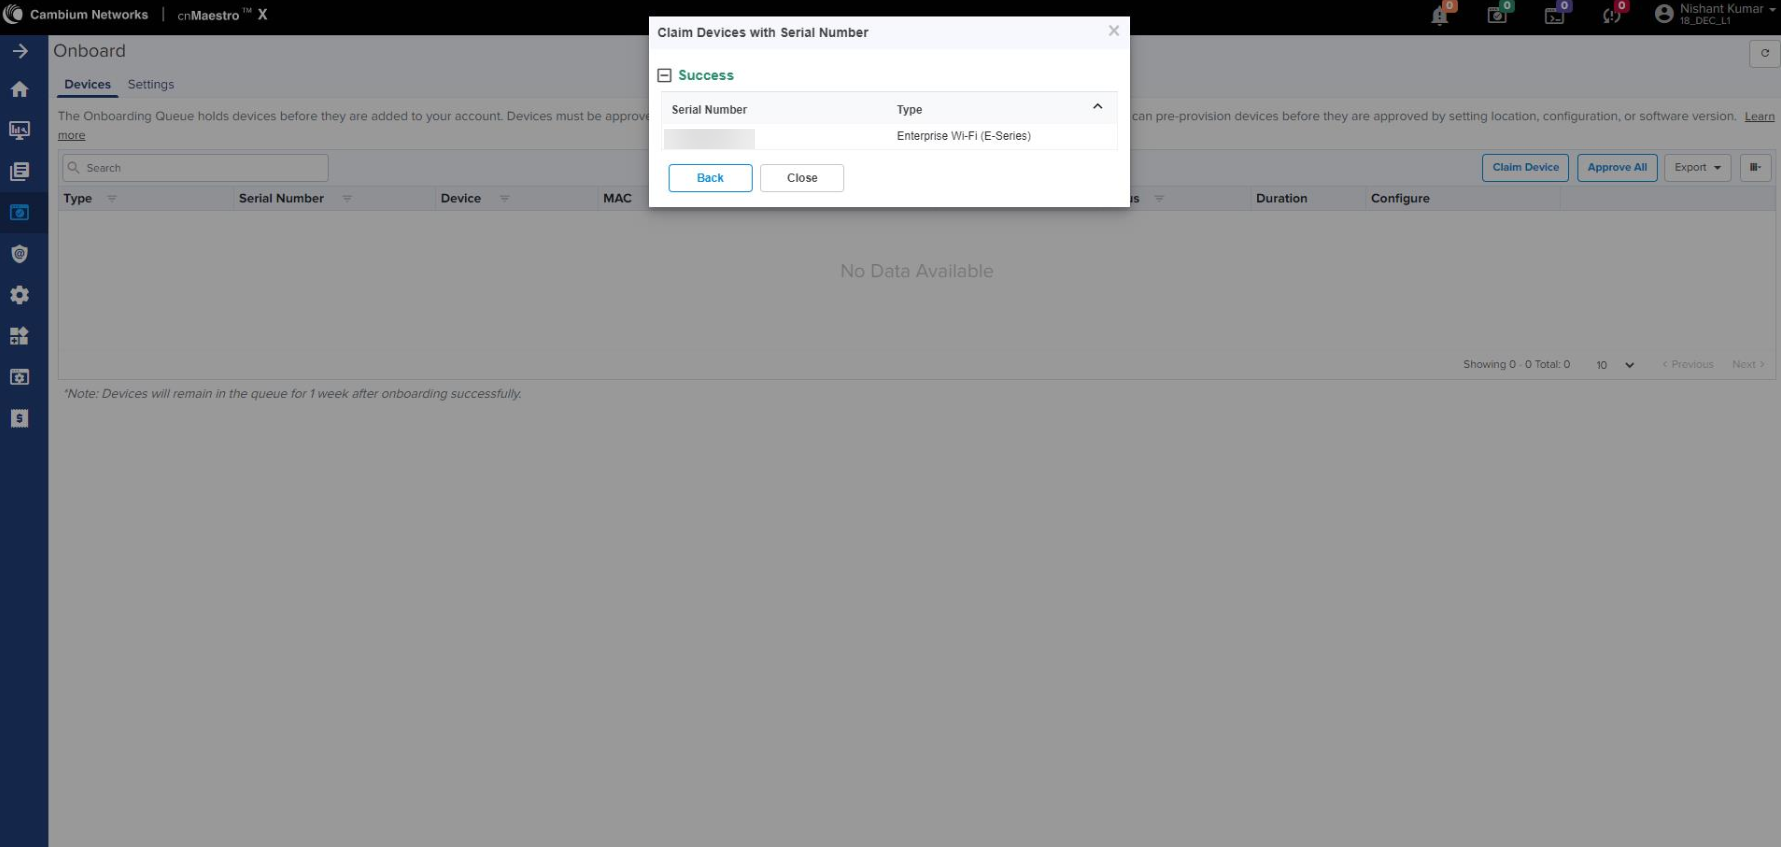
It pops-up the success window.
| 5. | The device appears on the onboarding page. |
| 6. | Click . |
New devices periodically query the cnMaestro Cloud to see if they have been claimed (it generally takes between 1 to 5 minutes to show up in an account, depending upon when the device was last rebooted). Once a device has been added to a Cloud Management account, it will be visible in the Onboarding Queue.
|
|
Devices must be able to access https://cloud.cambiumnetworks.com to be claimed and onboarded. HTTPS proxies are currently not supported. If your device is not showing up in the Cloud Management UI, you should verify network connectivity and reboot the device to prompt more frequent connection attempts. |
Devices in the Onboarding Queue must be approved before they are updated and added to the Cloud Management. Click the approval button in the device to onboard. Unapproved devices will remain in the Onboarding Queue indefinitely.
|
|
|
Devices that have completed onboarding remain in the queue for one week.
The Cambium ID is defined when the Cloud Management is first created. You can view it on the page; it uniquely identifies the account.
To claim a device with Cambium ID, you need to have access to the device. Cambium ID claiming is required for devices that do not have a 12-character serial number, and it is optional for devices that have 12-character serial number. There are two ways to claim a device with Cambium ID.
|
Type |
Description |
|---|---|
|
Device UI |
Enter the Cambium ID/Onboarding Key directly into the Device User Interface. This prompts the device to access Cambium Cloud and be placed in the corresponding Cloud Management. The device will be visible to the Onboarding Queue. |
|
Device SNMP |
The Cambium ID/Onboarding Key can also be entered into the device over SNMP. This allows one to quickly onboard existing devices using an SNMP manager. The correct OID will be dependent upon the device type. The string entered into the OID should be of the format “<Cambium ID>:<Onboarding Key>”. |
The directions for each specific device type are presented later in this chapter. Once devices are added to the Onboarding Queue using Cambium ID, the administrator must approve them prior to them being onboarded.
You must configure the Cloud Manager to support Cambium ID onboarding. Once enabled, Cambium ID onboarding will work for all device types.
Figure 2 Cambium ID Configuration

An Onboarding Key must be associated with a Cambium ID before onboarding. This provides security and tracking benefits for onboarded devices.
Each onboarding key is mapped to an account administrator. This allows Cambium Cloud to know who is onboarding a device. Onboarding Keys can also be revoked if needed.
The Onboarding Queue holds a list of pending and recent (last 24 hours) device onboards. It allows the administrator to pre-provision device software and configuration, as well as signal that a device is ready to be onboarded. The process flows for how the Onboarding Queue is used are slightly different based upon how the device was claimed.
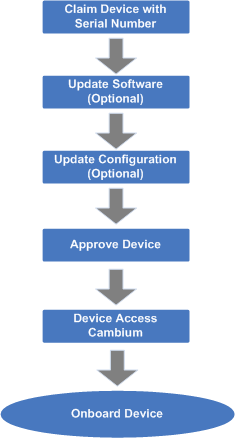
When onboarding with Serial Number, the device can be fully provisioned before it contacts Cambium Cloud and is placed in the Cloud Management. This allows it to be added immediately upon connection.
Figure 3 Serial Number Flow
|
|---|
|
|
When a user onboards using a Serial Number, the software update and configuration can be defined even before the device physically accesses the account. |
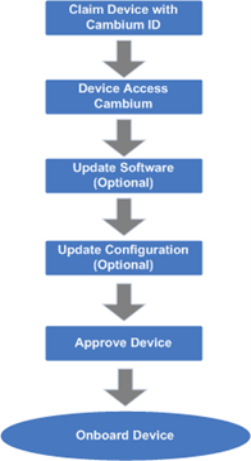
The flow is a little different when using Cambium ID. Here the devices must connect to Cambium Cloud before they are added to the Cloud Management. The administrator needs to then approve them in the Onboarding queue after optionally updating the software version and device configuration.
Figure 4 Claiming Devices Using Cambium ID
|
|---|
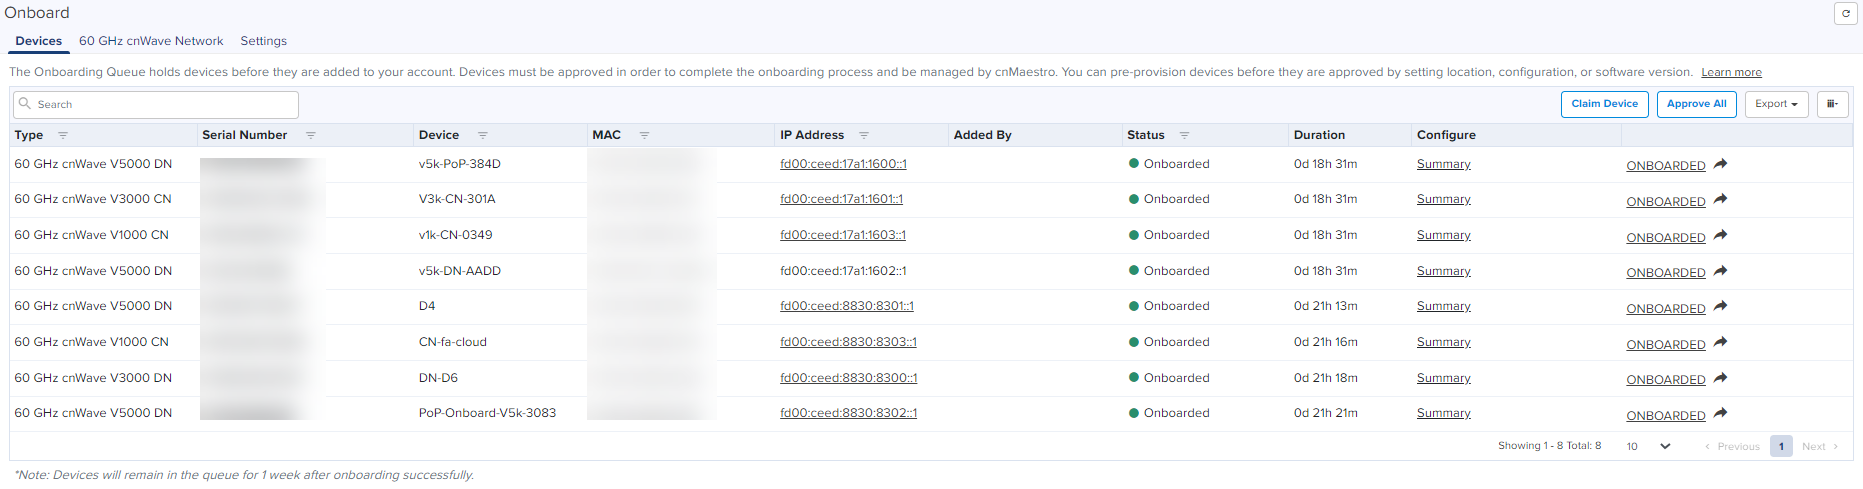
The following table details the columns in the Onboarding Queue. Some of these fields will be unknown or uncertain until the physical device has contacted Cloud Management.
|
Parameter |
Description |
||
|---|---|---|---|
|
Actions |
Before a device is onboarded, it must be approved. The actions icons allow this. There are two icons available: Approve: Click the Approve icon to enable the device for onboarding. If the device is connected, it will be onboarded immediately. Delete: If the device has been added with an error, you can delete it from the onboarding queue. This also disconnects the device and allows it to be added to another account. This button is only enabled before the device has started the onboarding process. |
||
|
Added By |
The user who added this device for onboarding.
|
||
|
Configure |
This highlights configuration that will be applied to the device before onboarding. It is presented as a set of icons that represent: software update, configuration update, and map placement. The icons have the following colors: Gray icon means nothing will be applied. Green means the parameter has been set and will be applied when onboarded. |
||
|
Device |
The name of the device. This is set manually, or, if unset, it will be read from the device. |
||
|
Duration |
Displays when the status last changed for the device. |
||
|
IP Address |
The IP address of the device. This is only available after the device contacts cnMaestro. |
||
|
MAC Address |
The MAC address of the device (if known). |
||
|
Serial No |
The serial number of the device. |
||
|
Status |
The current status of onboarding such as the following: The device has contacted cnMaestro, but it hasn’t been approved, so it is in a waiting state. Waiting for Devices: If user claims the device and not registered, so it will be in waiting for the device. Onboarded The device has completed onboarding and must now be managed through normal Configuration and Software Update processes. |
||
|
Type |
The type of the device (if known or manually configured). |
Before a device has been approved, the administrator can pre-provision the device. This is represented through a set of icons (depicted below), which represent configuration update, software download, and device map position.
The icon color means the following:
| | means no changes are made to the device configuration [ ] ] |
| | means the changes are applied successfully [ ] ] |
|
|
Onboarding configuration can be modified until the onboarding process has begun. The approval however needs to be turned off before any changes can be made. |
The basic configuration includes Serial Number, Mac, Device Name, Mode, and Description. A Comment can also be specified to provide additional context to the device.
Configure Device follows the standard template system (see the section on Template Configuration for full details). The administrator can select an existing configuration template and set any required variables.
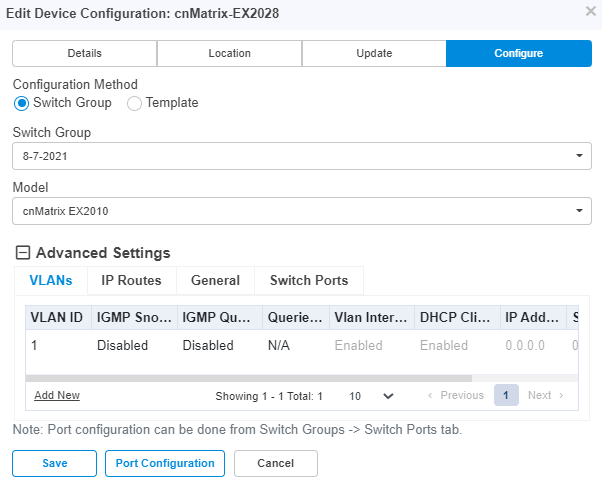
The administrator can select configuration method with the existing template or Switch Group.
User can configure the following Switch Group options while onboarding the devices:
| | VLANs |
| | IP Routes |
| | General |
| | Switch Ports |
Software Update pushes a software image to the device. The administrators can select an image version (latest or old) and push to all ePMP (AP or SM) device selected in a job.
The device location configure includes Network, Tower, Latitude, Longitude, and location can also be placed on a map.
An administrator needs to approve devices before onboarding can begin. This is done by selecting the Approve tab. As soon as a device is approved, it is eligible to start the onboarding process. This occurs immediately with connected devices. Any changes to the Onboarding Configuration need to be done before Onboarding begins and the Approval check is disabled.
Devices deleted from the Onboarding Queue are removed from the Cloud Management. They can then be added to other accounts. See below for how to delete devices that have already onboarded.
The count of devices that have contacted the cloud service and are ready to be onboarded, but are only waiting for approval, will be shown to the user in the UI header. The onboarding icon displays the number of devices that can be onboarded immediately if approved.

Zero Touch Configuration allows PMP SMs and also ePMP SM's to automatically appear in the onboarding queue, provided parent AP is already onboarded.

Irrespective of the account type, the option has been introduced to simplify Wi-Fi AP deployment.
| | In the Access and Backhaul account type, navigate to Wi-Fi AP Group tree view. You should see the option for claiming your first Wi-Fi AP. |
| | In Wi-Fi account type, by default the Wi-Fi AP Groups tree view will be launched automatically. |
Figure 5 Claim Your First Wi-Fi AP
.png)
This button is visible when no APs have been claimed. Later device claims are done from the AP Group or Site Dashboards). This button only allows claiming of Enterprise Wi-Fi devices.
To :
| 1. | Click the button. |
| 2. | Pop-up dialog with the AP MSN field will appear. |
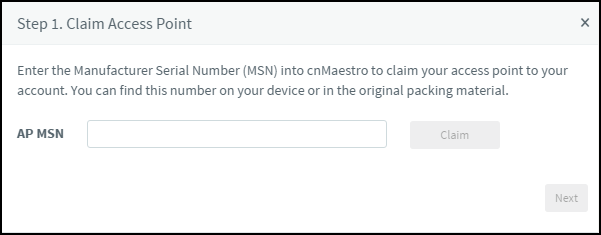
| 3. | Specify the AP MSN and click after the device is successfully claimed. |
| 4. | Click for basic default configuration, such as Country Code, WLAN SSID, and WLAN Passphrase. |
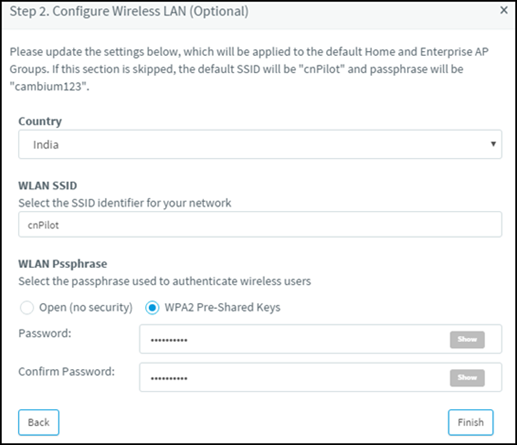
| 5. | By default, |
| | Country Code is the same as that defined during start-up |
| | WLAN SSID will be "cnPilot" for both the radios (2.4 and 5 GHz) |
| | WLAN passphrase is cambium123 with WPA2-PSK as the security mode |
| 6. | Click , and the final page displays status of the claim and configuration actions |
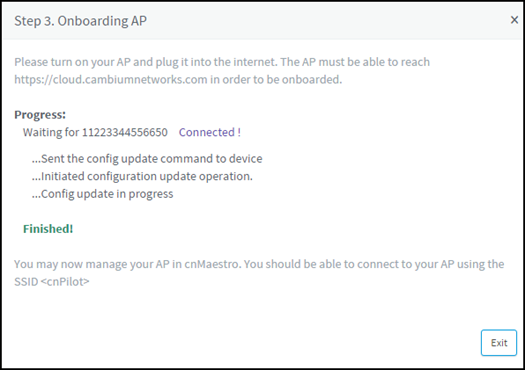
| 7. | Once complete, the device is mapped to the Default Enterprise AP Group, and the configuration will be updated in the Default Enterprise WLAN |
To claim multiple devices from the AP Group in Cloud, navigate to the tree view and click the drop-down menu for the selected AP Group.
| 1. | Click the s option. |
| 2. | In the pop-up dialog that appears to select the Network and Site under which these devices need to be placed and by default the devices claimed under this group will have the configuration settings from this AP Group. |
| 3. | Specify the MSNs (Manufacturing Serial Number) of the devices line-by-line or comma-separated, or click the Import .csv option to import the MSNs of the devices from a file. |
| 4. | Click to add to the selected AP Group with the configuration applied. |
|
|
In cnMaestro On-Premises the procedure is the same as Cloud, but instead of MSN, the user should use the Device MAC addresses. |
.png)
| 1. | To claim multiple devices from the Site Dashboard, navigate to the Networks tree view and select the drop-down menu for the Site. |
| 2. | Select the option. |
| 3. | In the pop-up dialog select the AP Group that should be applied for Enterprise Wi-Fi and cnPilot Home series devices. The devices claimed under this site will have the configuration settings from the selected AP Group. |
| 4. | Specify the MSNs of the devices line-by-line or comma-separated, or use the option to import the MSNs of the devices from a file. |
| 5. | Click to add the devices to the selected AP Group and apply configurations. |
As soon as onboarding completes, the device will no longer be managed through the Onboarding Queue. Instead, configuration and software upgrade needs to be managed through the standard cnMaestro UI sections.
While a device is in the onboarding queue, it can be removed from the account by deleting it from the queue.
After onboarding, the device needs to be manually deleted. The device can be deleted either by right-clicking the navigation and selecting the Delete option or from the inventory page in the backhaul account and the Wi-Fi account can be deleted from the AP grid.
When a device is sold to a third-party, the device ownership needs to be transferred. This is done by deleting the device in one account, thereby opening it up to being claimed by another.