Cloud Anchor accounts are used to manage On-Premises cnMaestro X subscriptions and Inventory details. Cloud Anchor accounts also simplify CBRS provisioning and billing by aggregating multiple On-Premises Instances. It collects the statistics and automatically pushes announcements of new device firmware and cnMaestro software images.
This chapter provides the following details:
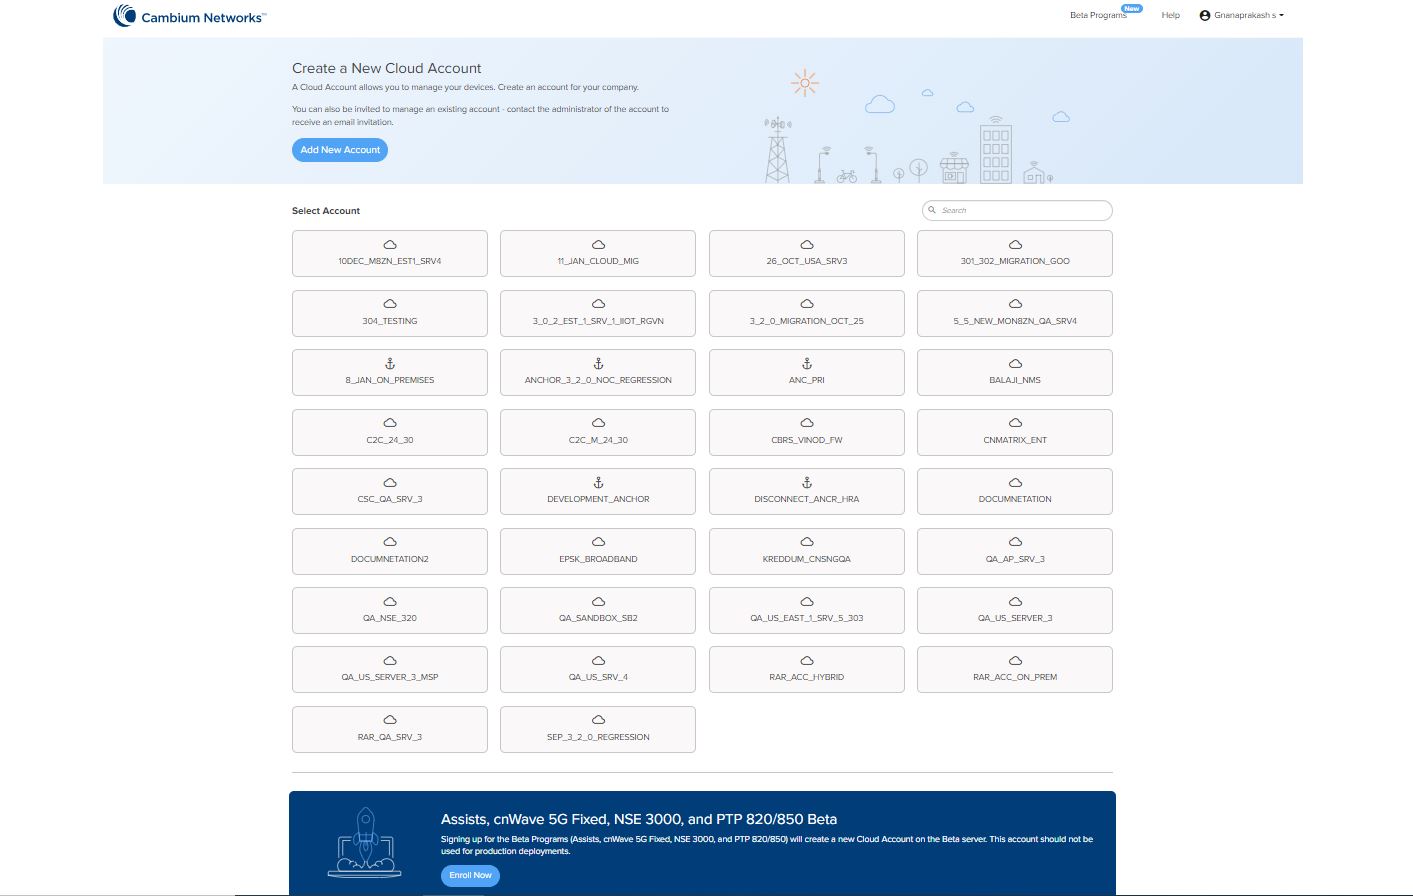
You must create a Cloud Anchor account before connecting the On-Premises Instance, as shown below:
| 1. | Navigate to https://cloud.cambiumnetworks.com and click Sign In. |
| 2. | Enter the Email address and Password. |
| 3. | Click Sign In. |
| 4. | Click . |
| 5. | Create a New Cloud Account page pops up. |
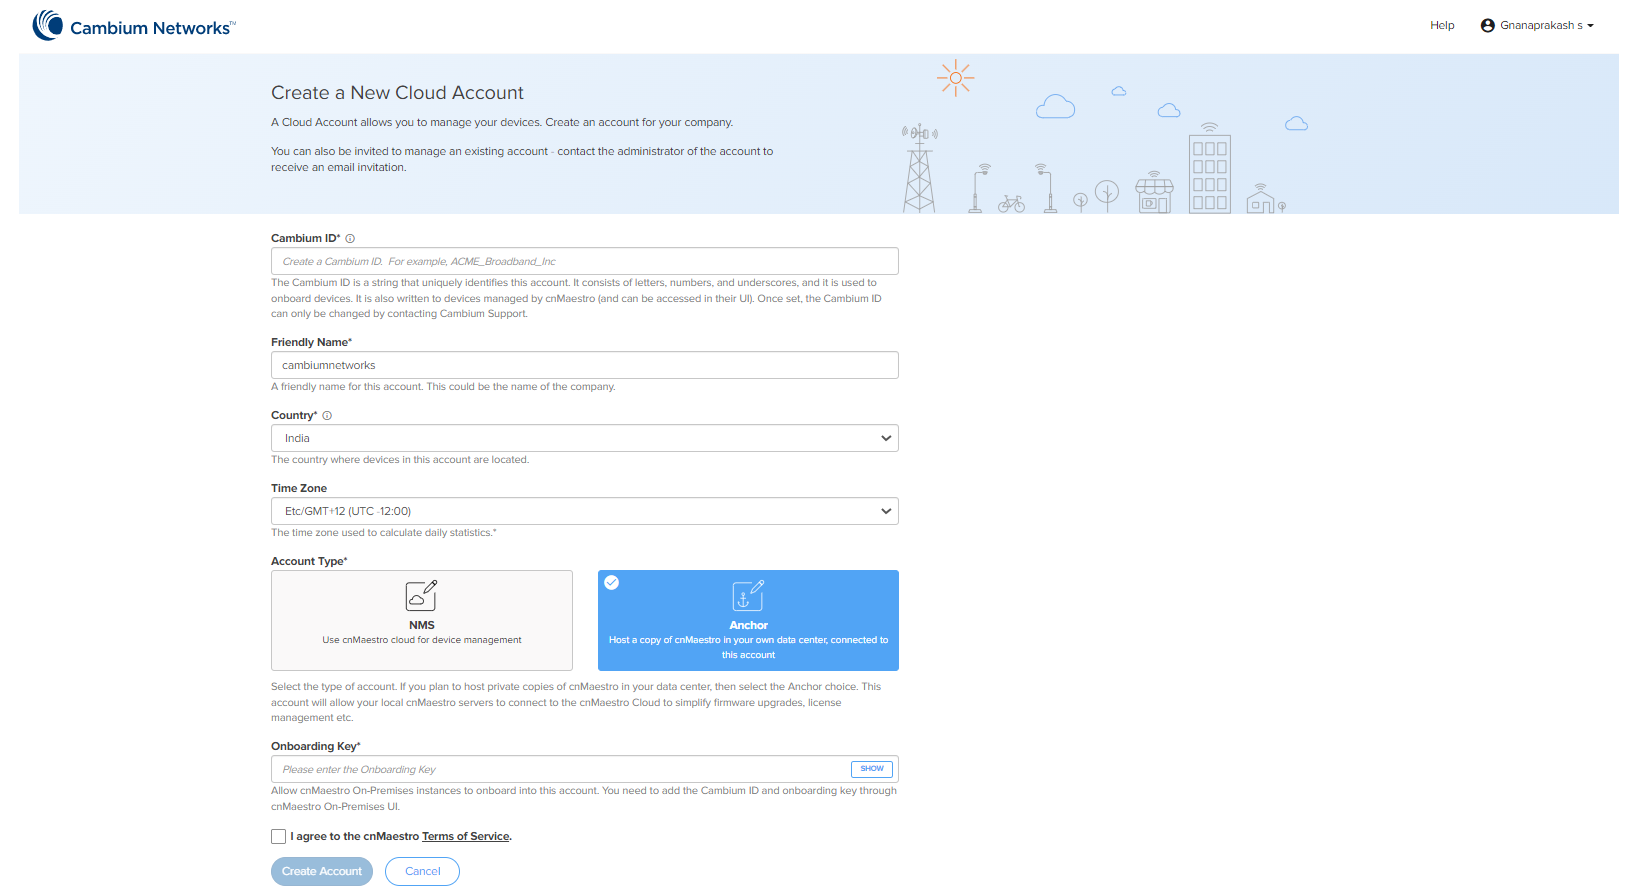
| 6. | Enter details such as Cambium ID, , , and |
| 7. | Select the as Anchor. |
| 8. | Enter the Onboarding key. |
| 9. | Enable I agree to the cnMaestro Terms of Service. |
| 10. | Click Create Account. |
A new Cloud Anchor account will be created with Essentials as shown in Figure 1.
Figure 1 : Cloud Anchor account
To activate the cnMaestro X account for Cloud Anchor account, perform the steps below:
| 1. | Navigate to https://support.cambiumnetworks.com/entitlements, or from the cnMaestro home page click the Licensing tile. |
| 2. | In the Licensing page under Entitlements select Activate Entitlements. |
| 3. | Enter the Entitlement ID received from licensing@cambiumnetworks.com. |
| 4. | Click Check. |
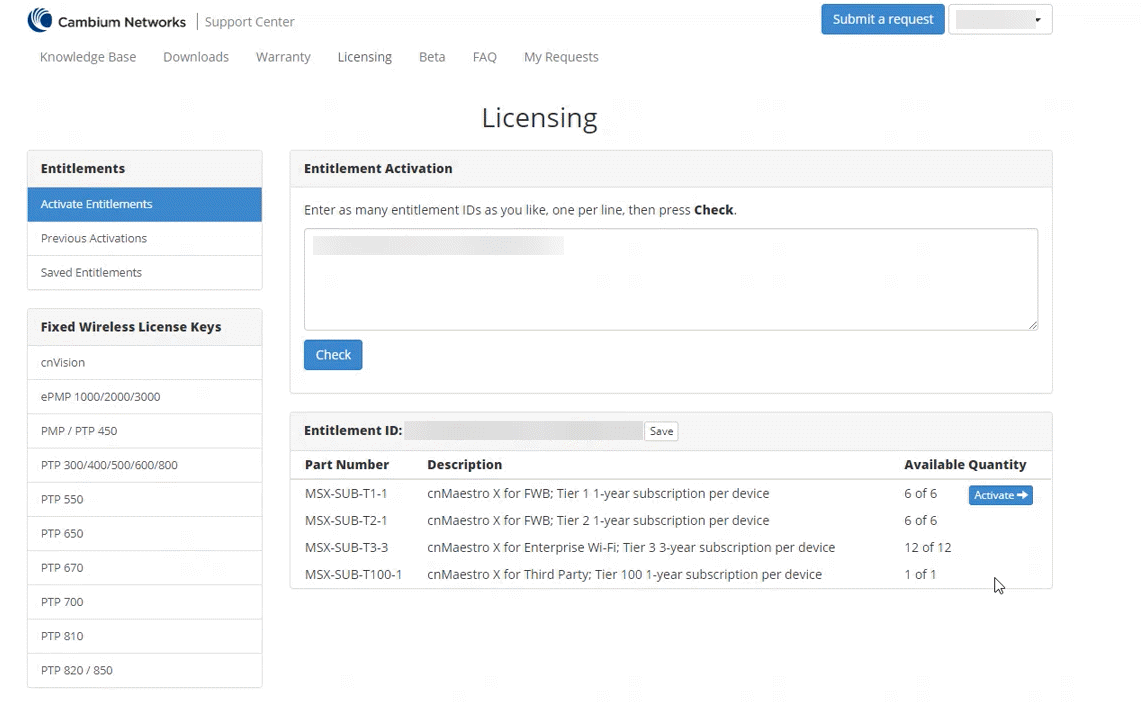
| 5. | Once the Entitlement ID is validated, the Activate button is enabled. |
| 6. | Click Activate. |
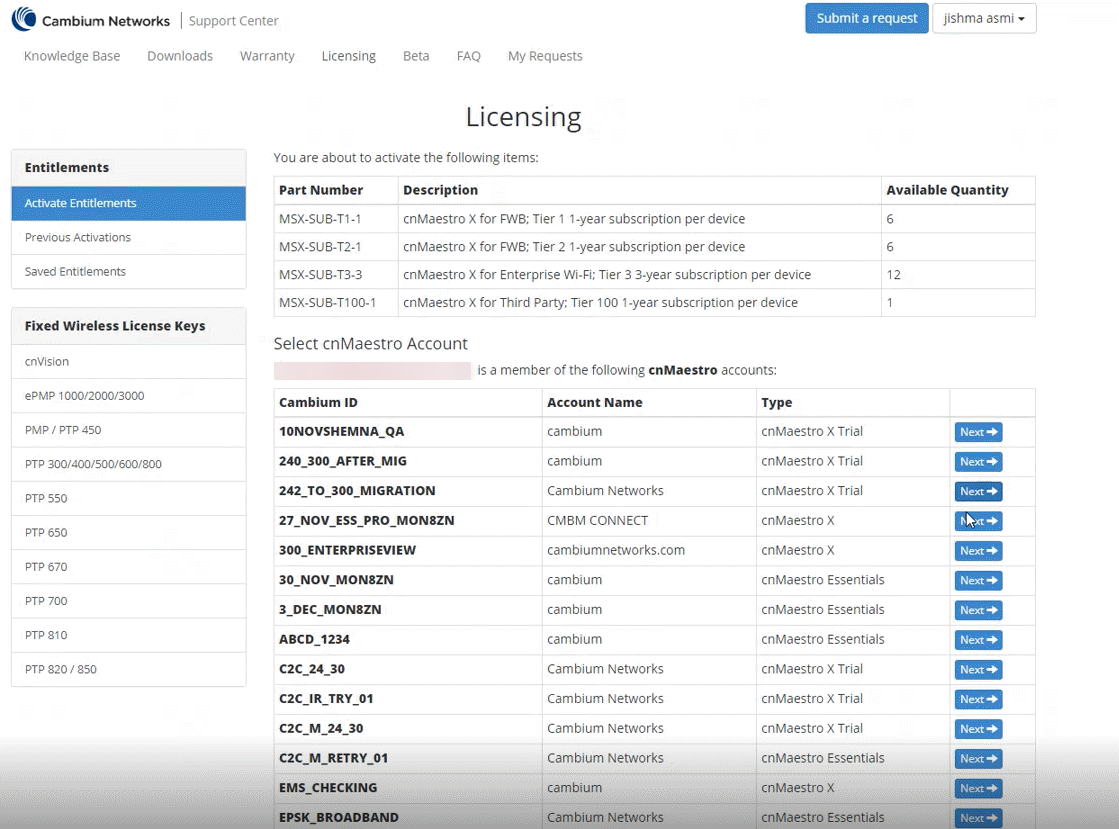
| 7. | Select the Cambium ID from the list and click Next. |
| 8. | The Ready to Upgrade page displays. |
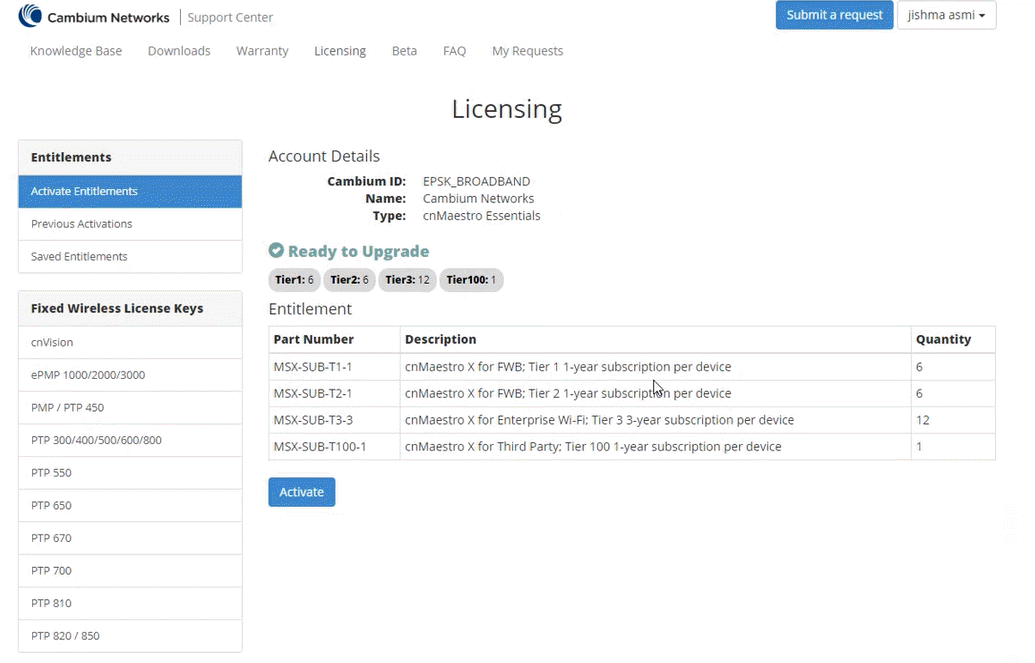
| 9. | Click Activate. |
| 10. | The Previous Activations page displays the Complete activation list. |
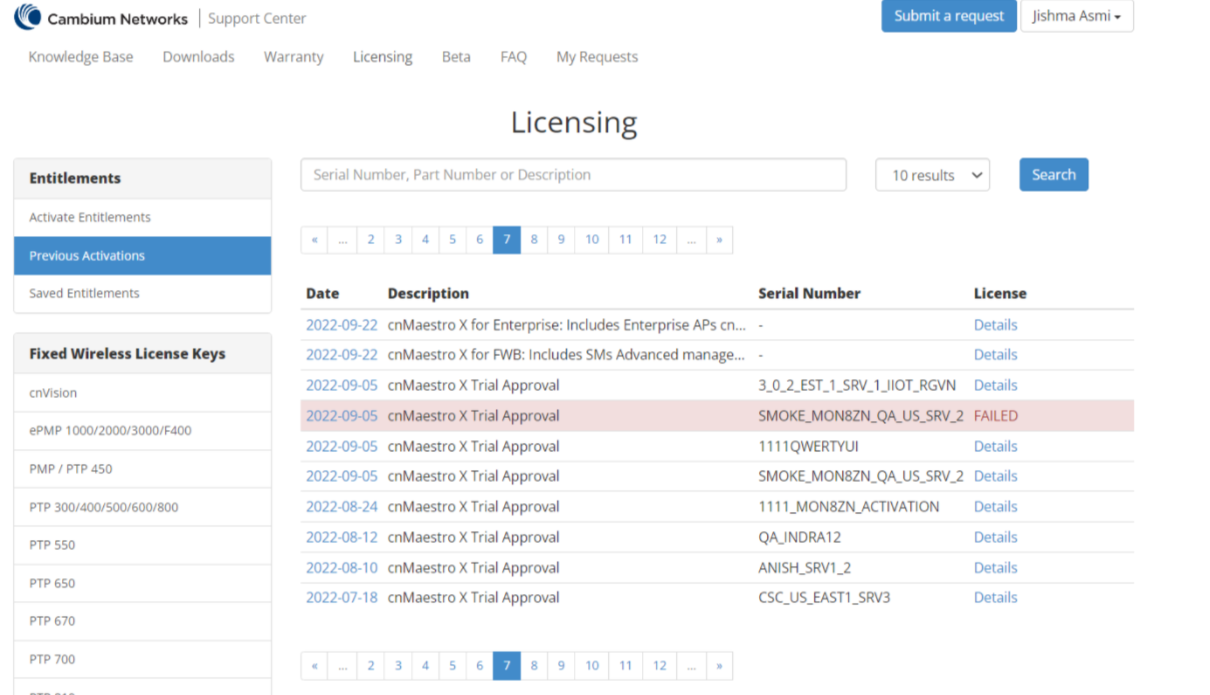
| 11. | Click Details to view the license description. |
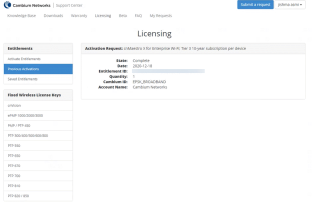
The Subscription is activated with the number of requested slots.
On the Cloud Anchor account page, a notification banner will be displayed after a successful upgrade, and the user needs to wait for 15 minutes.
Table 1 lists the Cloud Anchor account features supported between the Essentials and cnMaestro X.
| Essentials | X | Feature | Description |
|---|---|---|---|

|
|
Administration |
Allows to invite others to manage this account. |
|
|
Audit Logs | Viewing the audit logs. | |
|
|
|
Manage Instances |
Displays the monitoring details of the devices connected to On-Premises. |
|
|
Manage Subscriptions |
Provides usage summary and break-up of slots usage of On-Premises instances. |
|
|
|
Network Services |
Allows to enable and configure the CBRS. | |
|
|
|
Notifications | Provides the Cloud Anchor account event and On-Premises cloud connectivity event details. |
|
|
Session Management | Allows to view and optionally log out current cnMaestro administrator sessions. |
When the On-Premises account is connected with Cloud Anchor account, it collects the On-Premises statistics and automatically pushes announcements of new device firmware and software images.
Cloud Anchor account features are described below as:
| | Manage Instances |
| | Notifications |
| | Inventory |
| | Network Services |
| | Administration |
| | Manage Subscriptions |
To know more about the Essentials and cnMaestro X supporting features, refer to Cloud Anchor account features.
This section describes:
| | Onboarding |
| | On-Prem Instances |
| | Disable Onboarding |
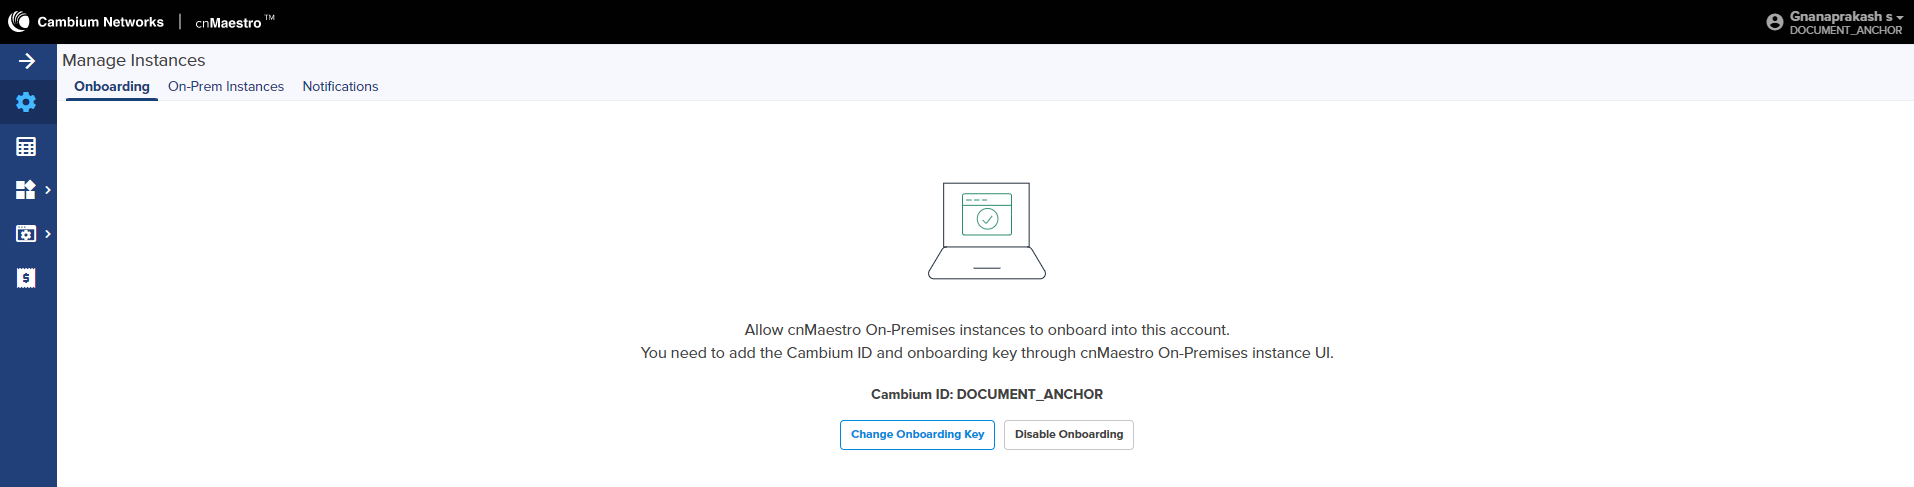
Once the On-Premises instances have been onboarded with the Key, they will be included in the On-Prem Instances page. Multiple On-Premises installations can be managed to a single Cloud Anchor account.
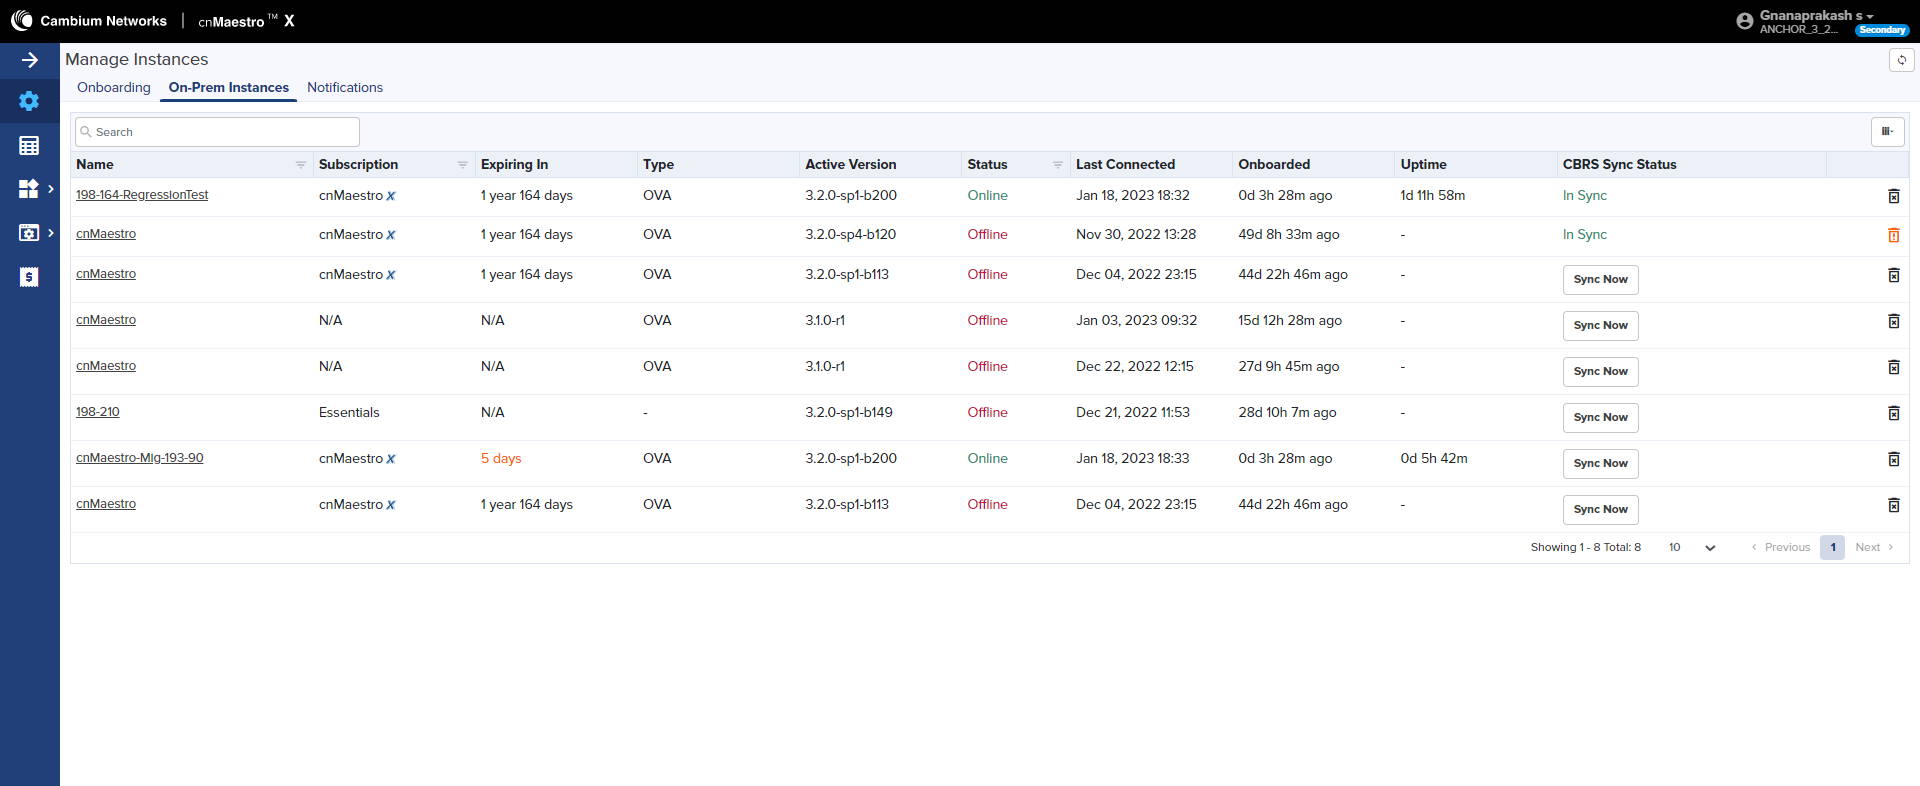
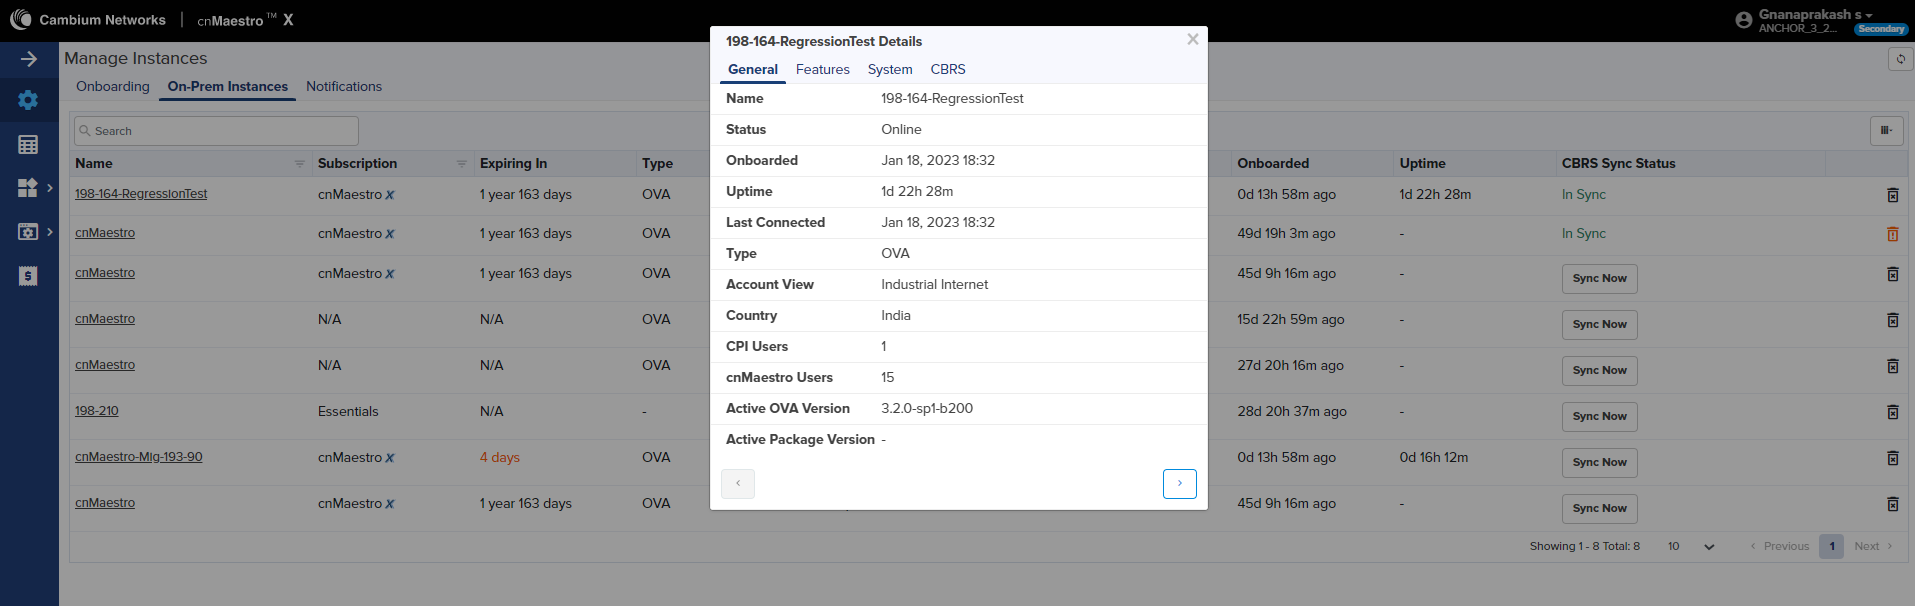
By clicking the On-Premises instance host name, you can see the details of the On-Premises instances such as General, Features, System, and CBRS as shown in Figure 2.
Figure 2 : On-Premises Instances details
Onboarding page allows the user to modify the onboarding key and disable/enable a fresh On-Premise connections.
To edit the Onboarding Key, perform the following steps:
| 1. | Navigate to the Manage Instances page and click Change Onboarding Key. |
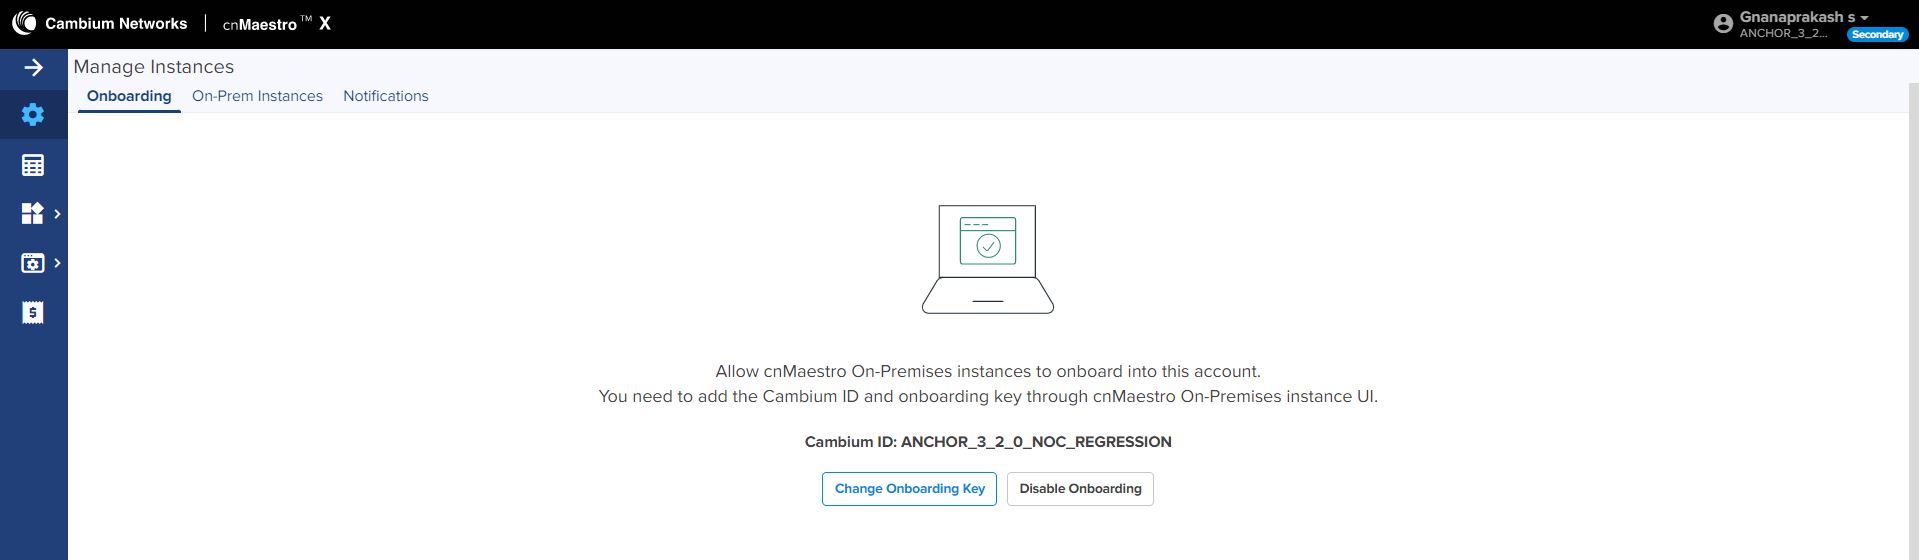
| 2. | ChangeOnboarding Key pops up. |
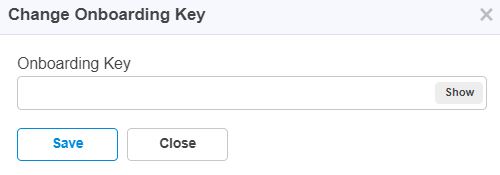
| 3. | Enter Onboarding Key and click Save. |
| 4. | Once the On-Premises instances onboards, the On-Premises Instances page lists all the connected On-Premises instances in the account. |
When the user do not want to onboard any extra On-Premises instances can configure the disable onboarding. It will not impact any existing onboarded On-Premises instances.
To disable the Onboarding Key, perform the following steps:
| 1. | Navigate to the Manage Instances page and click Disable Onboarding. |
| 2. | On-Premises instances onboarding will be disabled. |
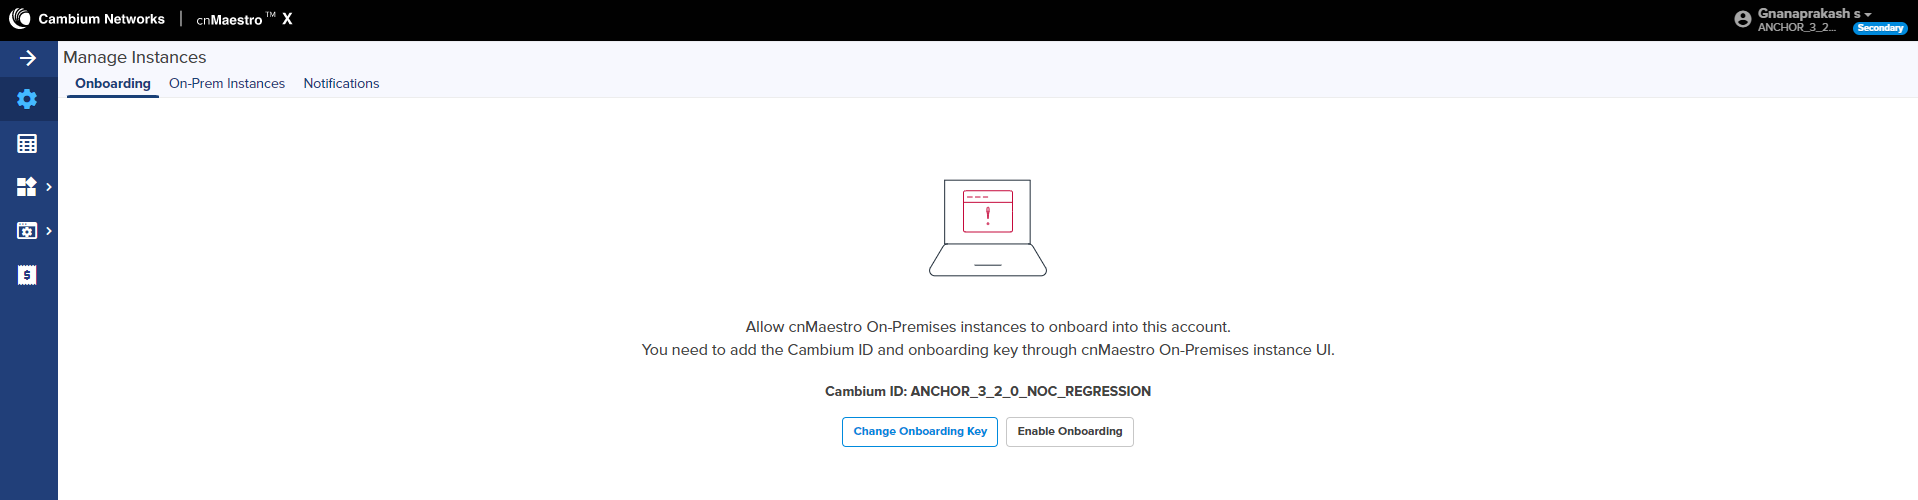
| 3. | Click Enable Onboarding to onboard the On-Premises instances when required. |
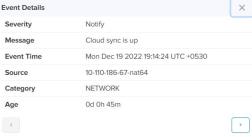
Notification page displays the history of the most recent events of Cloud synchronization and subscriptions with Severity, Source, Name, Raised Time, and Message.

Click View Details to view the Event Details as shown below:
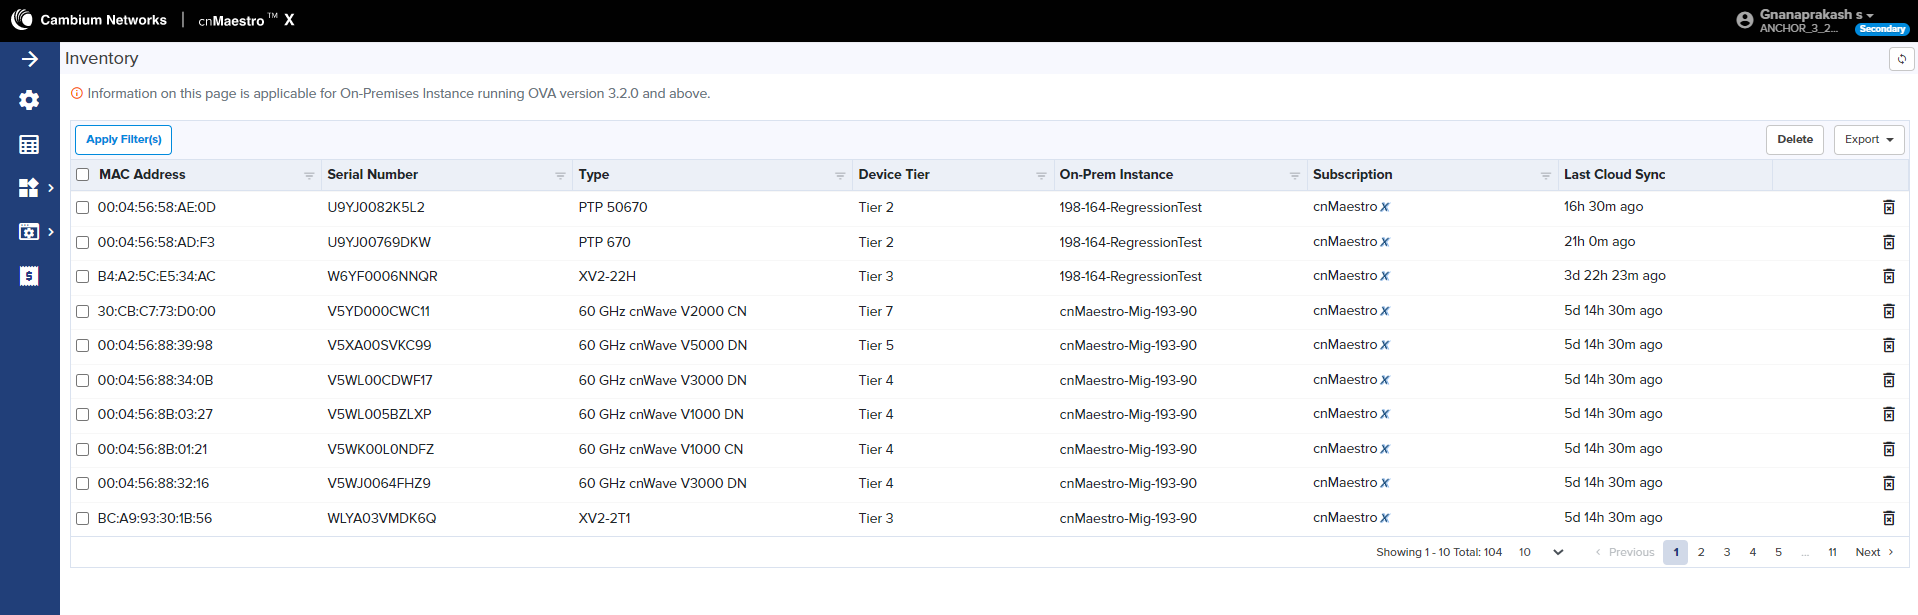
The Inventory page displays a list of devices of On-Premises instances 3.2.0 or above under the selected Cloud Anchor account with tier and subscription details.
Administration provides the following details:
| | Users |
| | Settings |
| | Audit Logs |
Cloud Anchor account allows to add Users using the Administration > Users page.
Figure 3 Adding Users
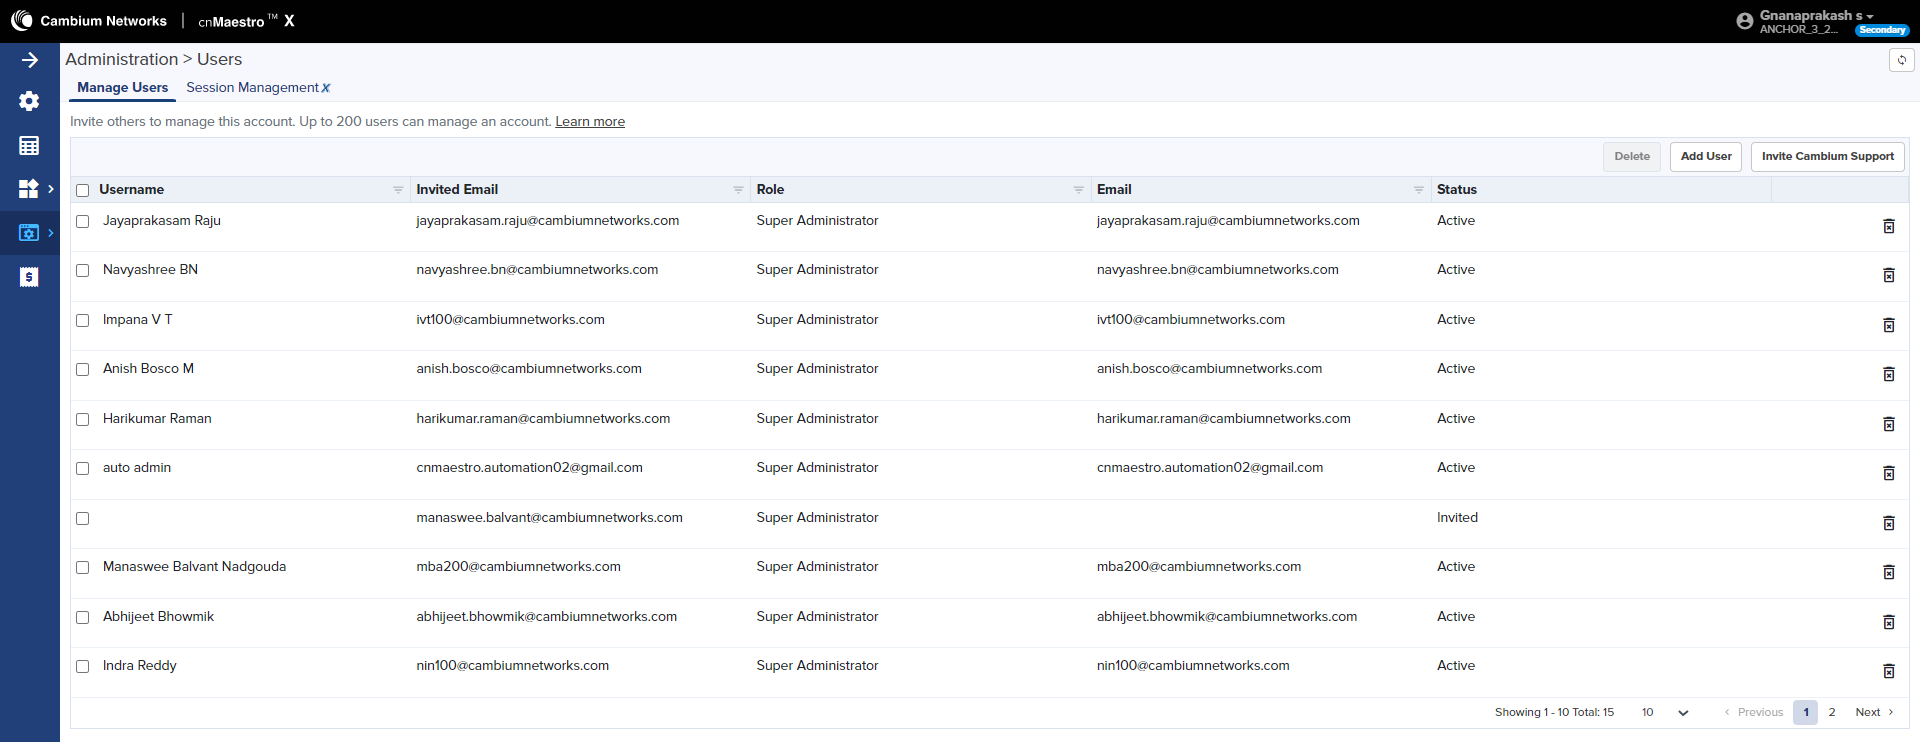
On successful authentication of every request from the user and an E-mail invitation will be sent to the users.
To add an administrator:
| 1. | Navigate to page. |
| 2. | Click Add User button. The following window is displayed: |
| 3. | Enter the ID in the Email text box. |
| 4. | Click Send button to add this user. |
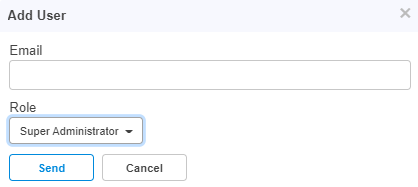
Session Management lists the current cnMaestro administrator sessions. The users with the Super Administrator role can log out of all other users sessions.
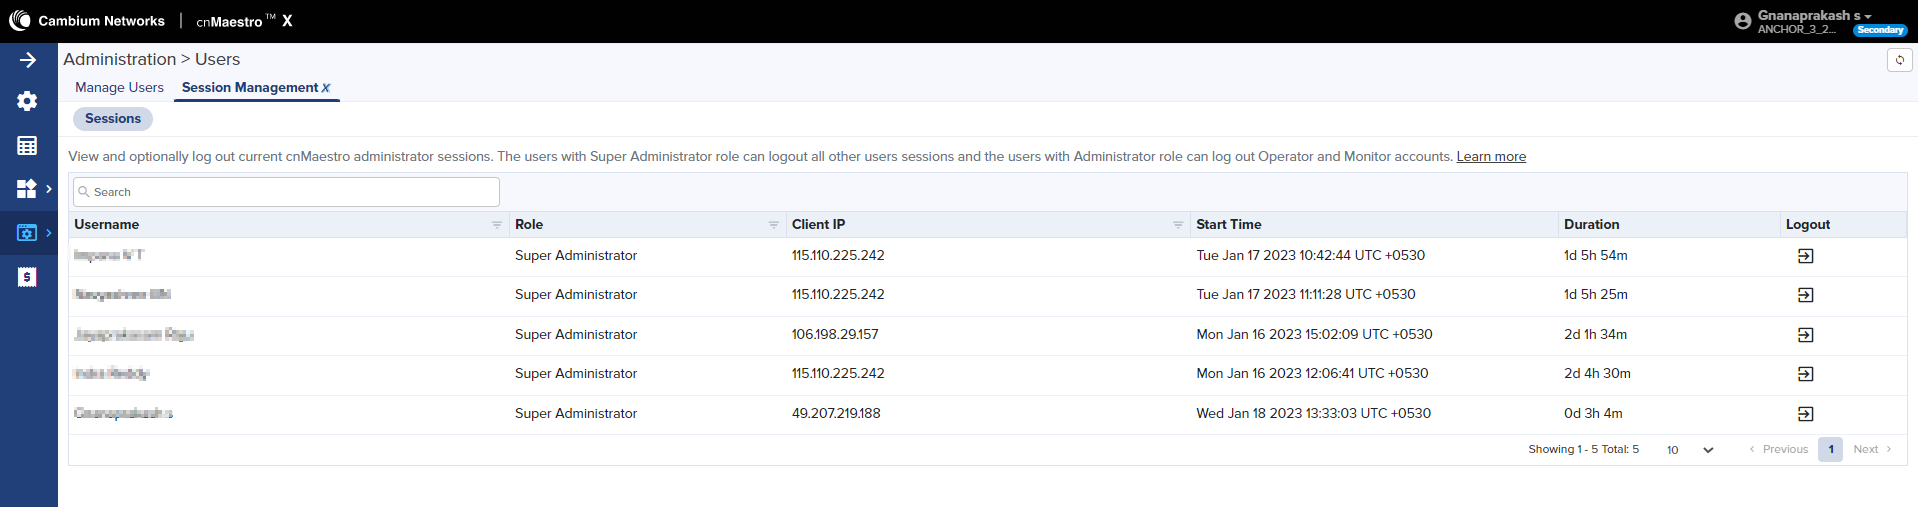
The Basic Settings page allows you to select the time zone from the drop-down. Based on the selected time zone all the time based subscription activities are configured accordingly.
Audit Logs records the user activities. Users can access Audit Logs in the Administration > Audit Logs page.

Network Services provide the following details:
| | CBRS |
| | Organization |
CBRS subscription for the CBRS-compliant devices in 3.6 GHz band (3550 MHz to 3700 MHz).
For further information, refer to CBRS.
An Organization allows multiple accounts to share CBRS billing and SAS ID. The primary account owns this configuration, and the secondary account can optionally share it. Both accounts must authorize the sharing.
For further information, refer to Organization.
Manage Subscriptions provide the following details:
| | Subscriptions |
| | Devices |
| | On-Prem Instances |
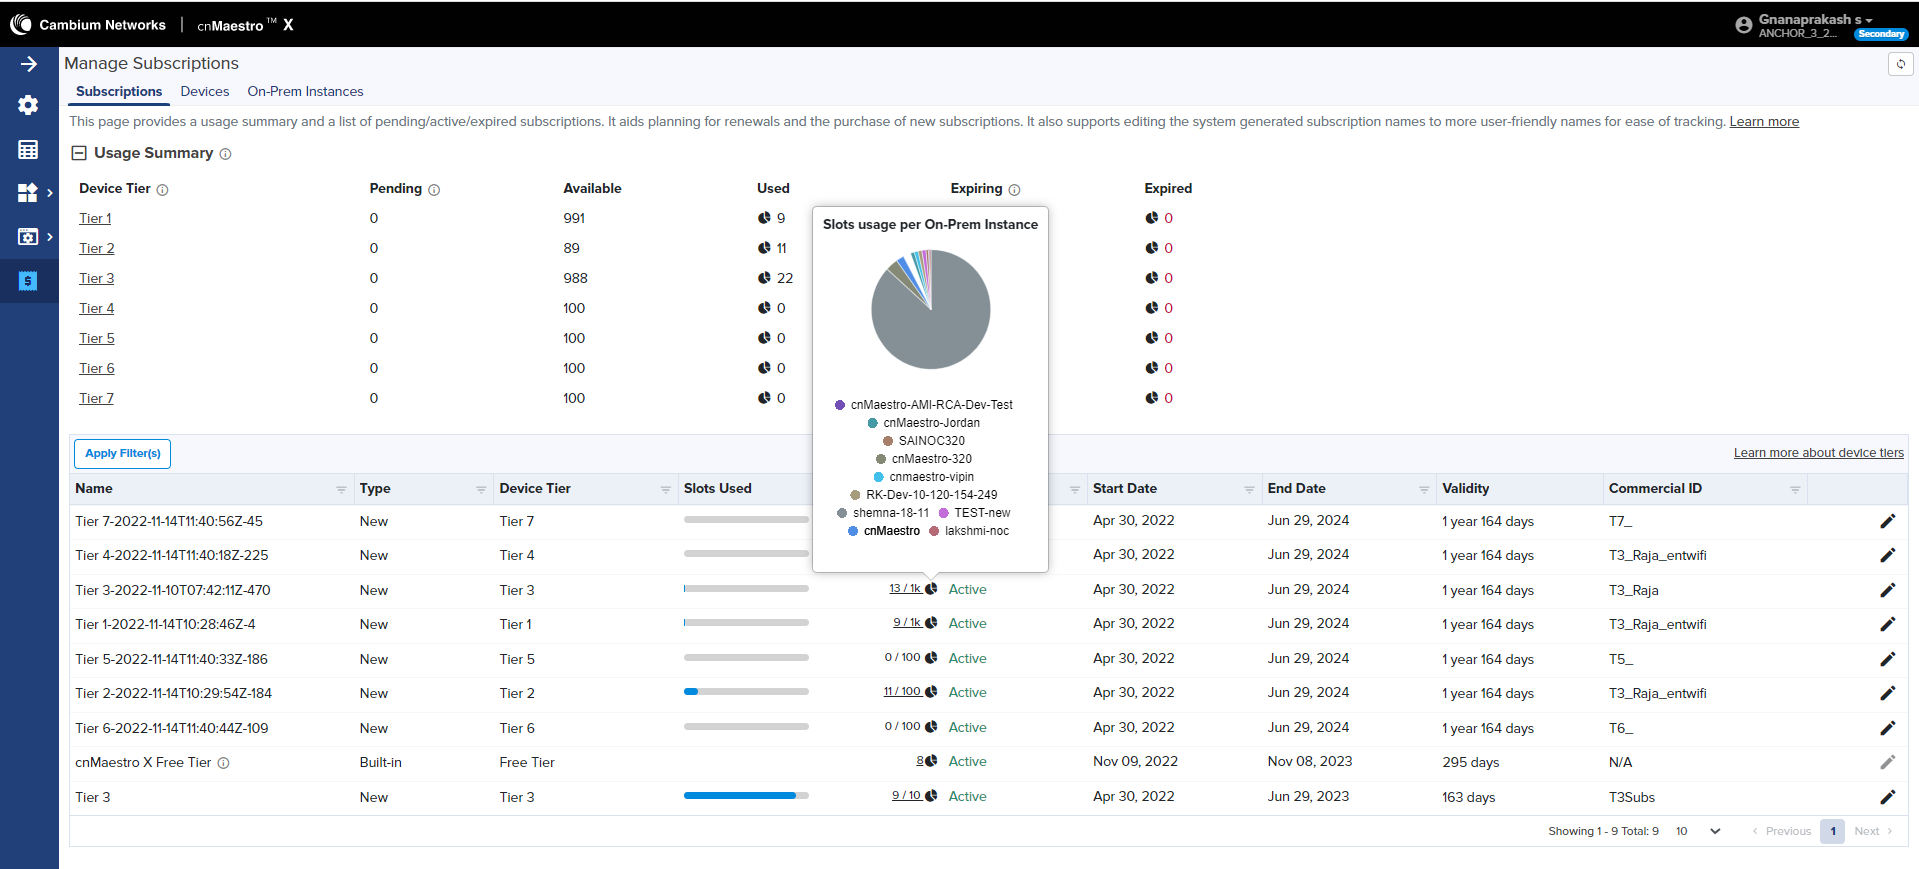
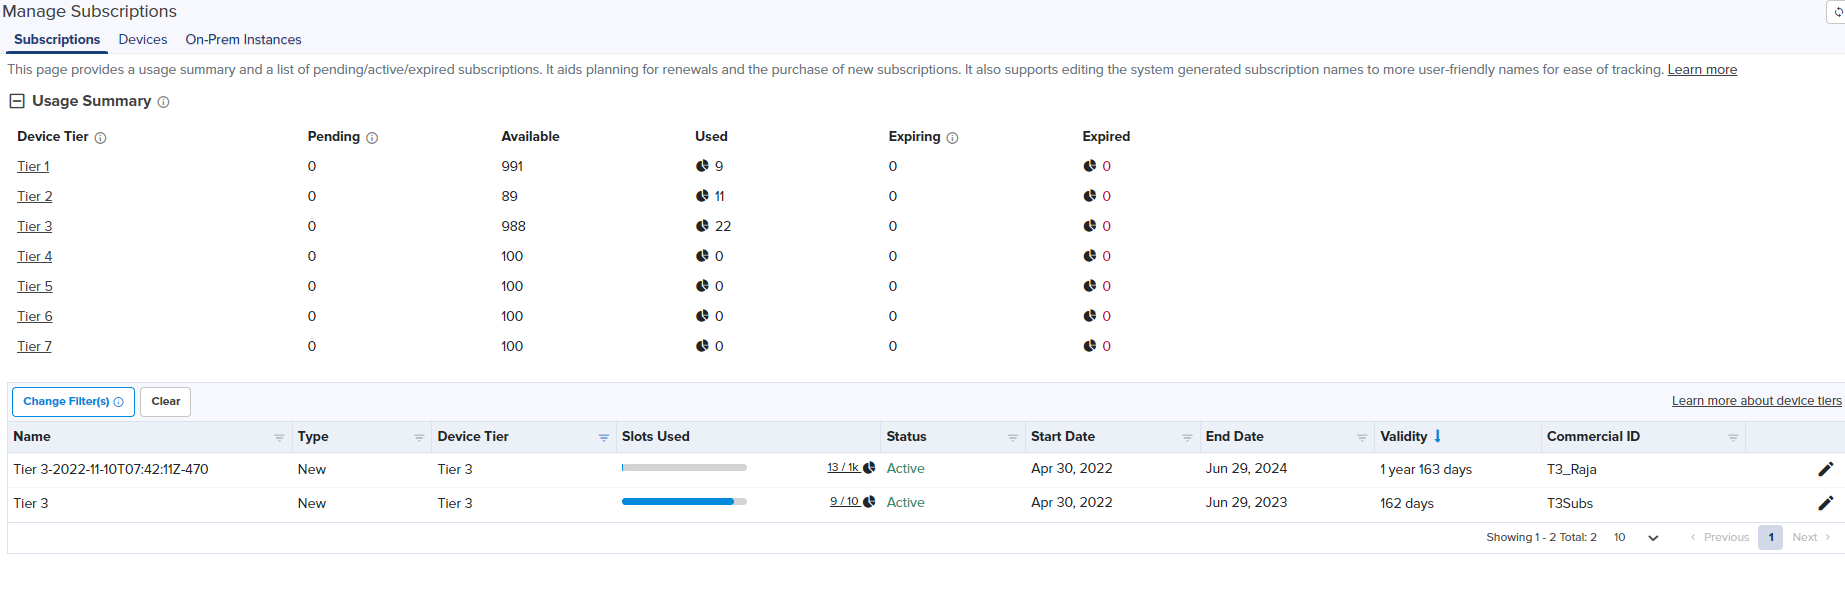
Subscriptions page describes the usage summary and a list of pending, active, and expired subscriptions and On-Premises instances alloted. It aids in planning for renewals and the purchase of new subscriptions.

The Manage Subscriptions page displays the following parameters:
Table 2: Subscription parameters
| Parameters | Description | |||||||||||||||
|---|---|---|---|---|---|---|---|---|---|---|---|---|---|---|---|---|
| Name | Device tier name. | |||||||||||||||
| Type |
Displays the subscriptions type such as:
|
|||||||||||||||
| Device Tier | Type of device tier. | |||||||||||||||
| Slots Used | Number of slots used in usage per On-Premises instances. | |||||||||||||||
| Status |
Displays the status such as:
Click on the status device number to view the particular devices list. |
|||||||||||||||
| Start Date | Displays the start date of the subscriptions. | |||||||||||||||
| End Date | Displays the end date of the subscriptions. | |||||||||||||||
| Validity | Displays the total validity of the subscriptions from the current date in year and days. | |||||||||||||||
| Commercial ID | Commercial ID used for the subscriptions. |
By clicking the Slot icon  , you can view the Slot usage per On-Premises instance as shown below:
It also supports editing the system generated subscription names to more user-friendly names for ease of tracking.
To edit the Subscriptions, perform the following steps:
| 1. | click edit  icon. icon. |
Edit window pops up as shown below.
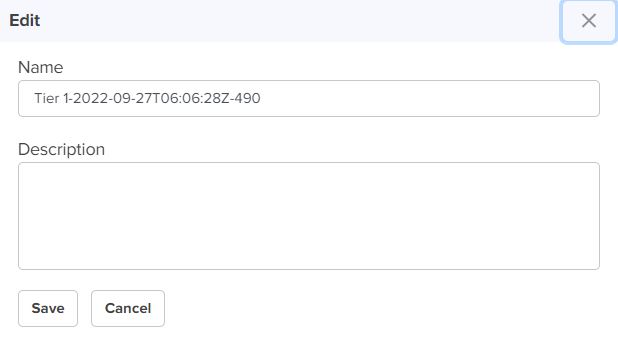
| 2. | Enter Name and Description. |
| 3. | Click Save. |
Usage summary displays the number of slots that are Pending, Available, Used, Expiring, and Expired, and click the Device Tier to view the particular list of devices as shown in Figure 4.
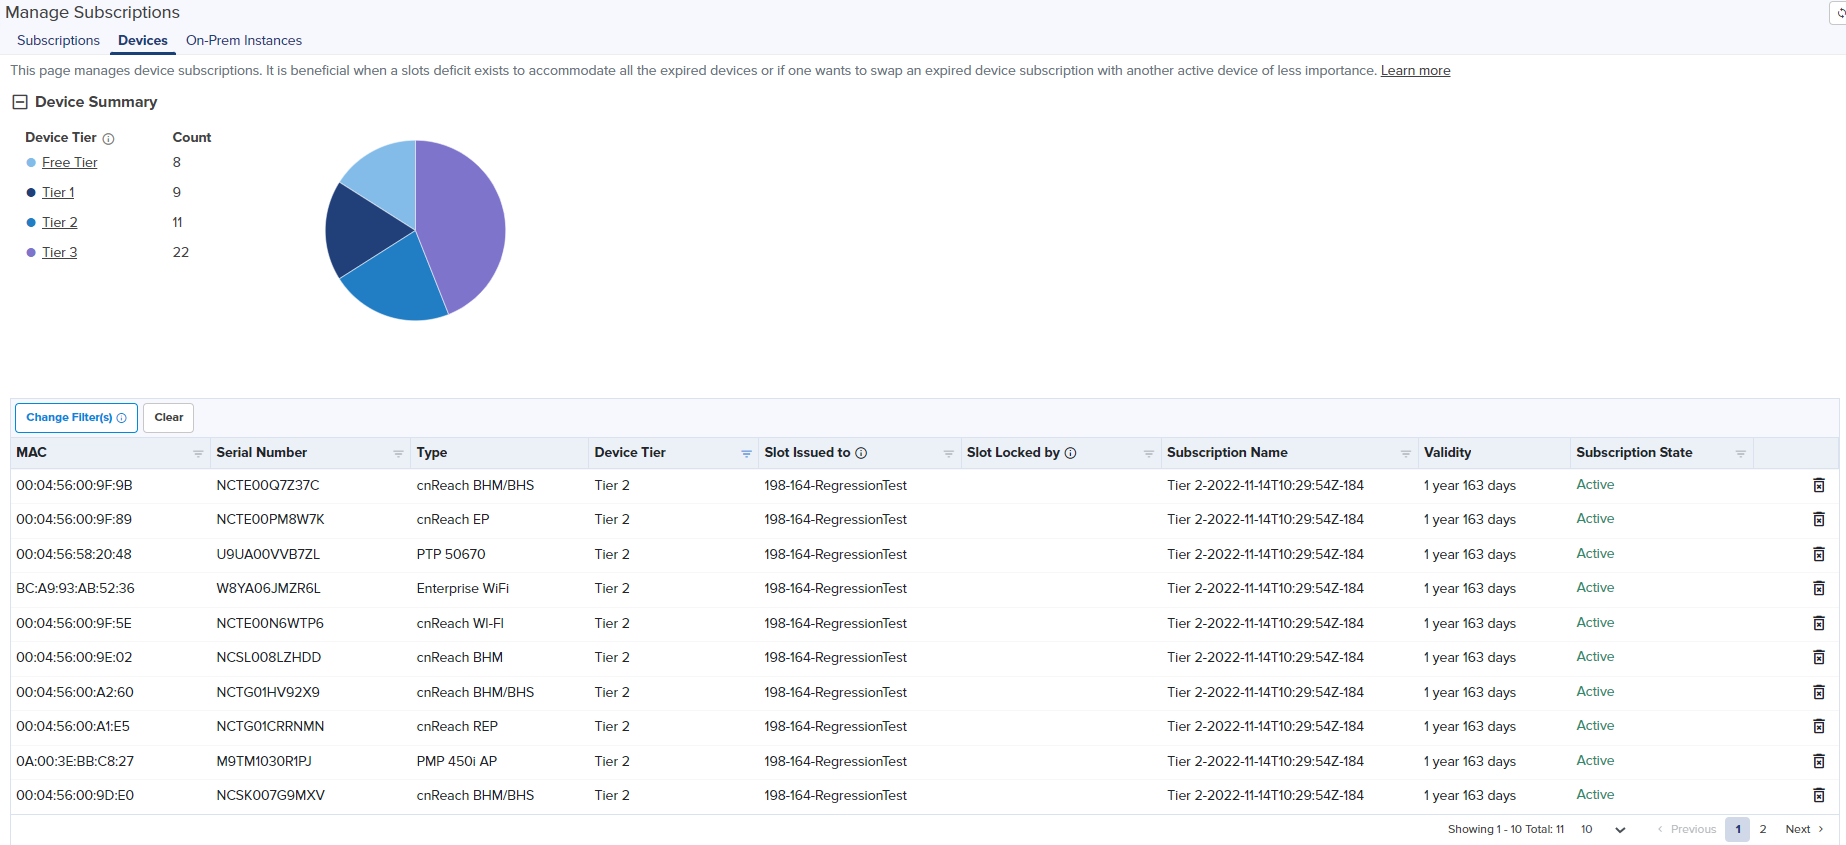
The Devices page displays devices mapped to the subscription.
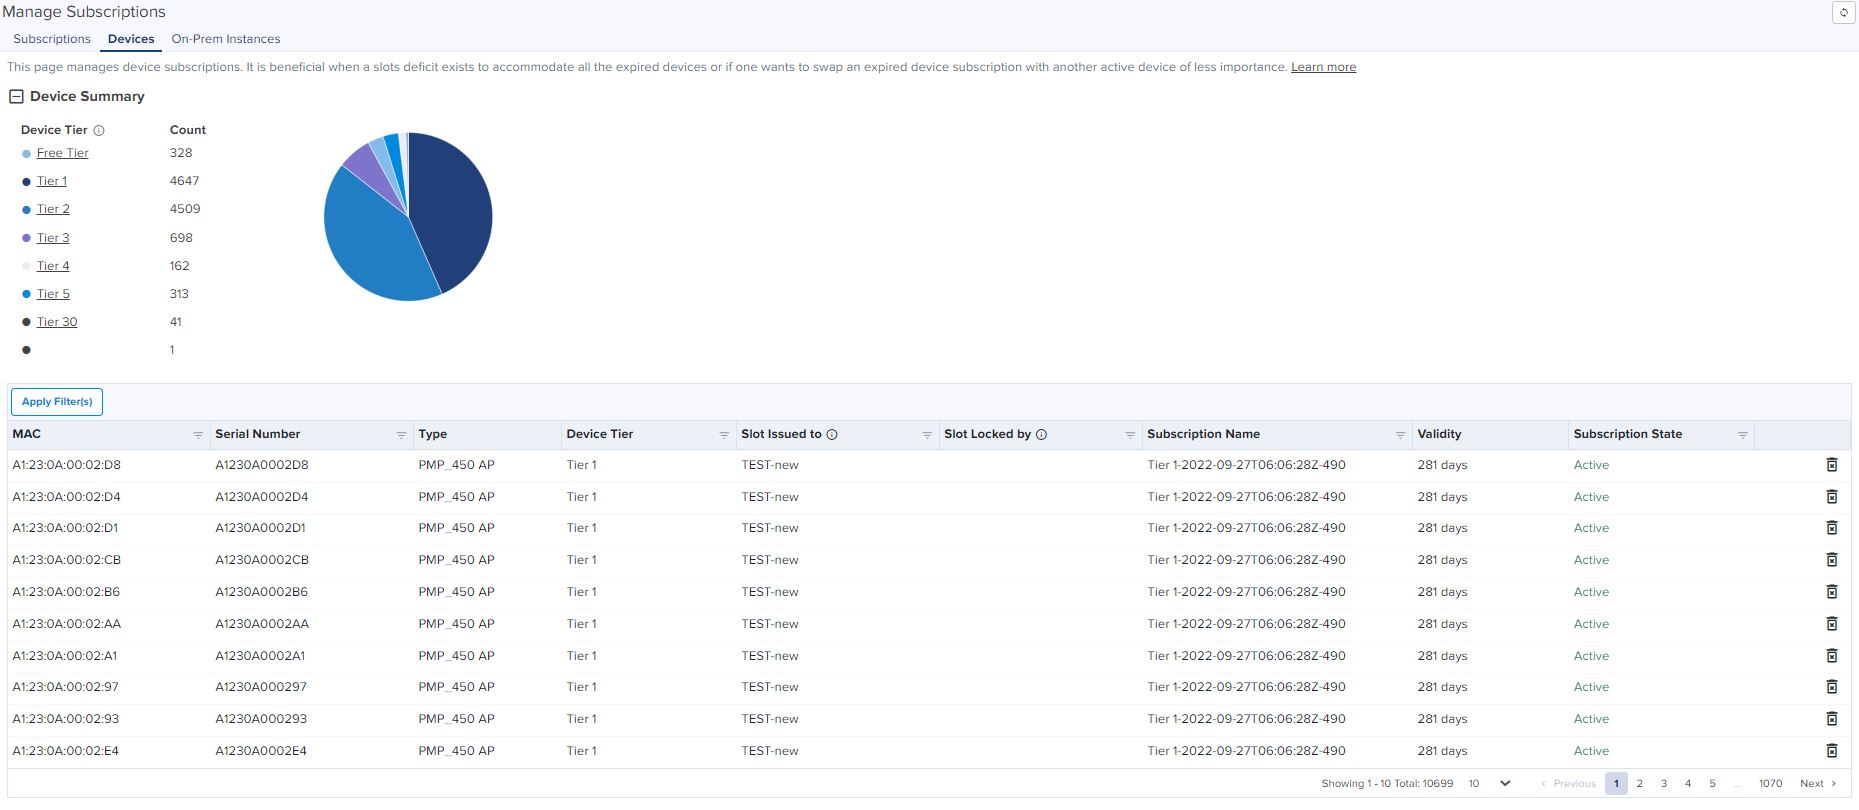
The Device page displays the following parameters:
Table 3: Device parameters
| Parameters | Description | |||||||||
|---|---|---|---|---|---|---|---|---|---|---|
| MAC | MAC address of the device. | |||||||||
| Serial Number |
Serial Number of the device. |
|||||||||
| Type | Type of the device. | |||||||||
| Device Tier | Device tier type. | |||||||||
| Slot Issued to |
On-Premises instance to which the device slot is currently issued. |
|||||||||
| Slot Locked By | On-Premises instance to which the device slot was originally issued. | |||||||||
| Subscription Name | Name of the subscription. | |||||||||
| Validity | Displays the total validity of the subscriptions from the current date in year and days. | |||||||||
| Subscription State |
Type of subscription state, such as:
|
Device summary displays the available tiers and the device count according to the tiers. By clicking on the Device Tires in the device summary you can able to view the particular device list as shown in Figure 5.

|
Note On-Premises Instances page is applicable only for subscribed On-Premises instances running OVA version 3.2.0 and above. |
On-Premises instances page provides a break-up of slots usage per On-Premises instance connected to this Cloud Anchor account such as cnMaestro X, Onboarding, and Essentials.
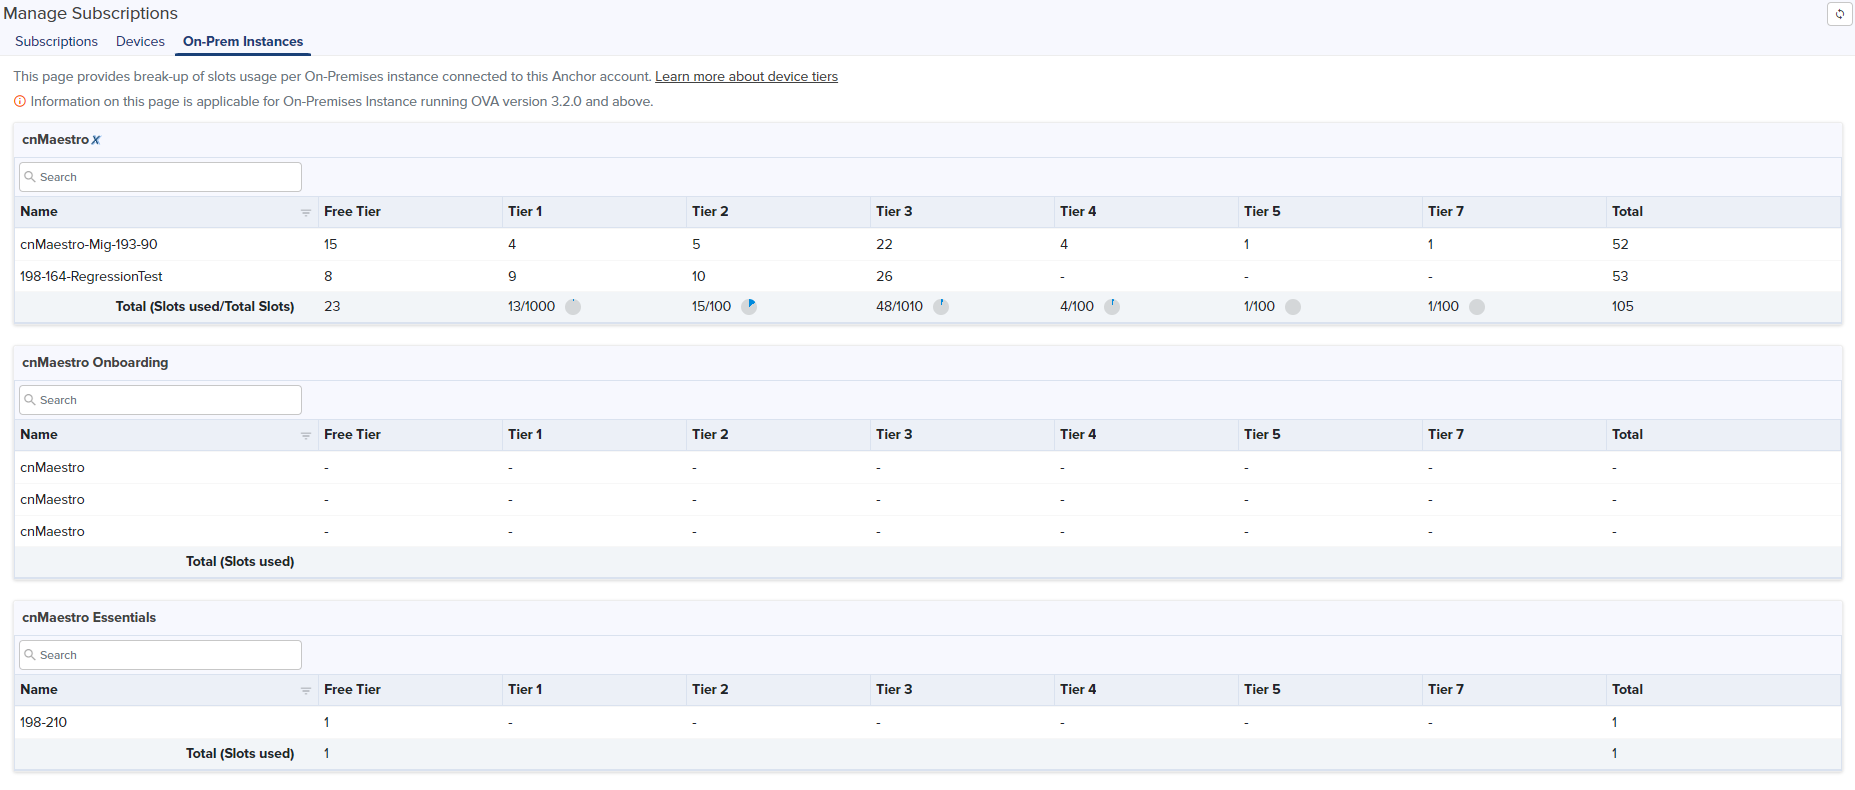
| | cnMaestro X - Lists the cnMaestro X On-Premises instances and devices that are subscribed along with slots by usage and availibility. |
| | Onboarding - Lists the cnMaestro trail version of On-Premises instances which are upgraded from On-Premises 3.1.x and devices count that are used. |
| | Essentials - Lists the cnMaestro Essentials On-Premises instances and devices that are managed along with slot device count. |