You can onboard cnMatrix through device CLI and using the device UI.
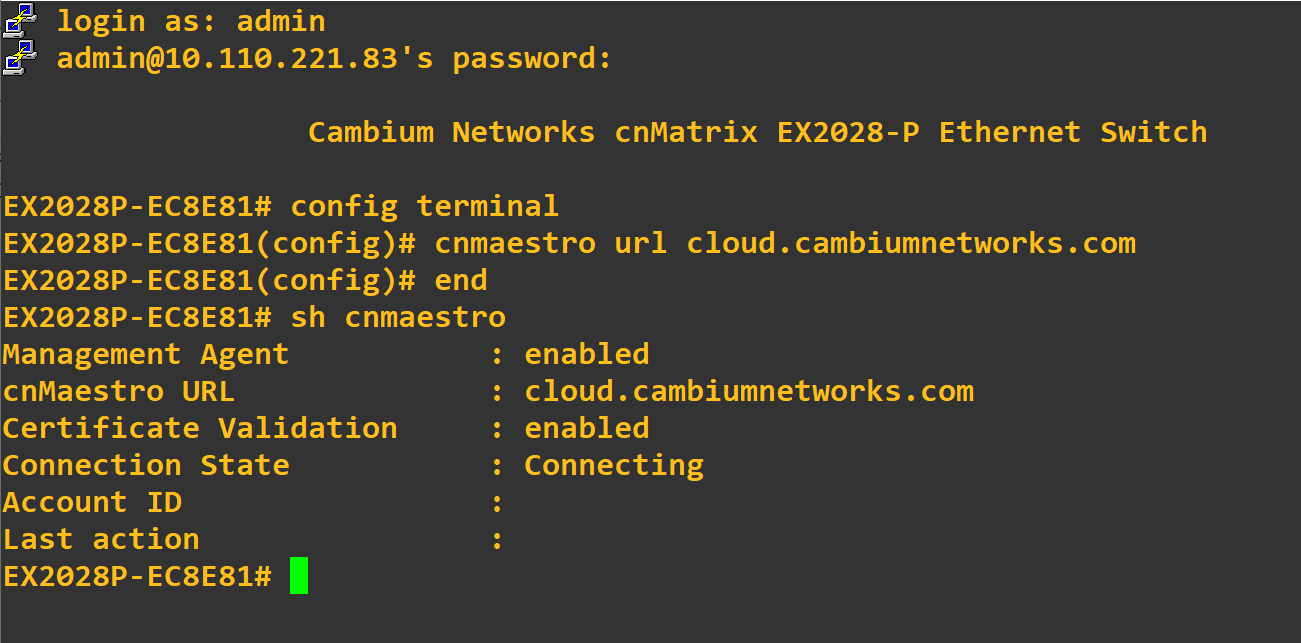
Execute the following command to onboard cnMatrix device connection to cnMaestro:
cnMatrix(config) # cnMaestro url cloud.cambiumnetworks.com
Execute the following command to view the status of cnMatrix device connection to cnMaestro:
cnMatrix(config) # show cnMaestro
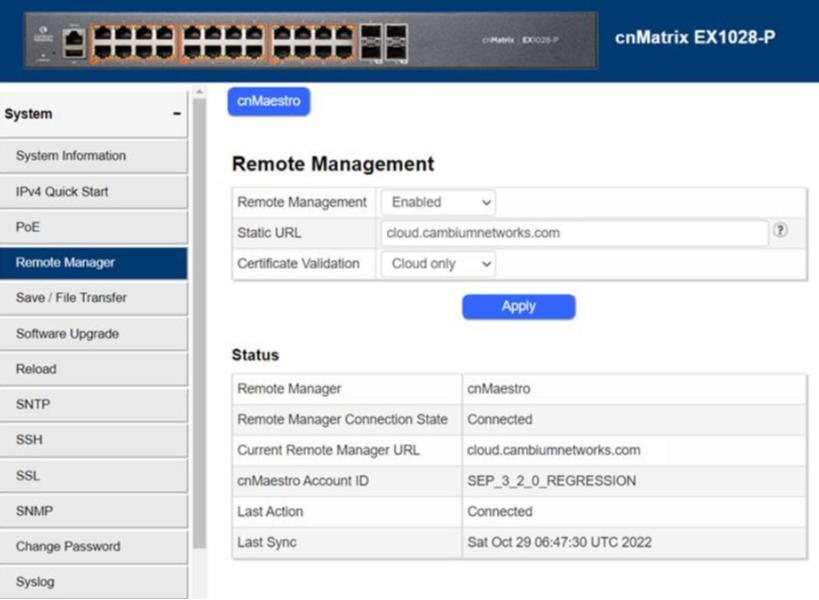
In the cnMatrix device UI perform as follows:
| 1. | Navigate to |
| 2. | Enter the details in Remote Management section. |
| 3. | Click Apply. |
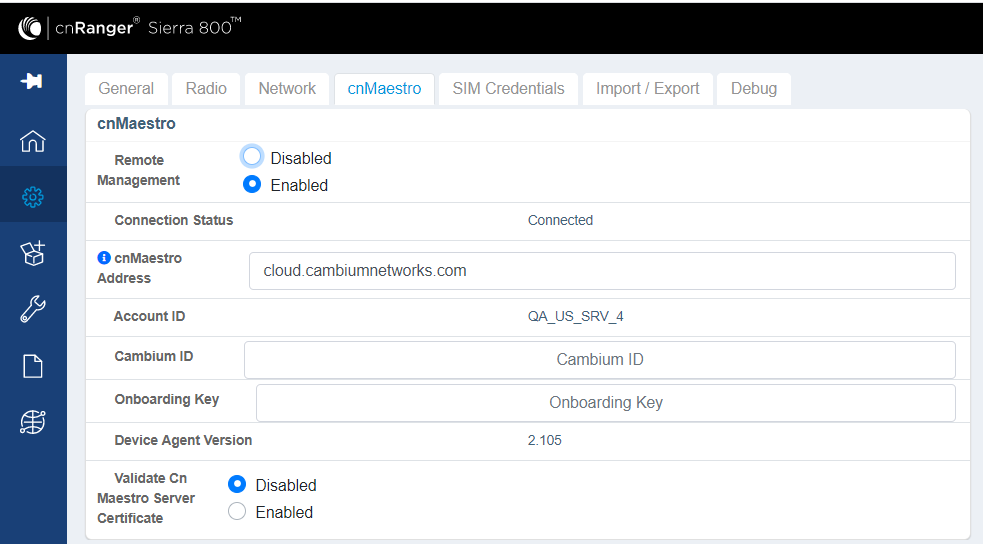
To view the status of Sierra 800 and Tyndall 101 connection to cnMaestro.
| 1. | Navigate to Configuration > cnMaestro. |
| 2. | Under cnMaestro section, enter the URL in the cnMaestro Address. |
| 3. | Click Save. |
| 1. | Navigate to Configuration > cnMaestro. |
| 2. | Under cnMaestro section, enter the URL in the cnMaestro URL. |
| 3. | Click Save. |
.png)
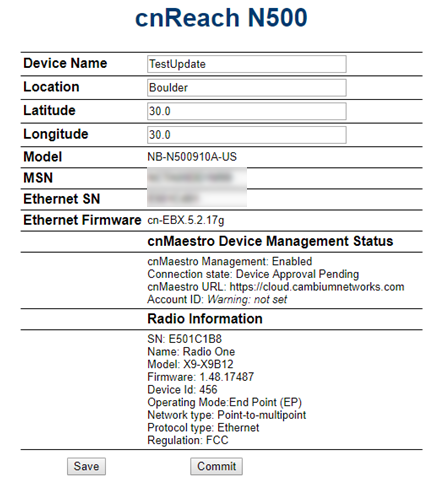
In the cnReach device UI,
| 1. | Navigate to >. |
| 2. | Enable cnMaestro Management in Settings section. |
| 3. | Enter your Cambium ID and Onboarding Key. |
| 4. | Click Save. |
| 5. | Navigate to to view the status of the cnReach device connection to cnMaestro. |
Figure 1 Onboarding cnReach through UI
To view the status of the cnReach connection in the cnMaestro:
Figure 2 Viewing the cnReach connection to cnMaestro
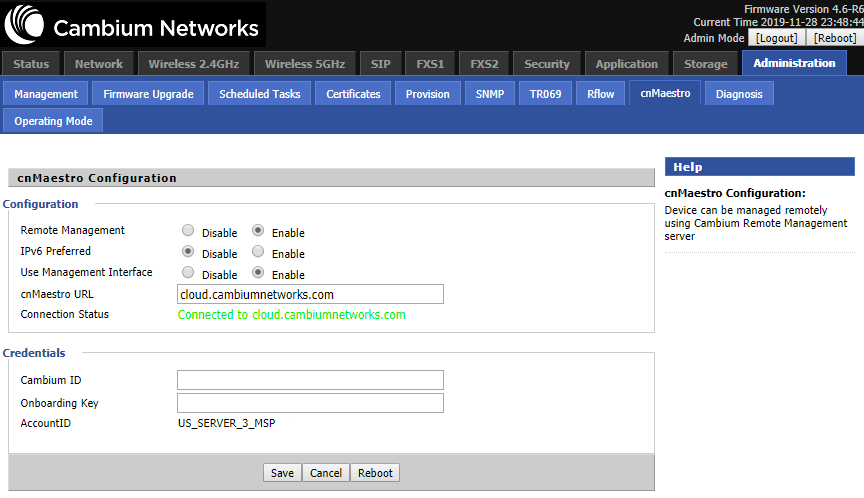
To view the status of the cnPilot R-Series device connection to cnMaestro:
| 1. | Navigate to Administration > cnMaestro. |
| 2. | Under cnMaestro configuration section. |
| 3. | Enter the URL in the cnMaestro URL. |
| 4. | Click Save. |
Figure 3 Viewing the cnPilot R-Series device connection
The following OIDs can be configured:
| | cambium_id |
| | cambium_token |
| | cns_staic_url |
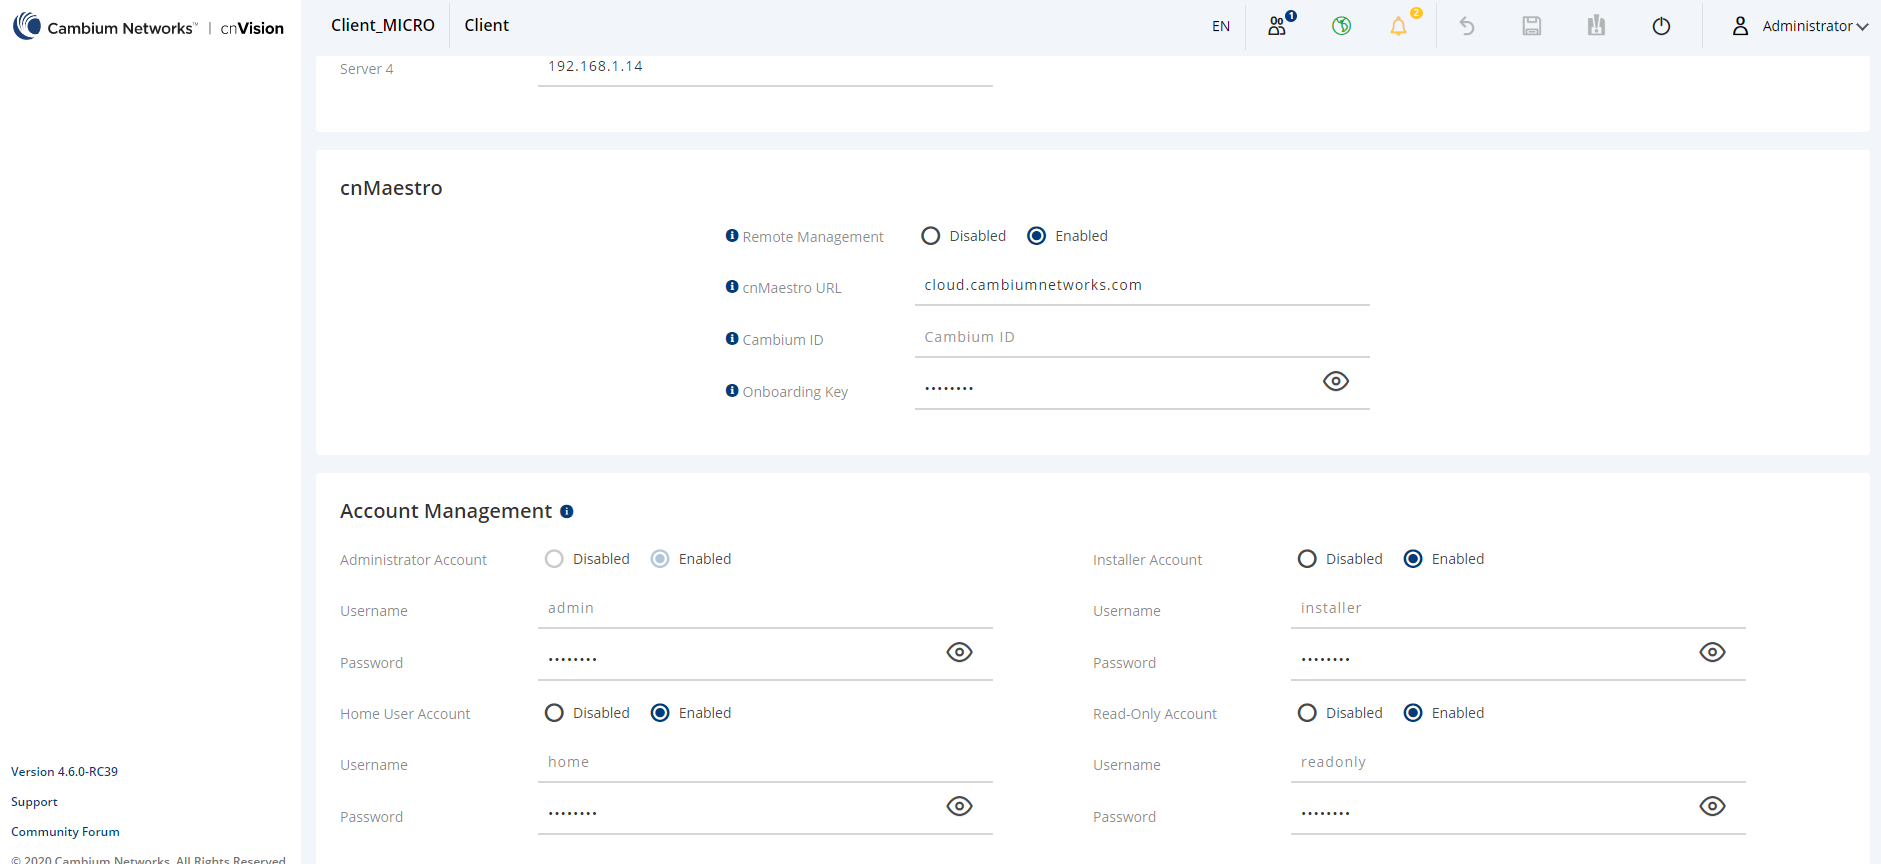
In the cnVision Client device UI,
| 1. | Navigate to Configuration > System. |
| 2. | Under cnMaestro section, enter cnMaestro URL. |
| 3. | Click Save. |
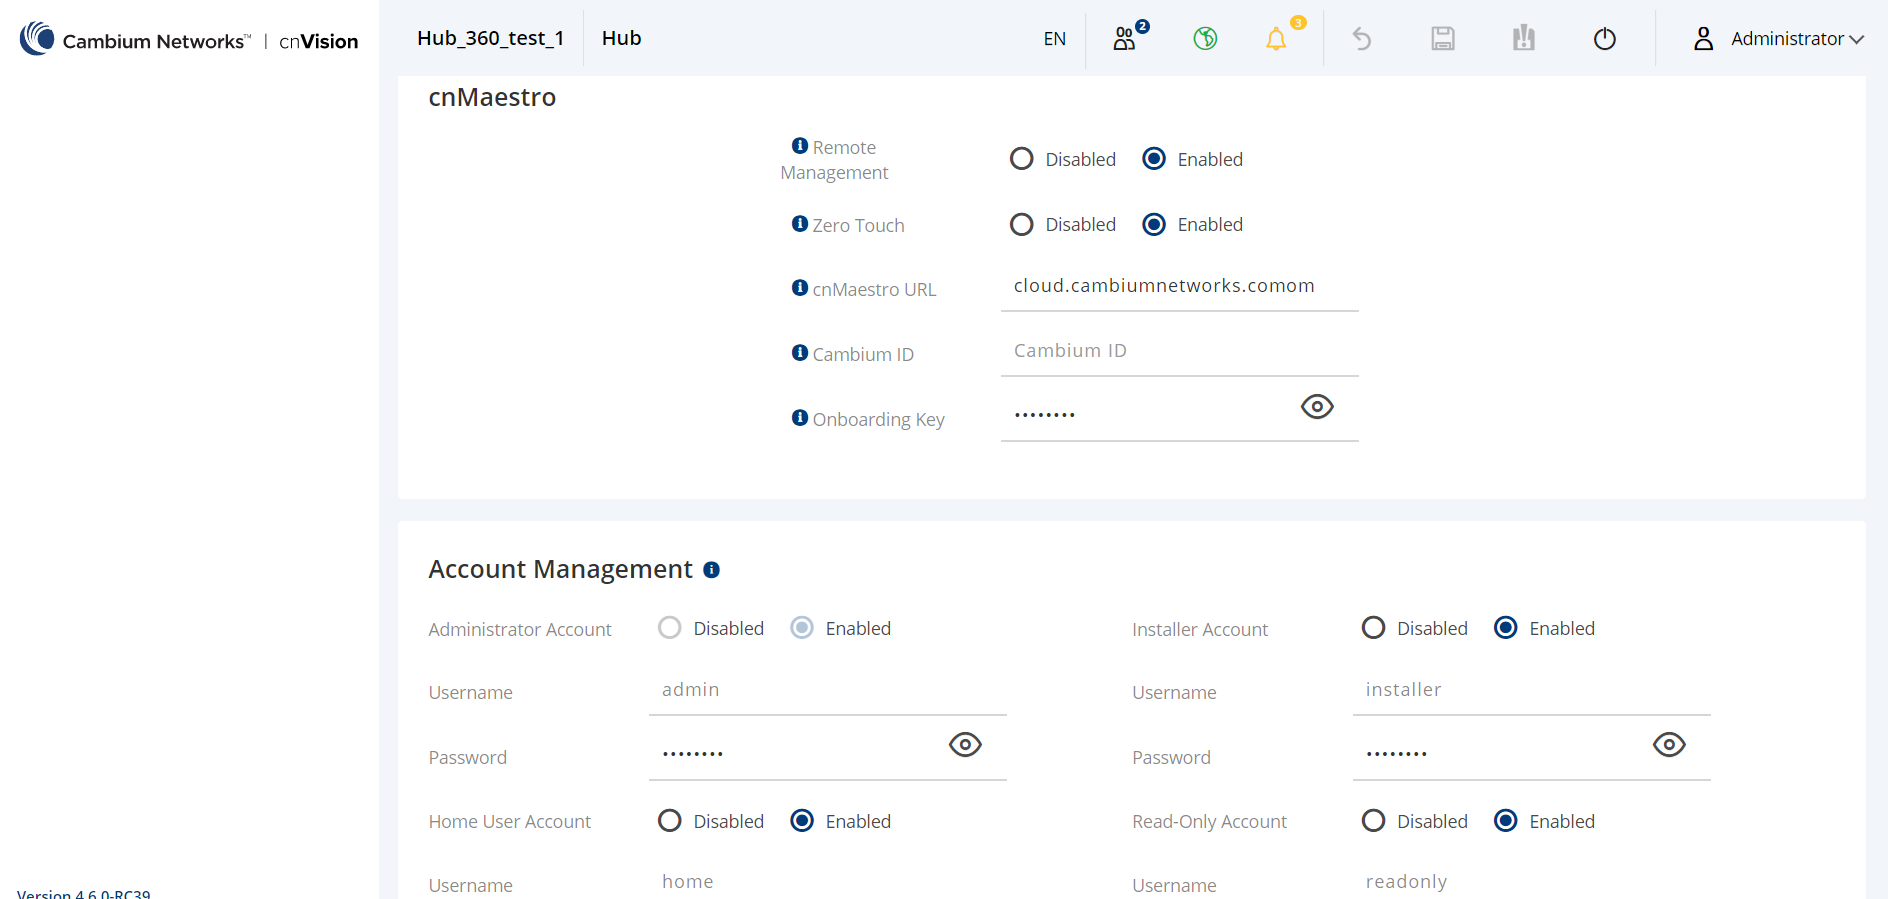
In the cnVision Hub device UI,
| 1. | Navigate to Configuration > System. |
| 2. | Under cnMaestro section, enter cnMaestro URL. |
| 3. | Click Save. |
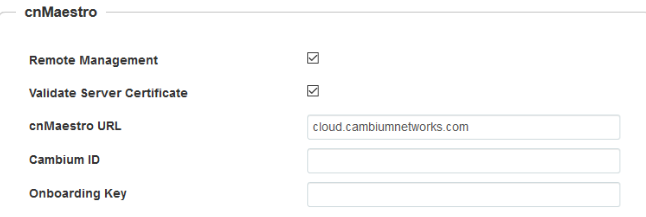
In the Enterprise AP device UI,
| 1. | Navigate to . |
| 2. | Scroll to Management > . |
| 3. | Enable Remote Management. |
| 4. | Enable Validate Server Certificate if required. |
| 5. | Enter cnMaestro URL. |
| 6. | Enter Cambium ID and Onboarding Key. |
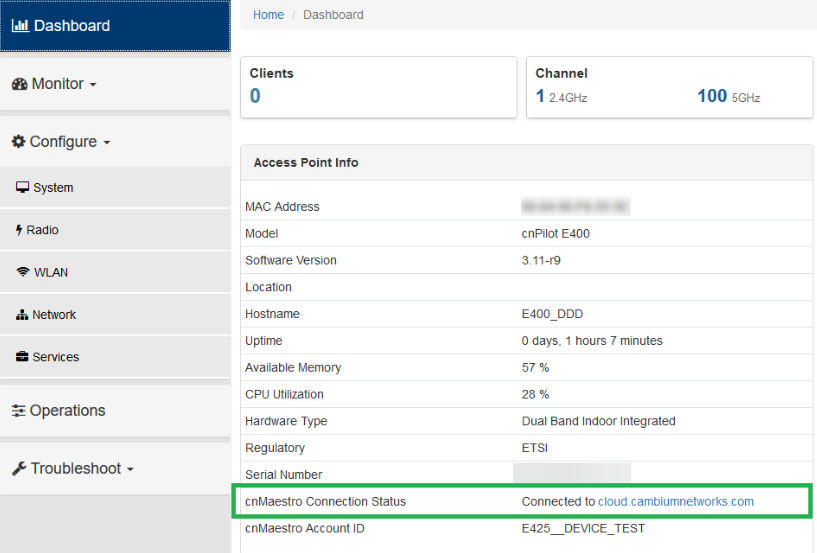
| 7. | Navigate to Dashboard to view the status of the Enterprise AP device connection to cnMaestro. |
Figure 4 Onboarding Enterprise AP through device UI
|
|---|
To view the status of the device connection to cnMaestro:
Figure 5 Viewing the Enterprise AP connection to cnMaestro
|
|---|
In the ePMP device UI,
| 1. | Navigate to . |
| 2. | Scroll to . |
| 3. | Select and enter your Cambium ID and the user’s Onboarding Password. |
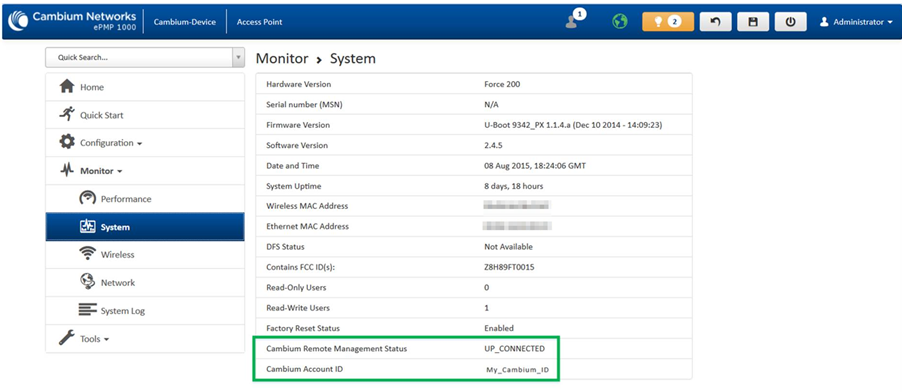
| 4. | Navigate to to view the status of the ePMP device connection to cnMaestro. |
Figure 6 Onboarding ePMP 1000 through UI

To view the status of the ePMP device connection to cnMaestro:
Figure 7 Viewing the ePMP device connection to cnMaestro
The following OIDs can be configured:
| | cambiumDeviceAgentEnable |
| | cambiumDeviceAgentCNSURL |
| | cambiumCNSDeviceAgentID |
| | cambiumCNSDeviceAgentPassword |
The following OID can be used to check the status of the device’s connection to cnMaestro.
cambiumCnsServConsStat
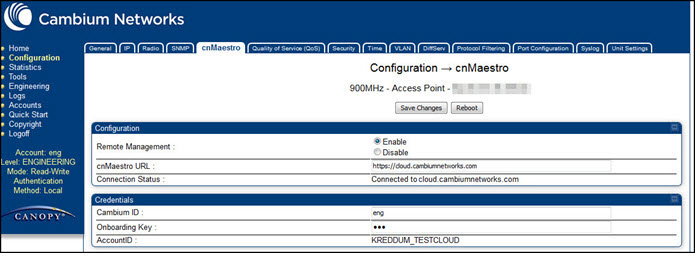
To onboard PMP device connection to cnMaestro:
In the PMP device UI,
| 1. | Navigate to . |
| 2. | Under, provide the following details: |
| a. | Select Enable under Remote Management. |
| b. | Enter the URL to connect to cnMaestro in the textbox. |
| 3. | Under , enter the in the respective textboxes. The Account ID field displays the account id of the user. |
Figure 8 Onboarding PMP through UI
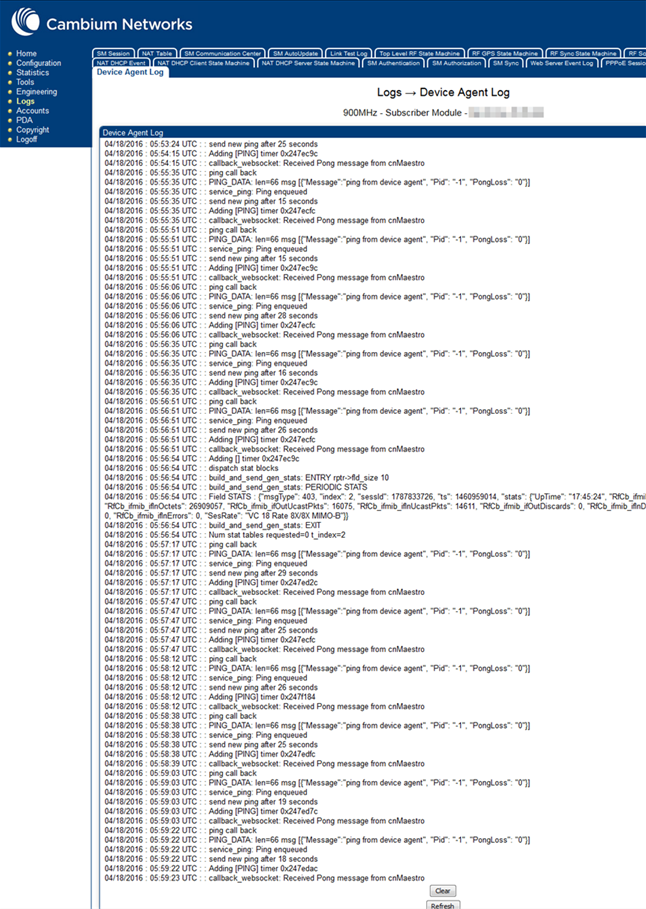
To view the logs, navigate to Logs > Device Agent Log page:
Figure 9 Viewing Logs
The following OIDs can be configured:
| | cnMaestro Enable |
| | cnMaestro Url |
| | cambium ID |
| | cam Onboard Key |
The following OIDs can be used to check the status of the device’s connection to cnMaestro.
| | cam AccID |
| | cnMaestro Status |
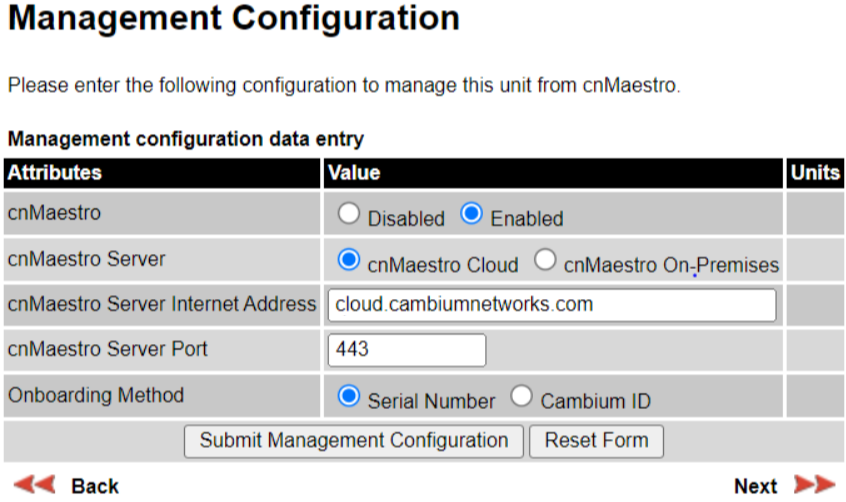
| 1. | Navigate to clickbutton. |
| 2. | In the Management Configuration window, under cnMaestro, select Enabled. |
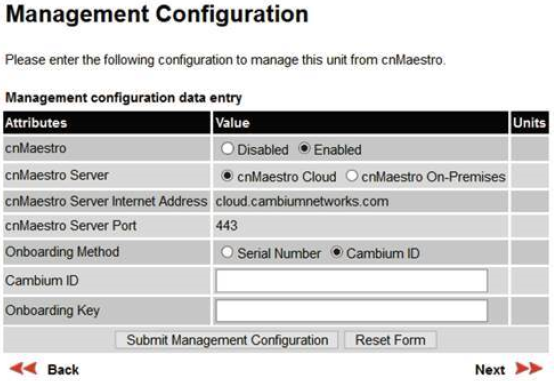
| 3. | Select cnMaestro Cloud radio button. |
Perform the following steps to onboard Xirrus device through CLI.
| 1. | Connect to the device using any SSH tool. |
| 2. | Login as admin, the default password is admin. |
| 3. | Execute the following command in ssh console: |
#ssh admin <device IP address>
#password <admin>
#configure
#management
#cloud server cloud.cambiumnetworks.com scheme cnmaestro enable
#save
#Saving configuration...OK
#cnMaestro-onboarding id cambium_ID key onboarding_key
#save
saving configuration...OK
#show management
Cloud Management enabled Cloud Timeout 50 seconds Cloud Port 443 Cloud Retry 5 Cloud Scheme cnMaestro Cloud Server cloud.cambiumnetworks.com
Cambium ID NOTSET Cambium Key Set cnMaestro Status Not Connected
| 4. | Login to Cloud account. |
| 5. | Navigate to Home > Onboard > Devices. |
| 6. | In the Devices page, the device onboarded is shown in Figure 10 |
Figure 10 Xirrus Device Waiting for Approval
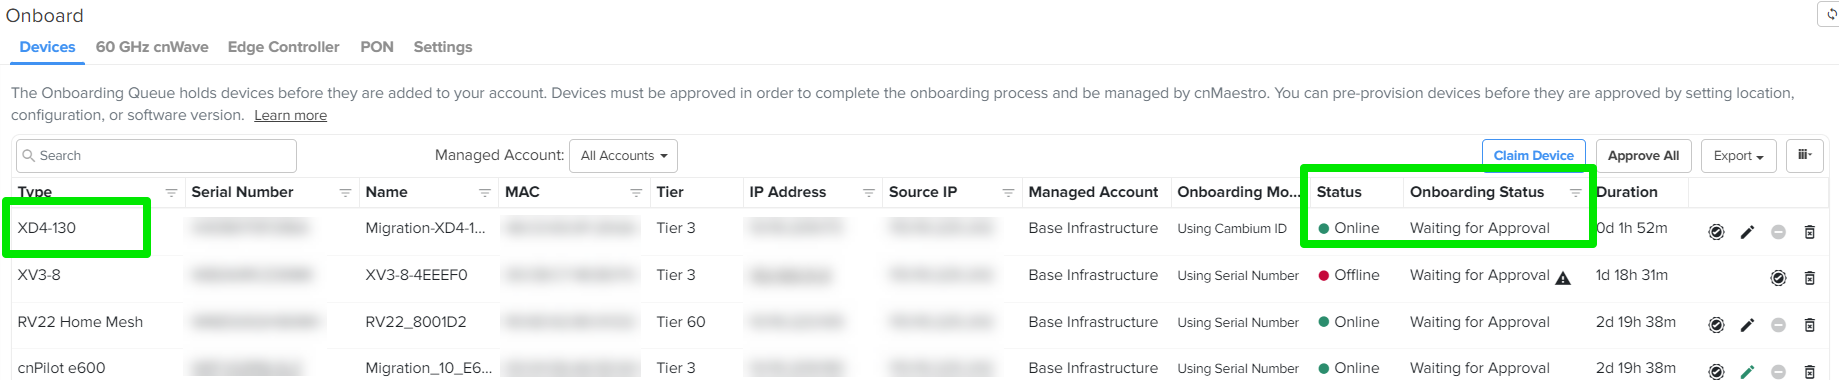
The Status field display Waiting for Approval.
It is optional to provision the device for location, software version update, and assign to an AP Group.
| 7. | Click Save. |
| 8. | Click Approve. |
For details to migrate Xirrus devices from XMS to cnMaestro X using a tool, see XMS-Enterprise to cnMaestro X.
|
|
|
To claim the cnWave 5G Fixed BTS device, you must have access to the device GUI. In the cnWave 5G Fixed BTS device UI, perform the following steps:
| 1. | From the main home page, navigate to |
| 2. | In the cnMaestro section, enable Remote Management. |
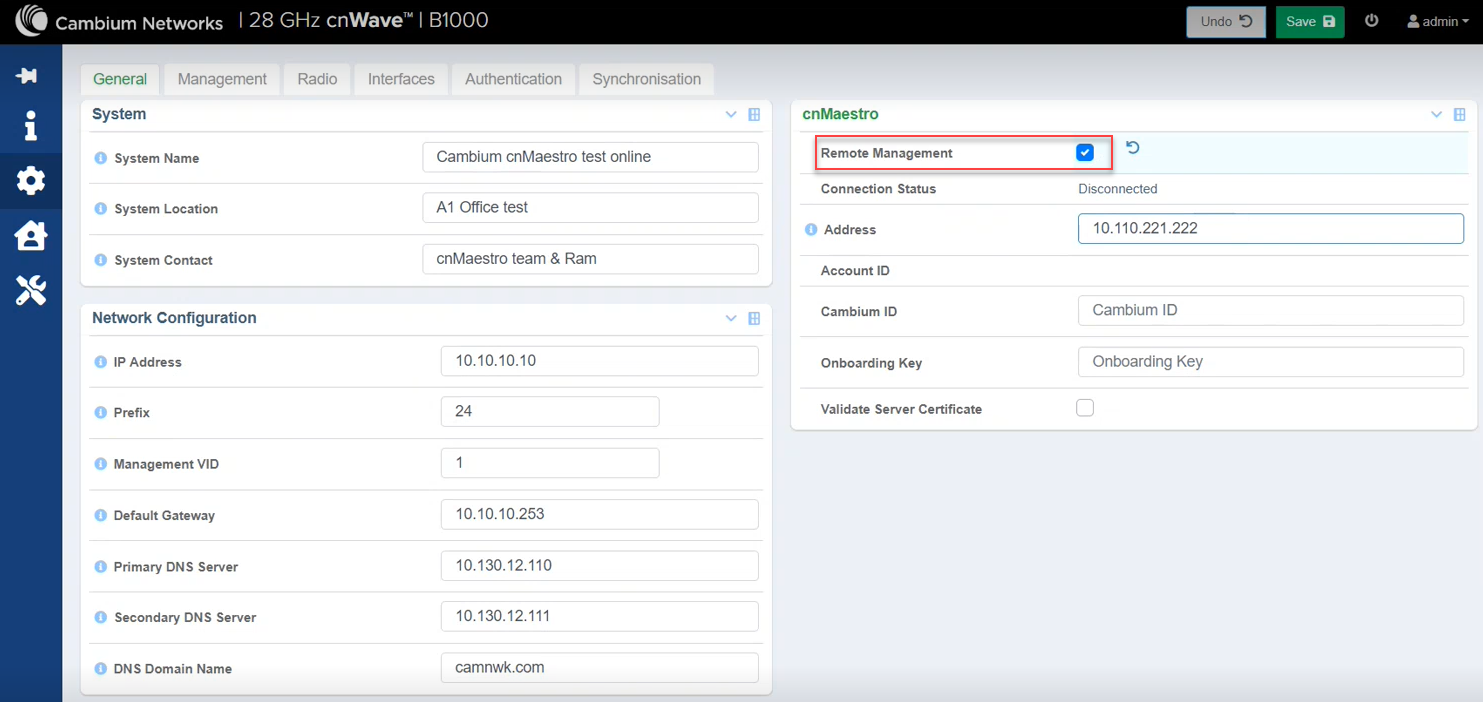
| 3. | In the Address field, enter the cnMaestro URL or IP Address. |
| 4. | Enter your Cambium ID and Onboarding Key. Validate Server Certificate is an optional field. |
|
|
Note You can enter a valid Cambium ID and Onboarding Key in the cnWave 5G Fixed BTS device UI, when Allow device to be claimed using Cambium ID option is enabled in the Settings section in the cnMaestro Onboard page. |
| 5. | Click Save. |
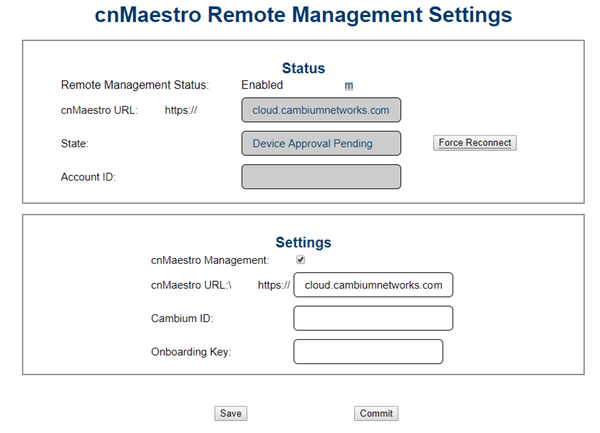
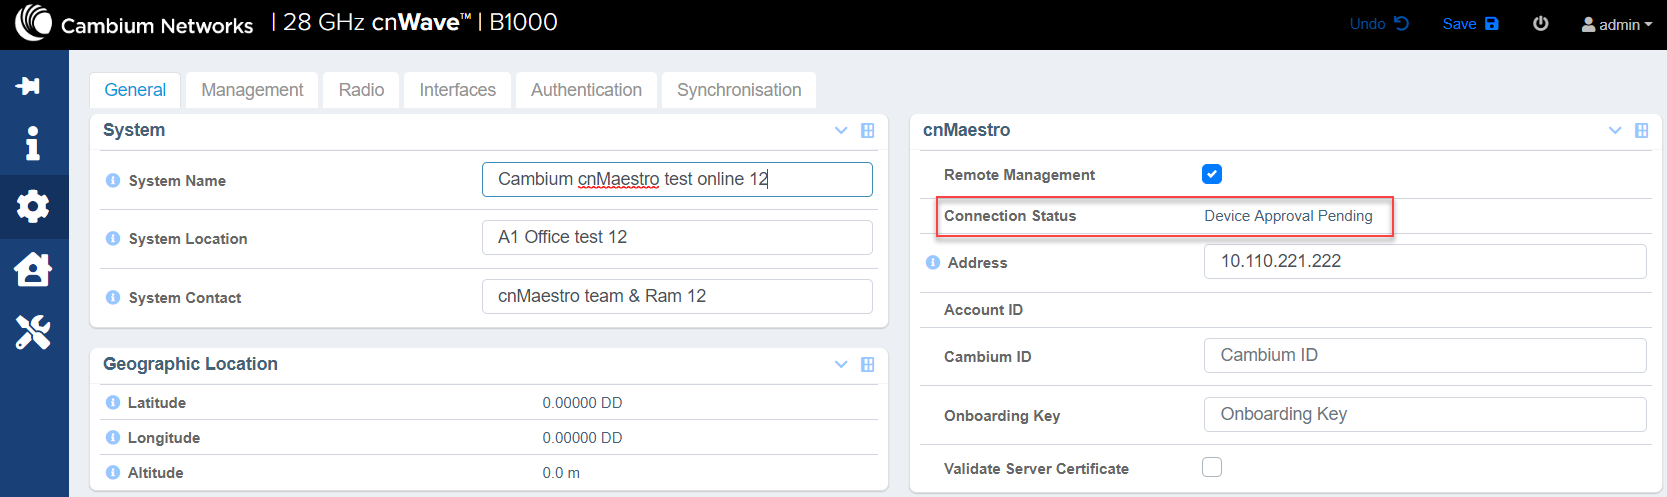
When the cnWave 5G Fixed BTS device is onboarded to the cnMaestro for the first time, the Connection Status field in the cnWave 5G Fixed BTS device UI displays Device Approval Pending as shown in Figure 11.
Figure 11 Device Approval Pending status in cnWave 5G Fixed BTS
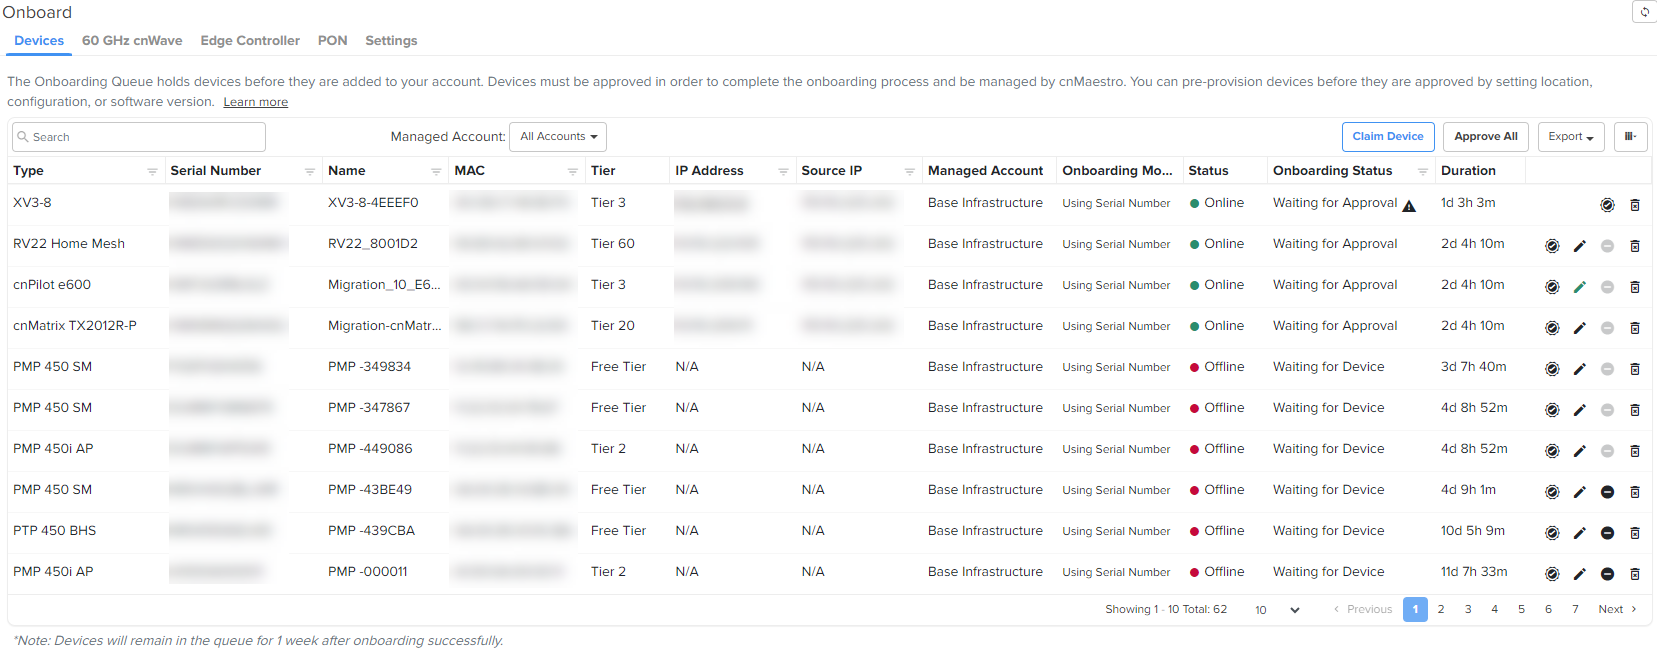
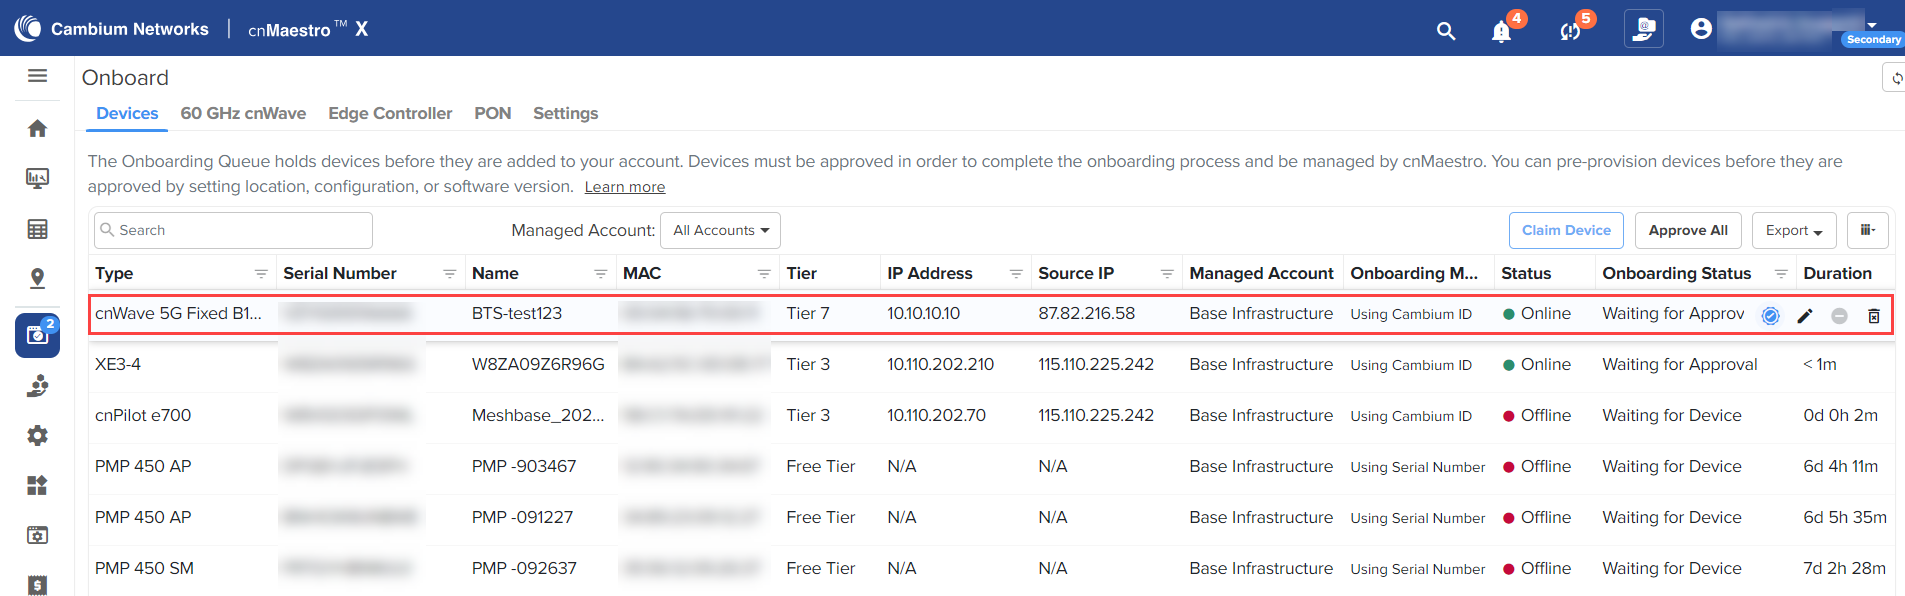
| 6. | In the cnMaestro UI, navigate to Onboard > Devices and click Approve, as shown in Figure 12. |
Figure 12 Approving the cnWave 5G Fixed device using the cnMaestro UI
The cnWave 5G Fixed BTS device is onboarded to cnMaestro.
Figure 13 Viewing the cnWave 5G Fixed BTS device onboarded in cnMaestro

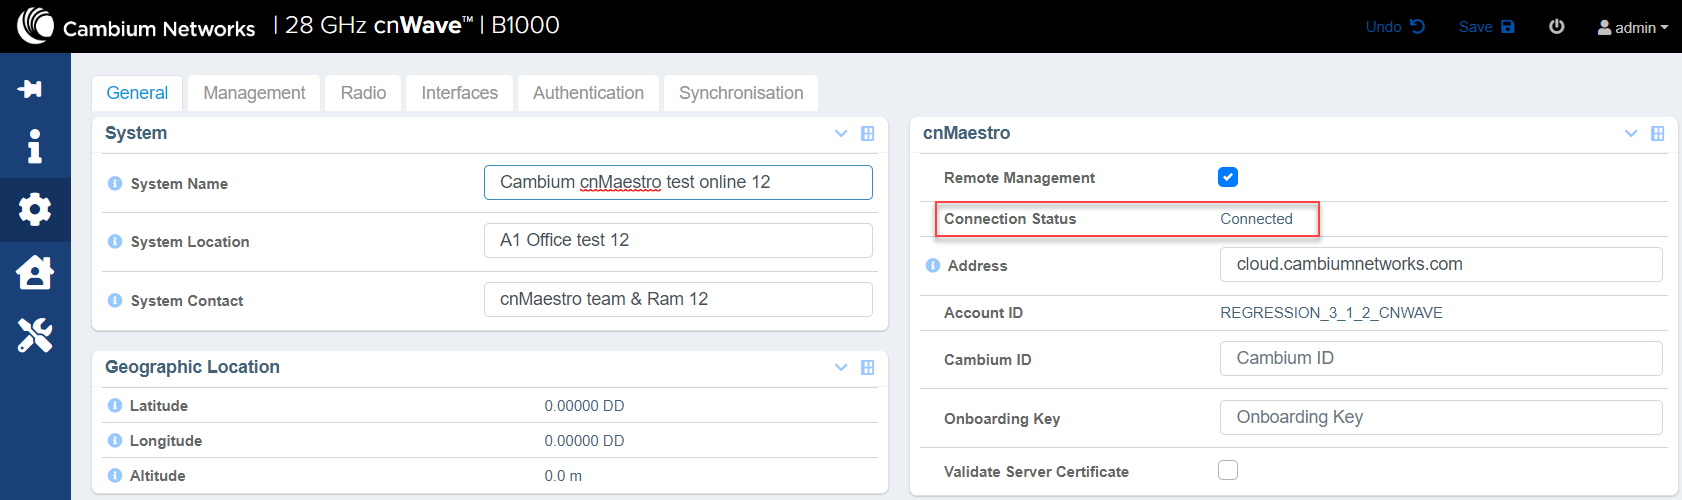
The Connection Status field in the cnWave 5G Fixed BTS device UI displays Connected, on approval, as shown in Figure 14.
Figure 14 cnWave 5G Fixed BTS device Connected
To view the cnWave 5G Fixed BTS device in cnMaestro, perform the following steps:
| 1. | From the cnMaestro UI home page, navigate to Monitor and Manage > default network or navigate to Onboard > Devices. |
| 2. | Click on the Onboarded link. |
Registered cnWave 5G Fixed CPE devices are also onboarded along with cnWave 5G Fixed BTS device.
Figure 15 Viewing cnWave 5G Fixed BTS device and registered CPE devices

To claim and onboard the cnWave 5G Fixed BTS device, perform the following steps:
| 1. | From the home page of cnMaestro, navigate to tab. |
The Onboard page appears with details of the devices and their serial numbers, as shown in Figure 16.
| 2. | Click Claim Device located at the right side of the Onboard page, as shown in Figure 16. |
Thepage appears, as shown in Figure 17.
| 3. | Enter the serial number of the cnWave 5G Fixed BTS device in the text box, as shown in Figure 17. |
|
|
Note You can also place the cursor in the text box and use a barcode scanner to quickly claim the devices. |
Figure 17 Claim Devices with Serial Number page
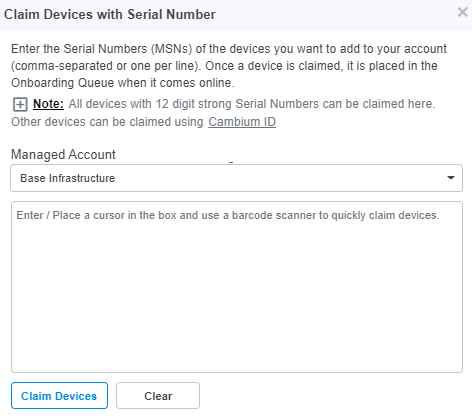
| 4. | Click |
| 5. | To onboard the cnWave 5G Fixed BTS device, click Approve located at the right side of the Onboard page, as shown in Figure 18. |
|
|
Note If you do not click , the device remains in the Onboarding Queue. |
To onboard Edge Controller perform the following steps:
| 1. | Enter cnMaestro URL or IP address, Cambium ID, and Onboarding Key in CLI. |
| 2. | Navigate to Onboard > Edge Controller > Controllers. |
| 3. | Click Approve. |
Figure 19 Edge Controller

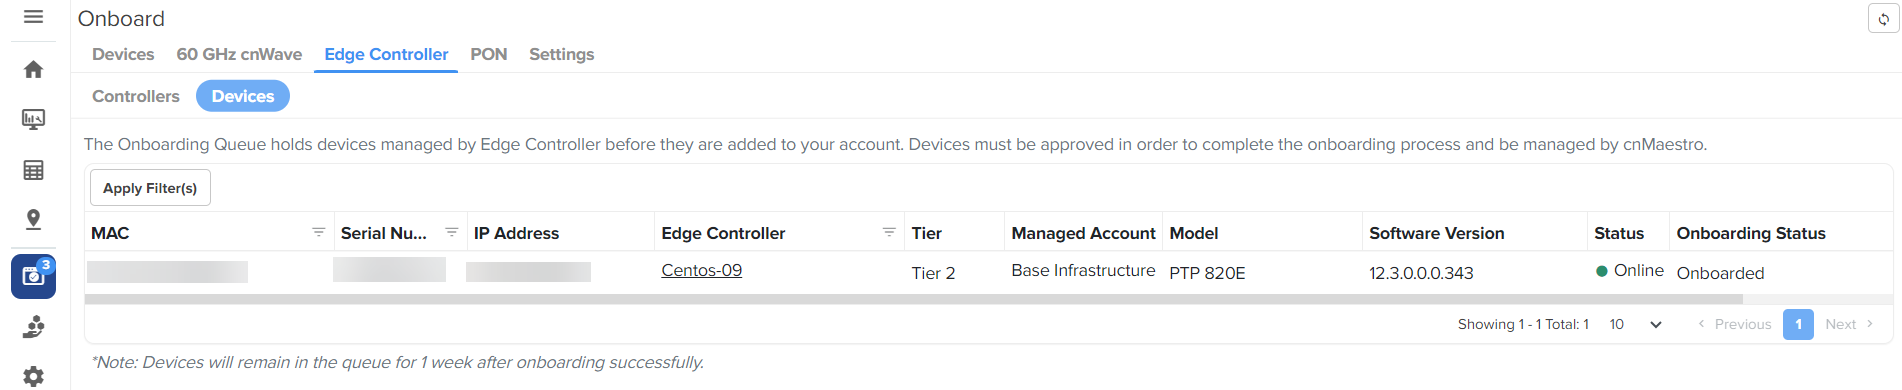
To onboard PTP 820/850 devices perform the following steps:
| 1. | Ensure SNMP rules are added in Edge Controller configuration. |
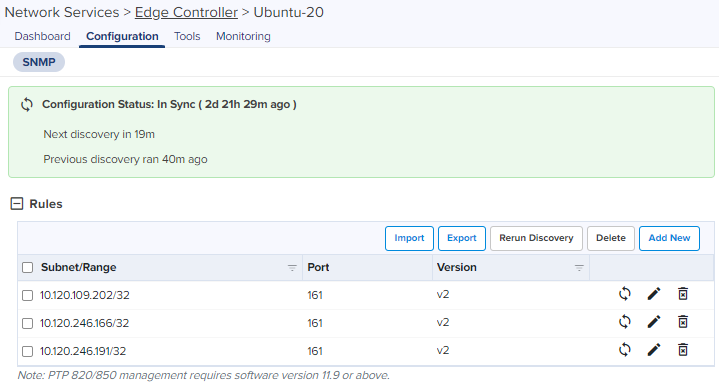
| 2. | Navigate to Onboard > Edge Controller > Devices. |
| 3. | Click Approve. |
Figure 20 PTP 820/850 devices
|
|
Note If the device needs static IP or other WAN configuration to be connected to the internet, refer to Device UI Configuration. |
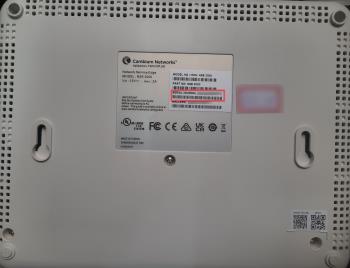
This section describes the onboarding of NSE 3000 to the cnMaestro Cloud X account. The onboarding process requires the device Manufacturing Serial Number (MSN). The MSN of the device can be found at the bottom of the device as shown in Figure 21.
To onboard the device, perform the following steps:
| 1. | Open a web browser and type the URL https://cloud.cambiumnetworks.com. |
The sign in page appears.
| 2. | Create a new cnMaestro X account or select an existing cnMaestro X account. A tier 30 subscription is required. |
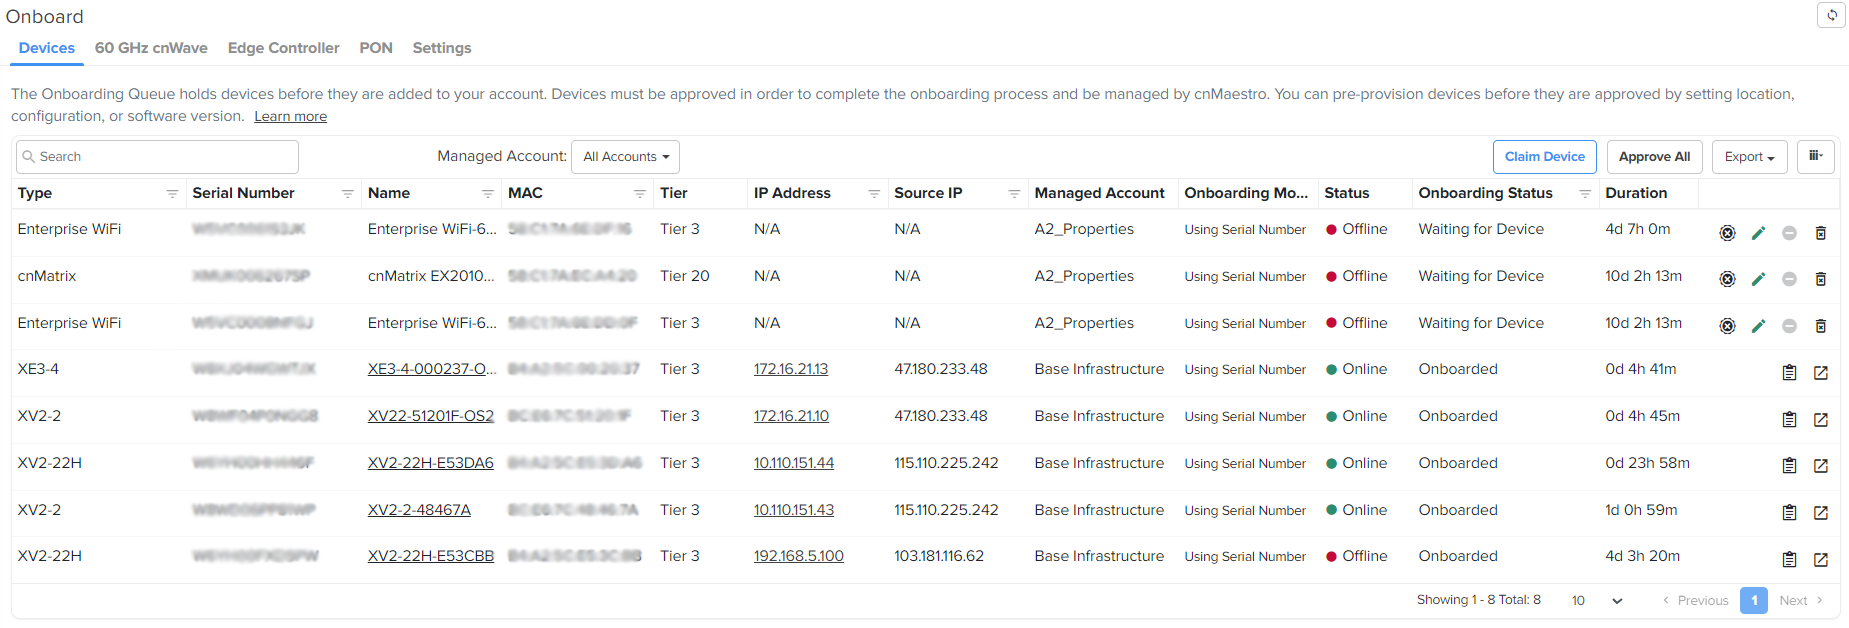
| 3. | Navigate to cnMaestro Home > Onboard > click Claim Device. |
Figure 22 Onboard page
| 4. | Claim Devices with Serial Number window pops up. |
Figure 23 Claim devices with Serial Number
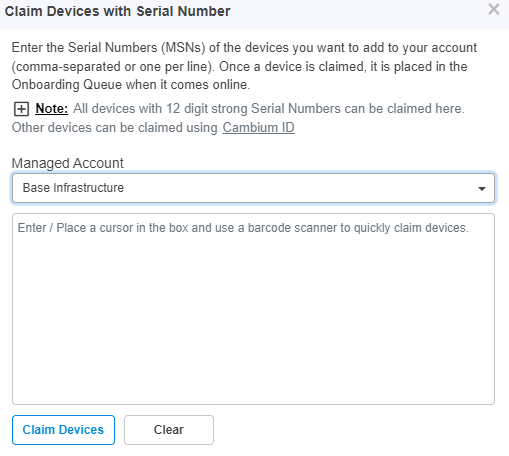
| 5. | Select the Managed Account from the drop-down. |
| 6. | Enter the Serial Number (MSN) of the device in the text box. |
| 7. | Click Claim Devices. |
The device will be listed in the Onboarding Queue.
| 8. | Click the Approve Device ( |
Figure 24 Approve
When device is approved appears on the Onboard page as shown below in Figure 25.
Figure 25 NSE 3000 Device Onboard

To onboard the Home Mesh Router to cnMaestro, see Onboarding the Home Mesh Router to cnMaestro.
Claiming the Home Mesh Router on the cnMaestro Cloud's Onboard page is not supported.
This section describes the onboarding of Home Mesh routers to the cnMaestro X account. The onboarding process requires the device Manufacturing Serial Number (MSN). The MSN of the device can be found at the bottom of the device as shown in Figure 26.
To onboard the router, complete the following steps:
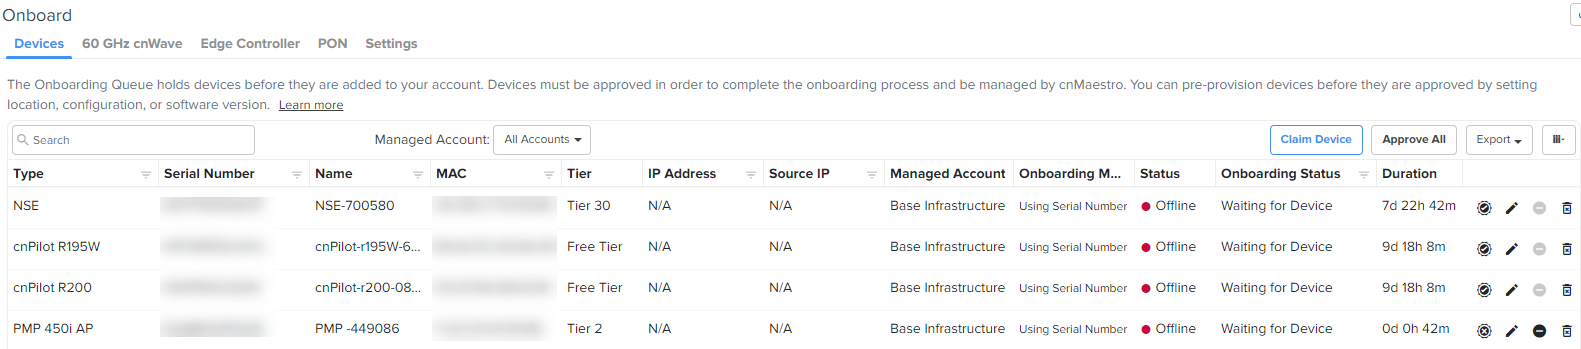
| 1. | Navigate to cnMaestro Home > Onboard. |
Figure 26 Onboard page for Home Mesh Router
| 2. | Click Claim Device. |
The Claim Devices with Serial Number window is displayed.
Figure 27 Claim devices with Serial Number
| 3. | Select the account from the Managed Account drop-down list . |
| 4. | Enter the Serial Number (MSN) of the device in the text box. |
| 5. | Click Claim Devices. |
The device will be listed in the Onboarding Queue.
| 6. | Click the Approve Device ( |
This section describes the onboarding of PON devices to the cnMaestro X account. The onboarding process requires the device Manufacturing Serial Number (MSN). The MSN of the device can be found at the bottom of the device as shown in Figure 26.
To onboard the router, complete the following steps:
| 1. | Navigate to cnMaestro Home > Onboard. |
Figure 28 Onboard page for PON devices
| 2. | Click Claim Device. |
The Claim Devices with Serial Number window is displayed.
Figure 29 Claim devices with Serial Number
| 3. | Select the account from the Managed Account drop-down list . |
| 4. | Enter the Serial Number (MSN) of the device in the text box. |
| 5. | Click Claim Devices. |
The device will be listed in the Onboarding Queue.
| 6. | Click the Approve Device ( |