This topic describes how to onboard the following Cambium devices to cnMaestro:
You can onboard cnMatrix through device CLI and using the device UI.
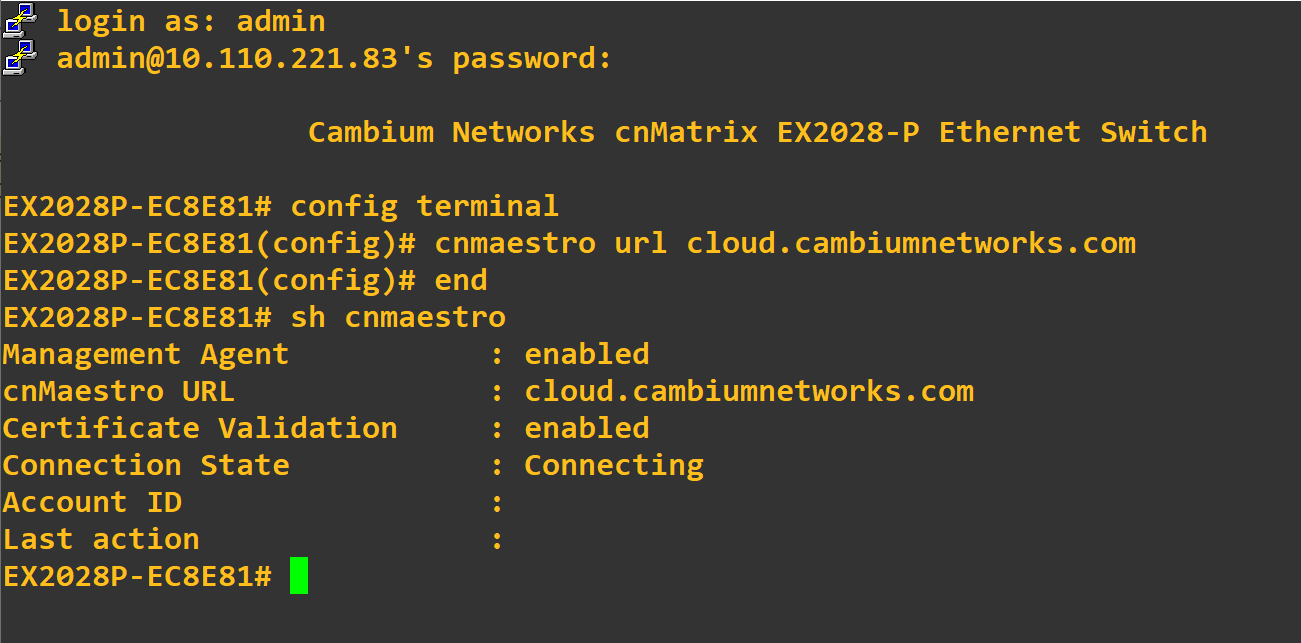
Execute the following command to onboard cnMatrix device connection to cnMaestro:
cnMatrix(config) # cnMaestro url cloud.cambiumnetworks.com
Execute the following command to view the status of cnMatrix device connection to cnMaestro:
cnMatrix(config) # show cnMaestro
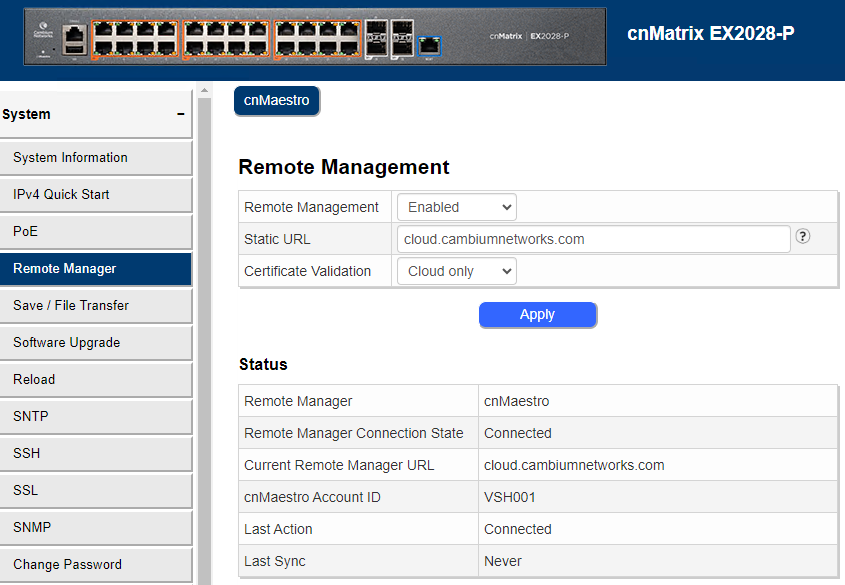
In the cnMatrix device UI, complete the following steps:
Navigate to
Enter the details in Remote Management section.
Click Apply.
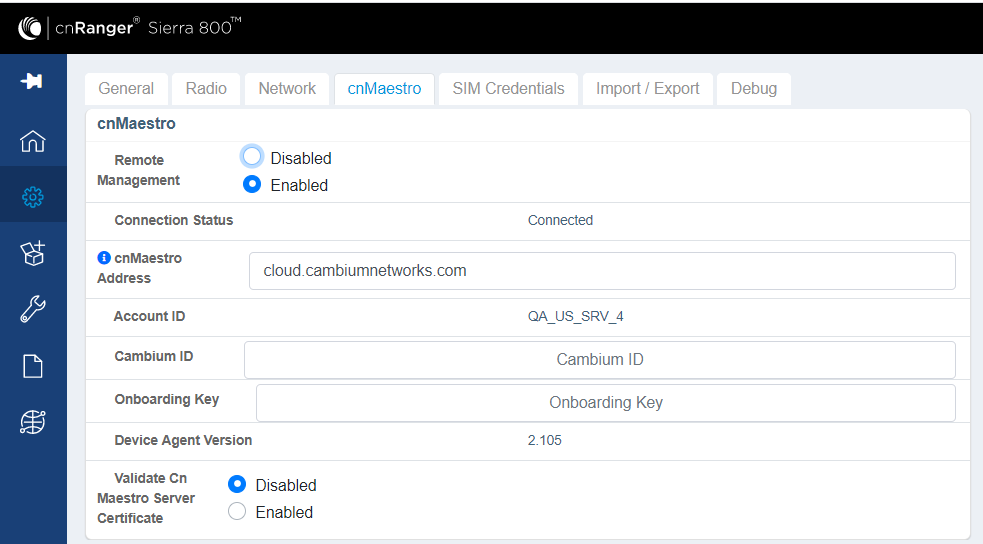
To view the status of Sierra 800 and Tyndall 101 connection to cnMaestro, complete the following steps.
Navigate to Configuration > cnMaestro.
Under cnMaestro section, enter the URL in the cnMaestro Address.
Click Save.
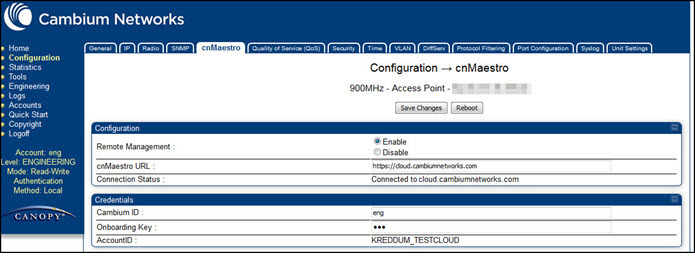
Navigate to Configuration > cnMaestro.
Under cnMaestro section, enter the URL in the cnMaestro URL.
Click Save.
.png)
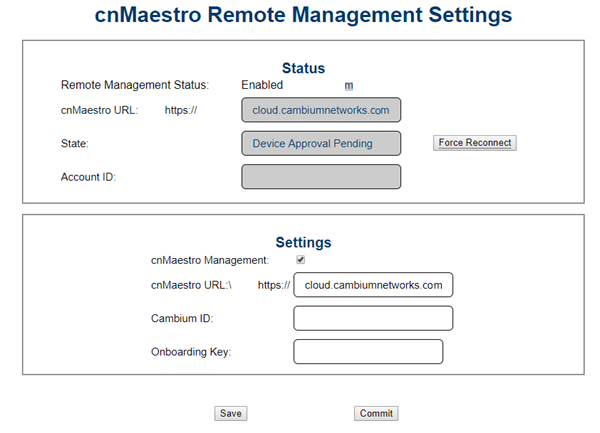
In the cnReach device UI, complete the following steps:
Navigate to >.
Enable cnMaestro Management in Settings section.
Enter your Cambium ID and Onboarding Key.
Click Save.
Navigate to to view the status of the cnReach device connection to cnMaestro.
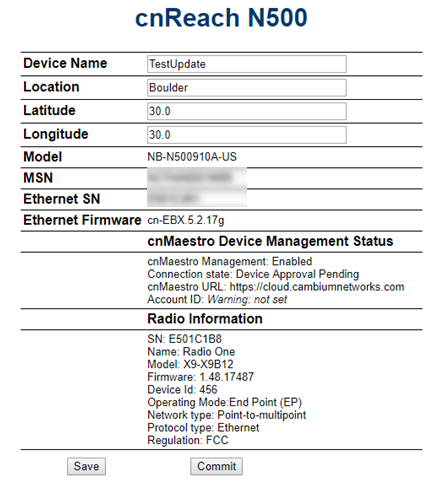
Figure 1 Onboarding cnReach through UI
To view the status of the cnReach connection in the cnMaestro:
Figure 2 Viewing the cnReach connection to cnMaestro
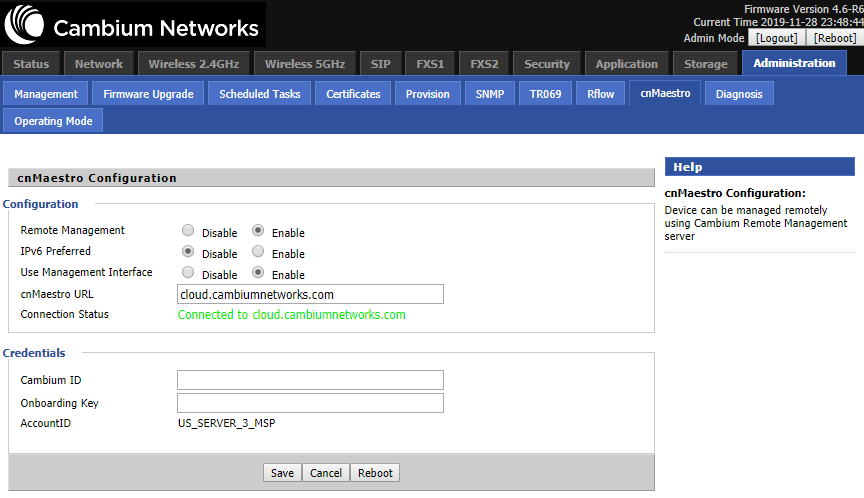
To view the status of the cnPilot R-Series device connection to cnMaestro, complete the following steps:
Navigate to Administration > cnMaestro.
Under cnMaestro configuration section.
Enter the URL in the cnMaestro URL.
Click Save.
Figure 3 Viewing the cnPilot R-Series device connection
The following OIDs can be configured:
cambium_id
cambium_token
cns_staic_url
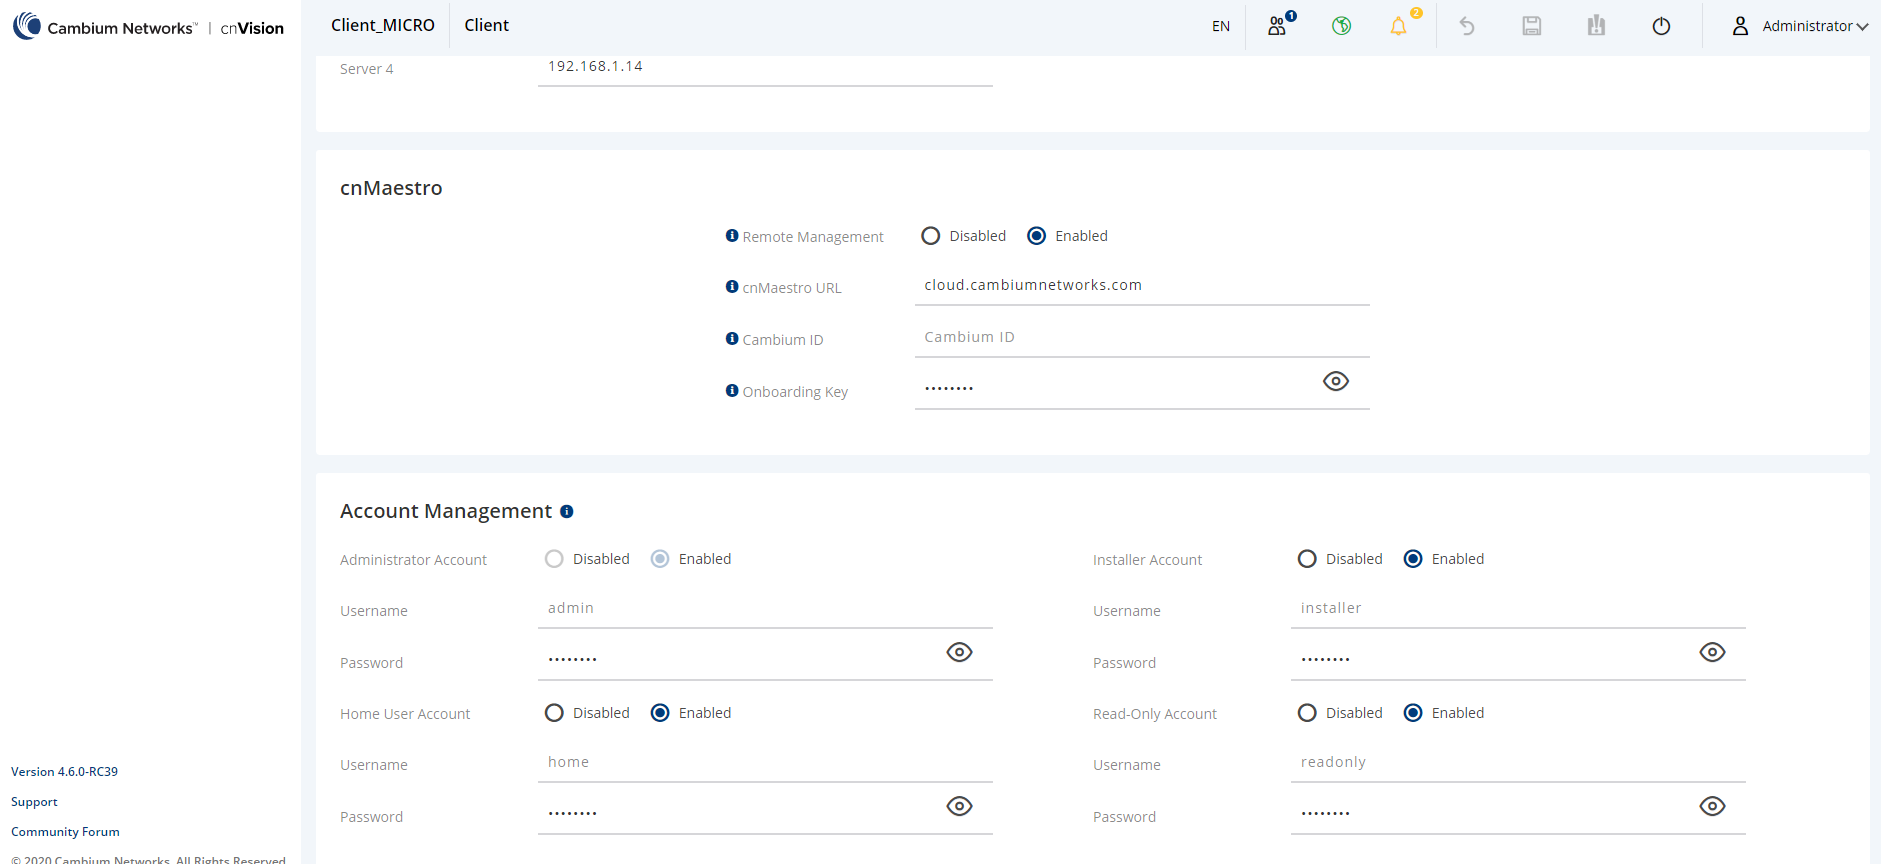
In the cnVision Client device UI, complete the following steps:
Navigate to Configuration > System.
Under cnMaestro section, enter cnMaestro URL.
Click Save.
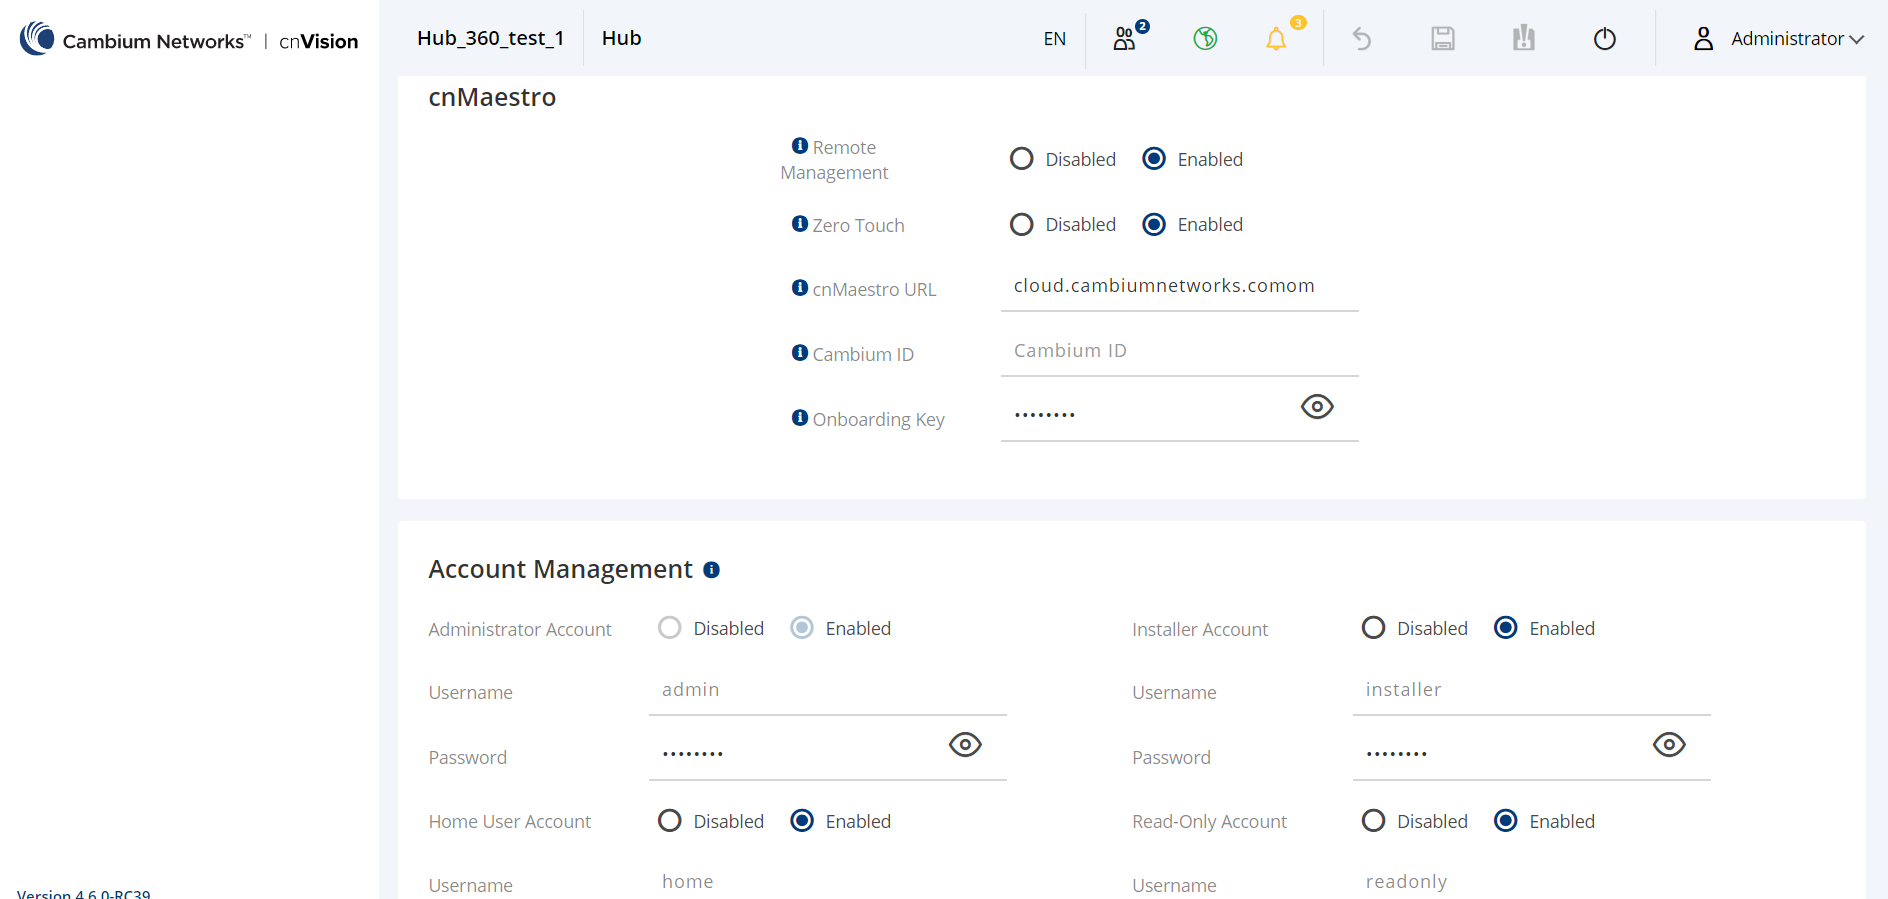
In the cnVision Hub device UI, complete the following steps:
Navigate to Configuration > System.
Under cnMaestro section, enter cnMaestro URL.
Click Save.
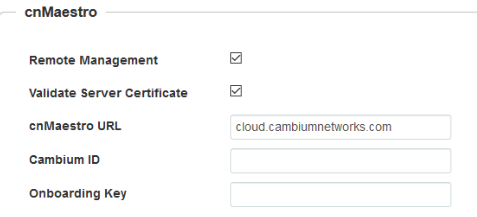
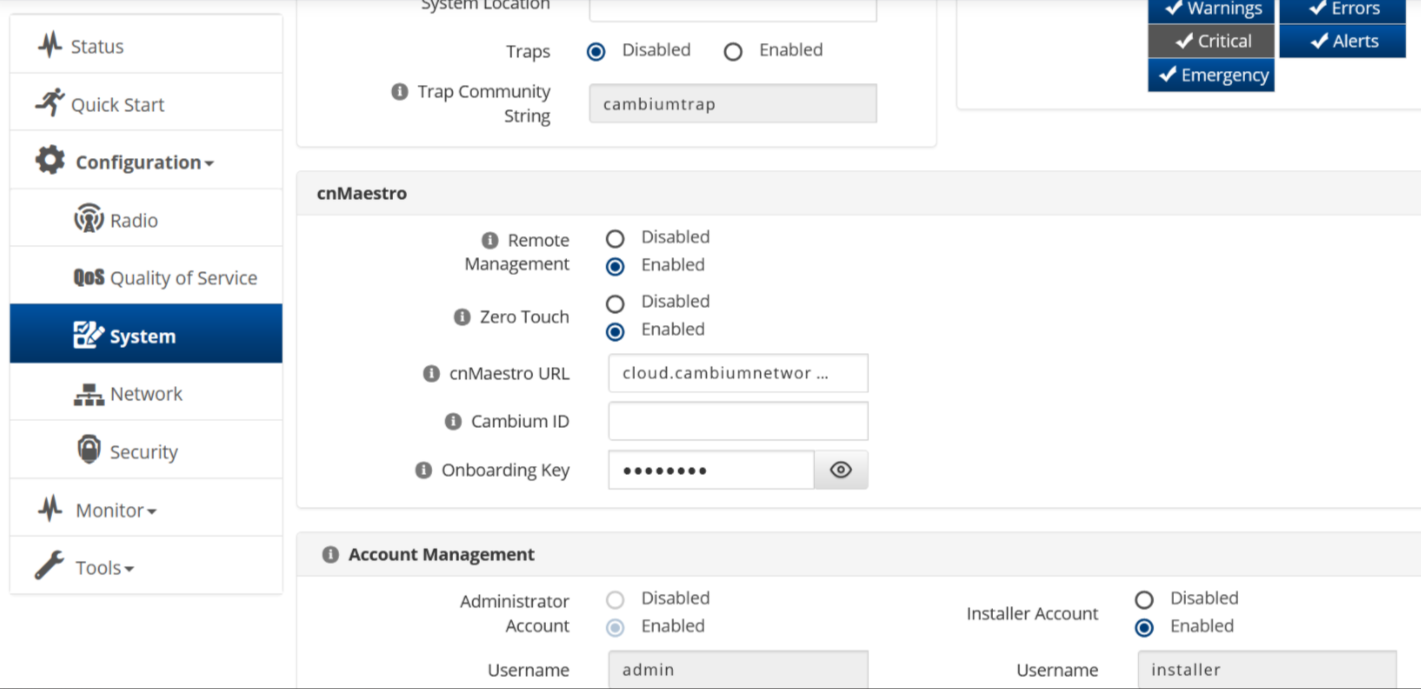
In the Enterprise AP device UI, complete the following steps:
Navigate to .
Scroll to Management > .
Enable Remote Management.
Enable Validate Server Certificate if required.
Enter cnMaestro URL.
Enter Cambium ID and Onboarding Key.
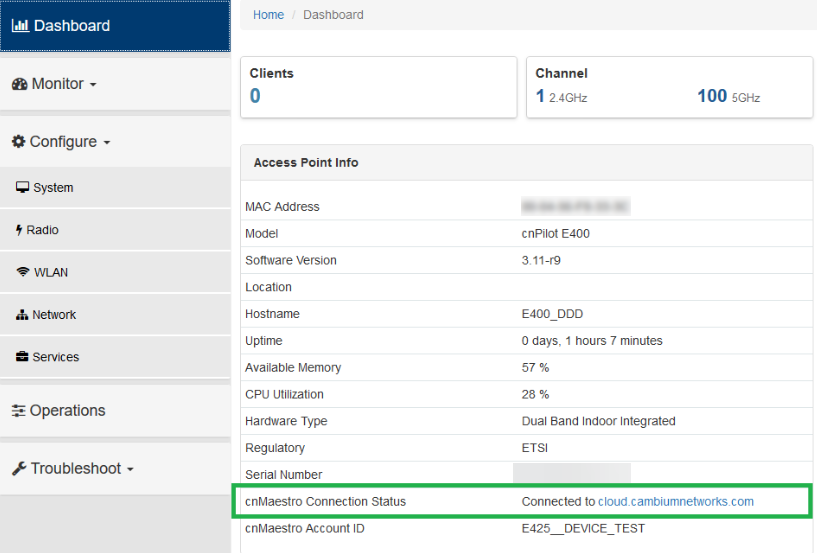
Navigate to Dashboard to view the status of the Enterprise AP device connection to cnMaestro.
Figure 4 Onboarding Enterprise AP through device UI
To view the status of the device connection to cnMaestro:
Figure 5 Viewing the Enterprise AP connection to cnMaestro
In the ePMP device UI, complete the following steps:
Navigate to .
Scroll to .
Select and enter your Cambium ID and the user’s Onboarding Password.
Navigate to to view the status of the ePMP device connection to cnMaestro.
Figure 6 Onboarding ePMP 1000 through UI
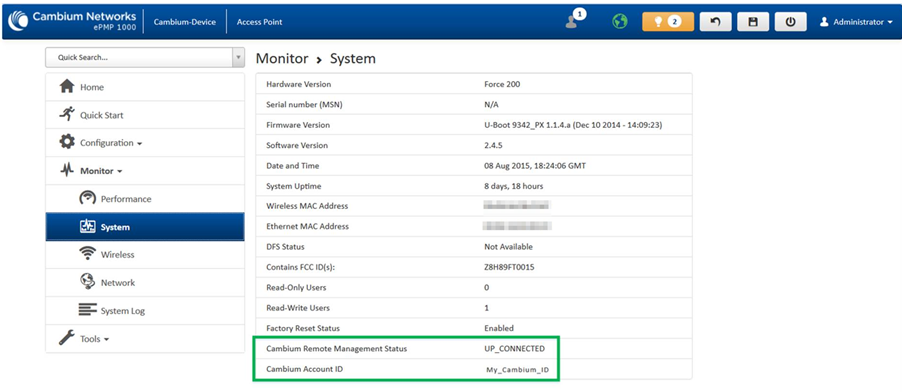
To view the status of the ePMP device connection to cnMaestro:
Figure 7 Viewing the ePMP device connection to cnMaestro
The following OIDs can be configured:
cambiumDeviceAgentEnable
cambiumDeviceAgentCNSURL
cambiumCNSDeviceAgentID
cambiumCNSDeviceAgentPassword
The following OID can be used to check the status of the device’s connection to cnMaestro.
cambiumCnsServConsStat
To onboard PMP device connection to cnMaestro:
In the PMP device UI, complete the following steps:
Navigate to .
Under, provide the following details:
Select Enable under Remote Management.
Enter the URL to connect to cnMaestro in the textbox.
Under , enter the in the respective textboxes. The Account ID field displays the account id of the user.
Figure 8 Onboarding PMP through UI
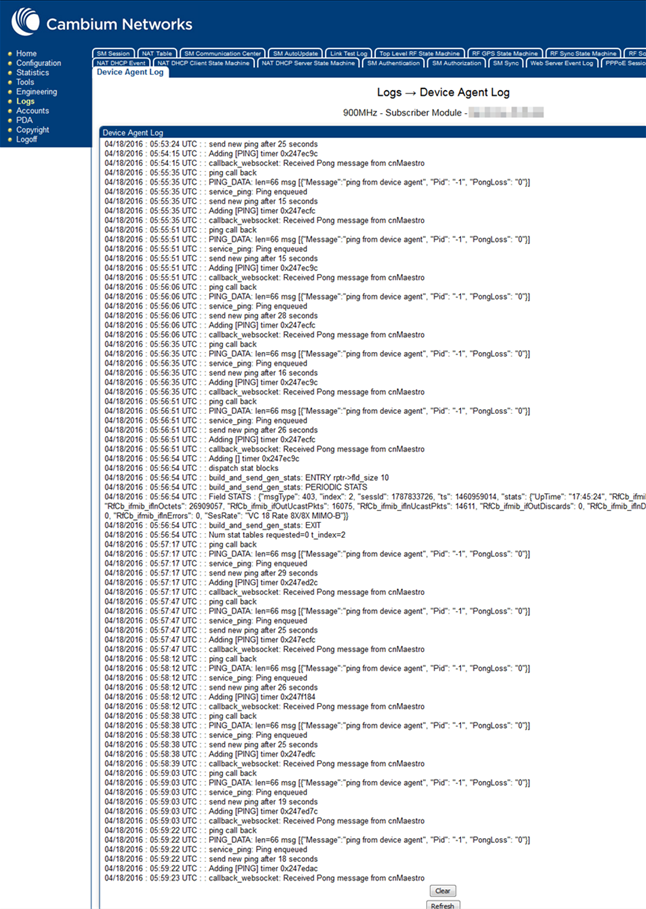
To view the logs, navigate to Logs > Device Agent Log page:
Figure 9 Viewing Logs
The following OIDs can be configured:
cnMaestro Enable
cnMaestro Url
cambium ID
cam Onboard Key
The following OIDs can be used to check the status of the device’s connection to cnMaestro.
cam AccID
cnMaestro Status
Navigate to clickbutton.
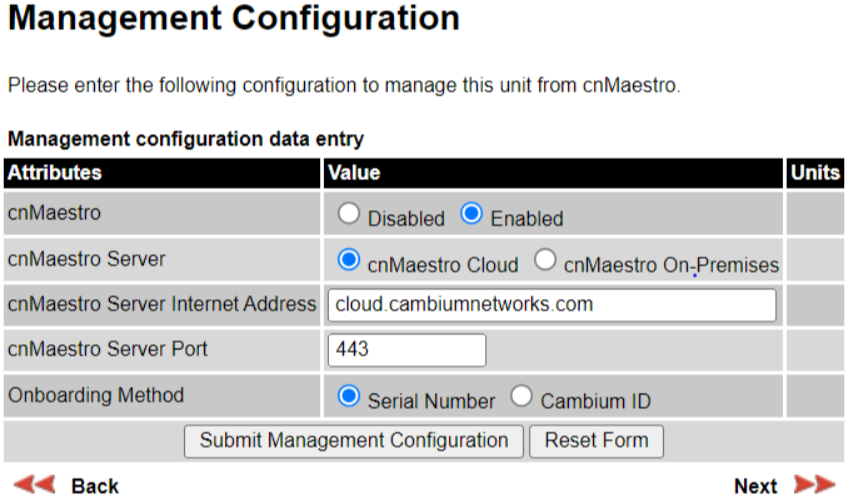
In the Management Configuration window, under cnMaestro, select Enabled.
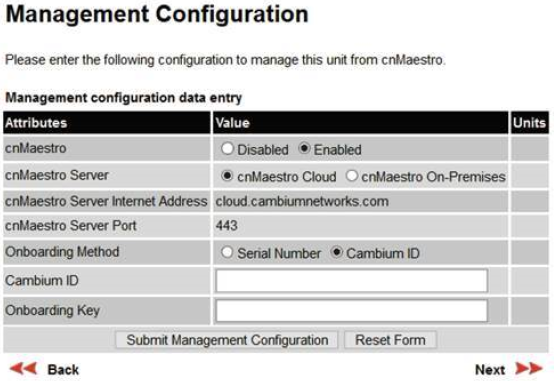
Select cnMaestro Cloud radio button.
Perform the following steps to onboard Xirrus device through CLI.
Connect to the device using any SSH tool.
Login as admin, the default password is admin.
Execute the following command in ssh console:
#ssh admin <device IP address>
#password <admin>
#configure
#management
#cloud server cloud.cambiumnetworks.com scheme cnmaestro enable
#save
#Saving configuration...OK
#cnMaestro-onboarding id cambium_ID key onboarding_key
#save
saving configuration...OK
#show management
Cloud Management enabled Cloud Timeout 50 seconds Cloud Port 443 Cloud Retry 5 Cloud Scheme cnMaestro Cloud Server cloud.cambiumnetworks.com
Cambium ID NOTSET Cambium Key Set cnMaestro Status Not Connected
Login to Cloud account.
Navigate to Home > Onboard > Devices.
In the Devices page, the device onboarded is shown in Figure 10
Figure 10 Xirrus Device Waiting for Approval
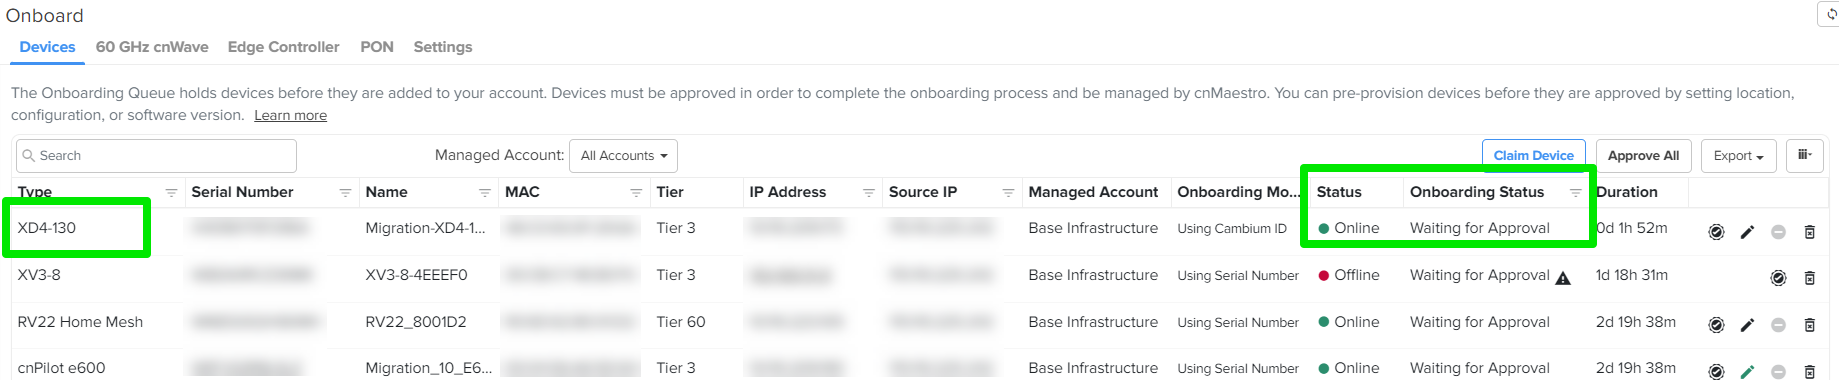
The Status field display Waiting for Approval.
It is optional to provision the device for location, software version update, and assign to an AP Group.
Click Save.
Click Approve.
For details to migrate Xirrus devices from XMS to cnMaestro X using a tool, see XMS-Enterprise to cnMaestro X.
|
|
Note
|
To claim the cnWave 5G Fixed BTS device, you must have access to the device GUI. In the cnWave 5G Fixed BTS device UI, complete the following steps:
From the main home page, navigate to
In the cnMaestro section, enable Remote Management.
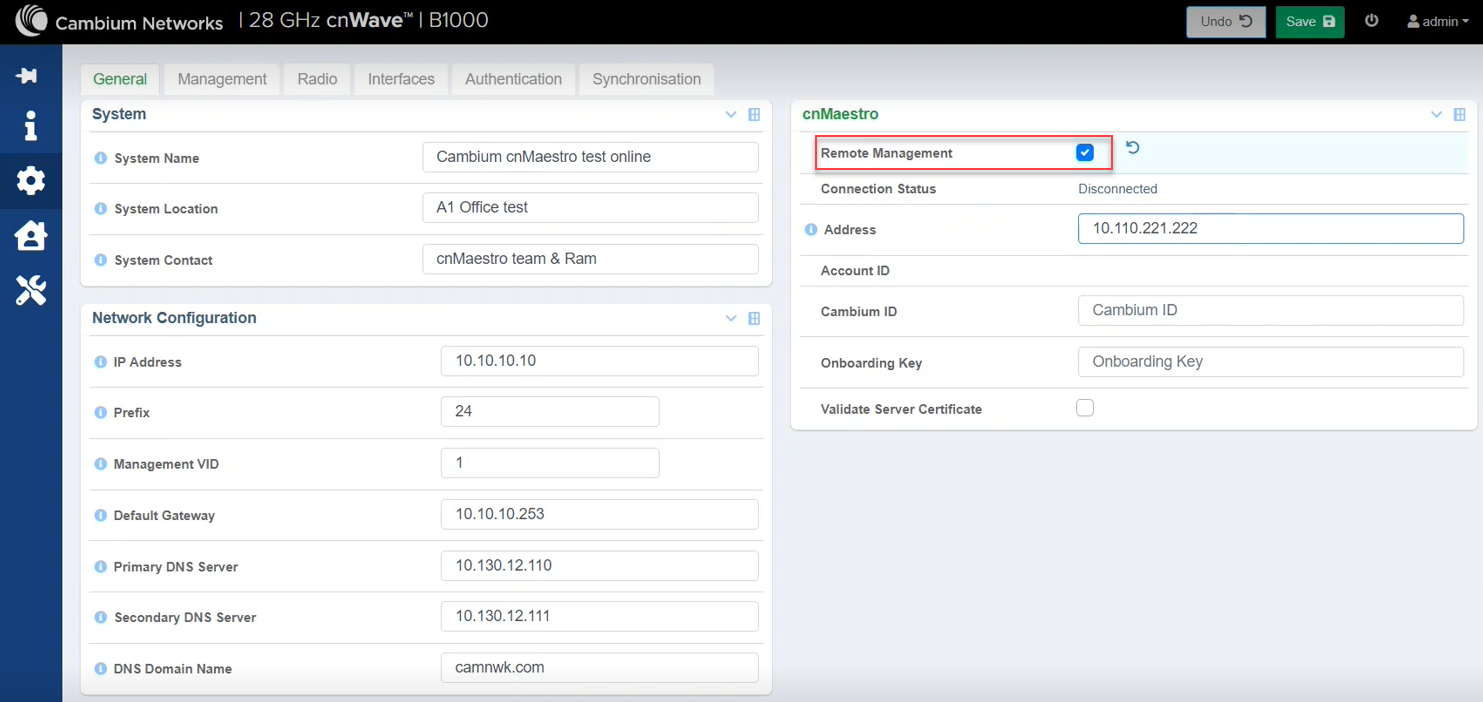
In the Address field, enter the cnMaestro URL or IP Address.
Enter your Cambium ID and Onboarding Key. Validate Server Certificate is an optional field.
|
|
Note You can enter a valid Cambium ID and Onboarding Key in the cnWave 5G Fixed BTS device UI, when Allow device to be claimed using Cambium ID option is enabled in the Settings section in the cnMaestro Onboard page. |
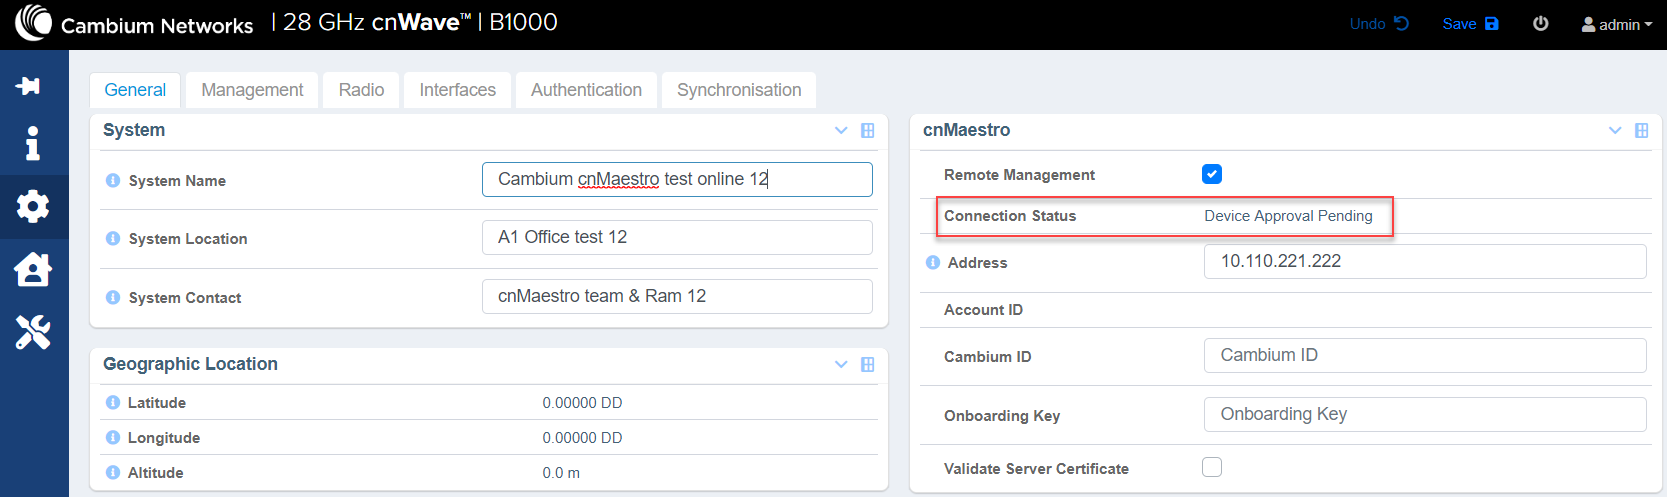
Click Save.
When the cnWave 5G Fixed BTS device is onboarded to the cnMaestro for the first time, the Connection Status field in the cnWave 5G Fixed BTS device UI displays Device Approval Pending as shown in Figure 11.
Figure 11 Device Approval Pending status in cnWave 5G Fixed BTS
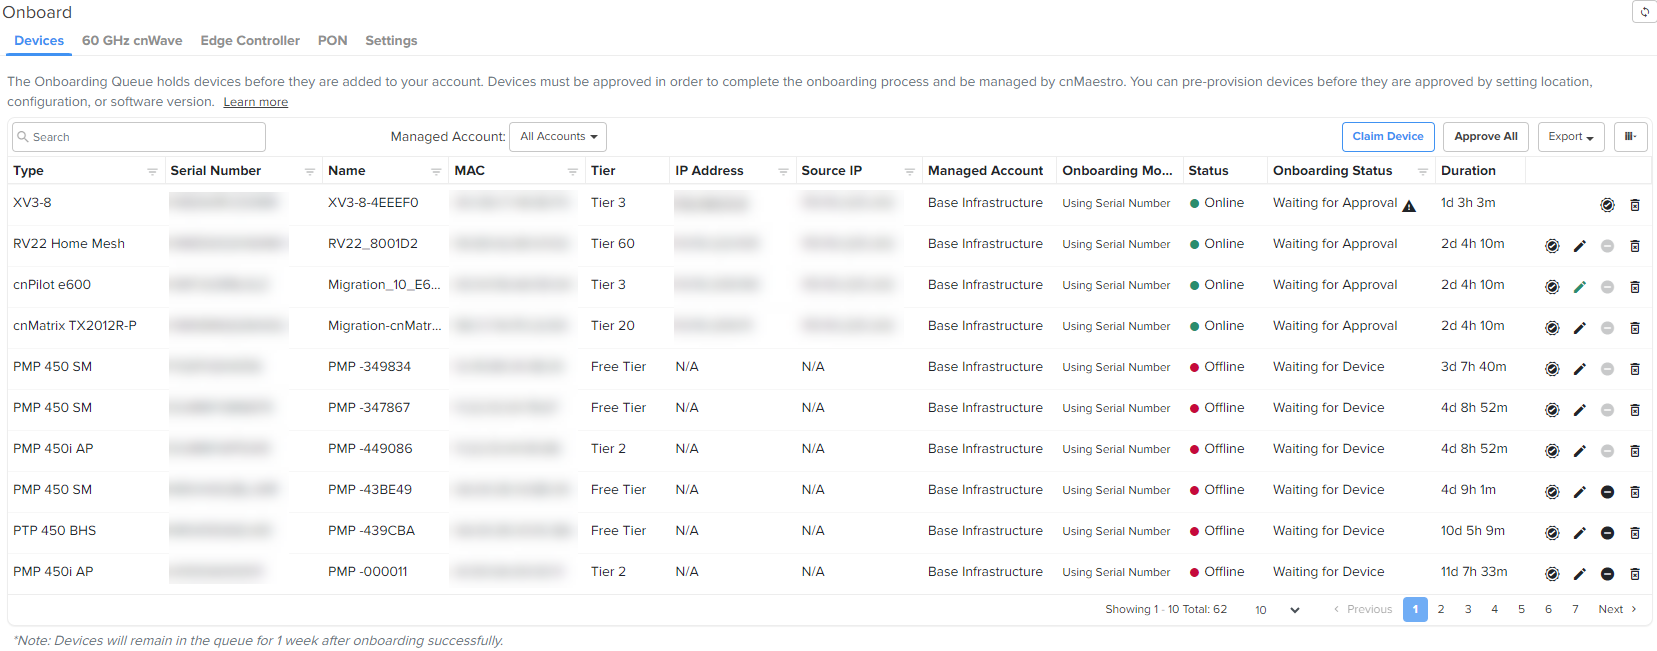
In the cnMaestro UI, navigate to Onboard > Devices and click Approve, as shown in Figure 12.
Figure 12 Approving the cnWave 5G Fixed device using the cnMaestro UI
The cnWave 5G Fixed BTS device is onboarded to cnMaestro.
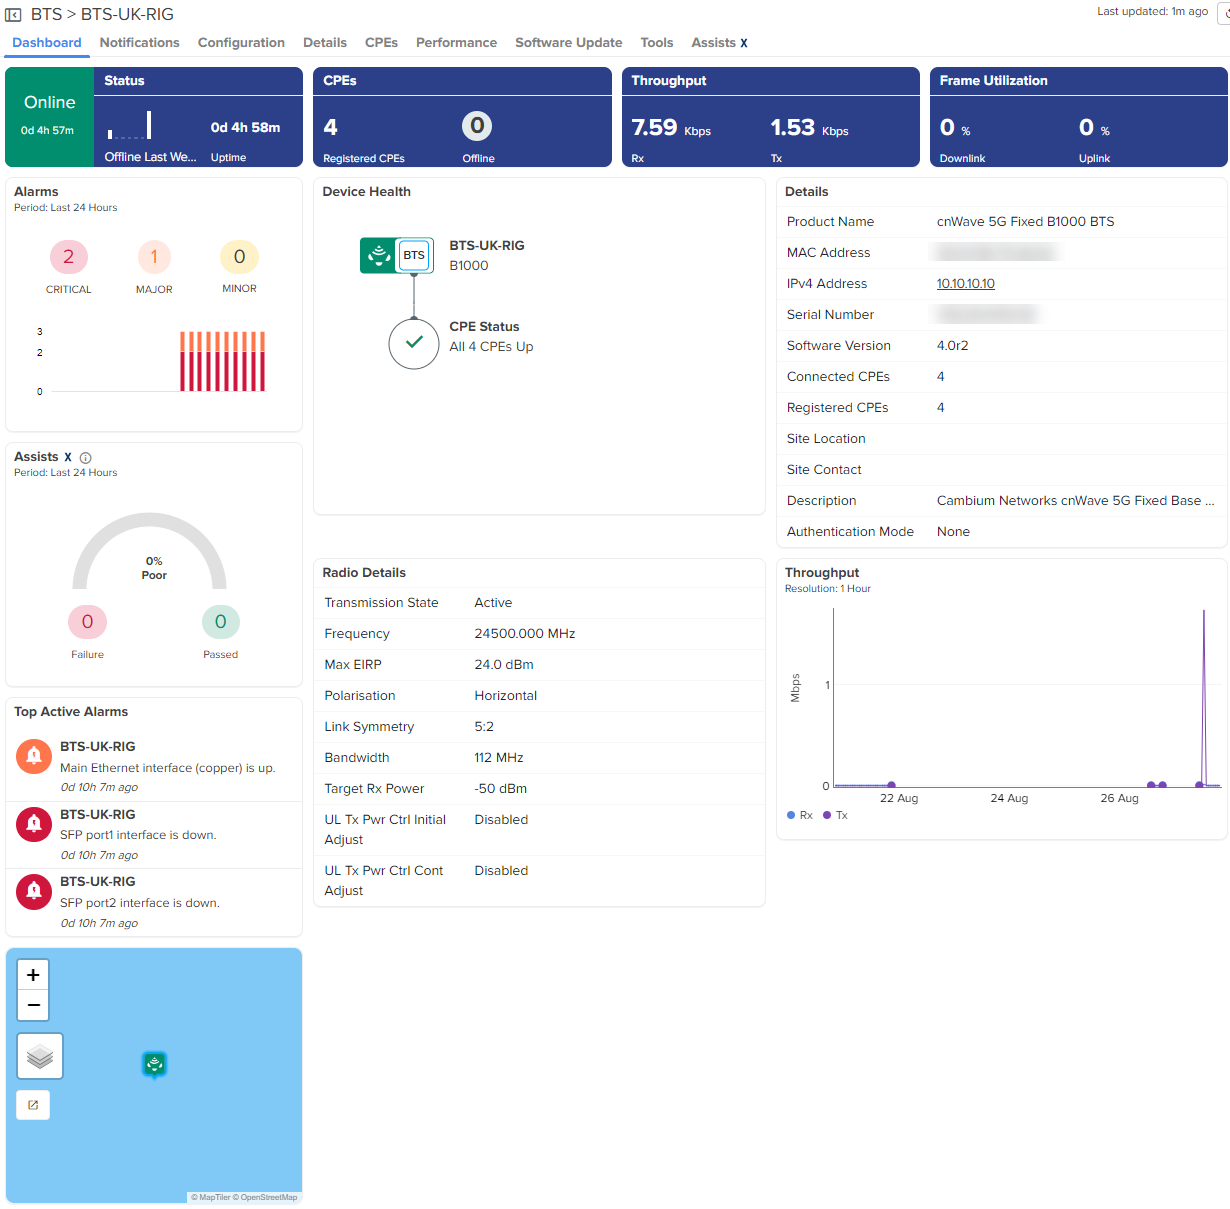
Figure 13 Viewing the cnWave 5G Fixed BTS device onboarded in cnMaestro

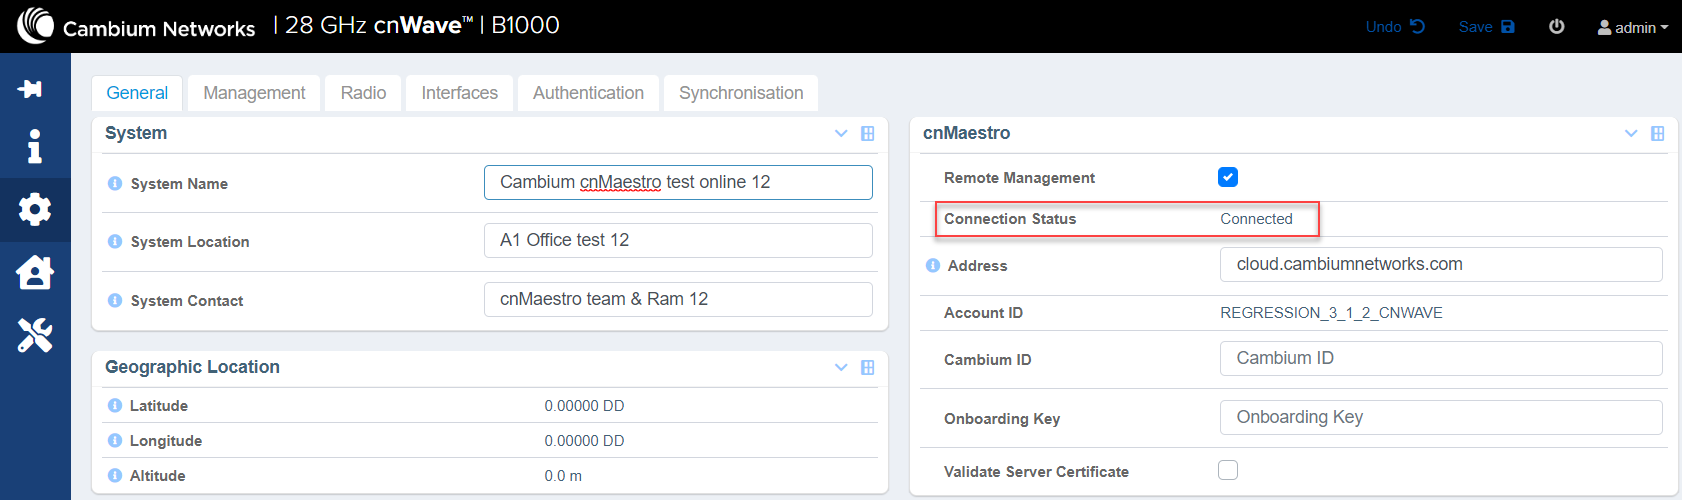
The Connection Status field in the cnWave 5G Fixed BTS device UI displays Connected, on approval, as shown in Figure 14.
Figure 14 cnWave 5G Fixed BTS device Connected
To view the cnWave 5G Fixed BTS device in cnMaestro, complete the following steps:
From the cnMaestro UI home page, navigate to Monitor and Manage > default network or navigate to Onboard > Devices.
Click on the Onboarded link.
Registered cnWave 5G Fixed CPE devices are also onboarded along with cnWave 5G Fixed BTS device.
Figure 15 Viewing cnWave 5G Fixed BTS device and registered CPE devices
To claim and onboard the cnWave 5G Fixed BTS device, complete the following steps:
From the home page of cnMaestro, navigate to tab.
The Onboard page appears with details of the devices and their serial numbers, as shown in Figure 16.

Click Claim Device located at the right side of the Onboard page, as shown in Figure 16.
Thepage appears, as shown in Figure 17.
Enter the serial number of the cnWave 5G Fixed BTS device in the text box, as shown in Figure 17.
|
|
Note You can also place the cursor in the text box and use a barcode scanner to quickly claim the devices. |
Figure 17 Claim Devices with Serial Number page
Click
To onboard the cnWave 5G Fixed BTS device, click Approve located at the right side of the Onboard page, as shown in Figure 18.
|
|
Note If you do not click , the device remains in the Onboarding Queue. |
To onboard Edge Controller, complete the following steps:
Enter cnMaestro URL or IP address, Cambium ID, and Onboarding Key in CLI.
Navigate to Onboard > Edge Controller > Controllers.
Click Approve.
Figure 19 Edge Controller

To onboard PTP 820/850 devices, complete the following steps:
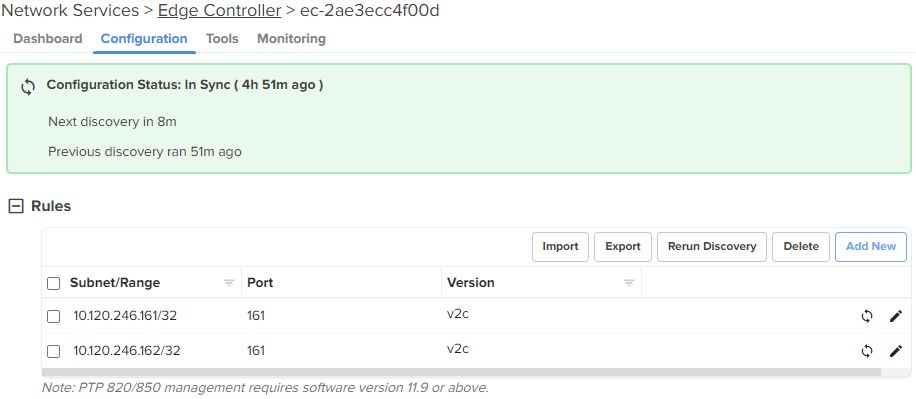
Ensure SNMP rules are added in Edge Controller configuration.
Navigate to Onboard > Edge Controller > Devices.
Click Approve.
Figure 20 PTP 820/850 devices

|
|
Note If the device needs static IP or other WAN configuration to be connected to the internet, refer to Device UI Configuration. |
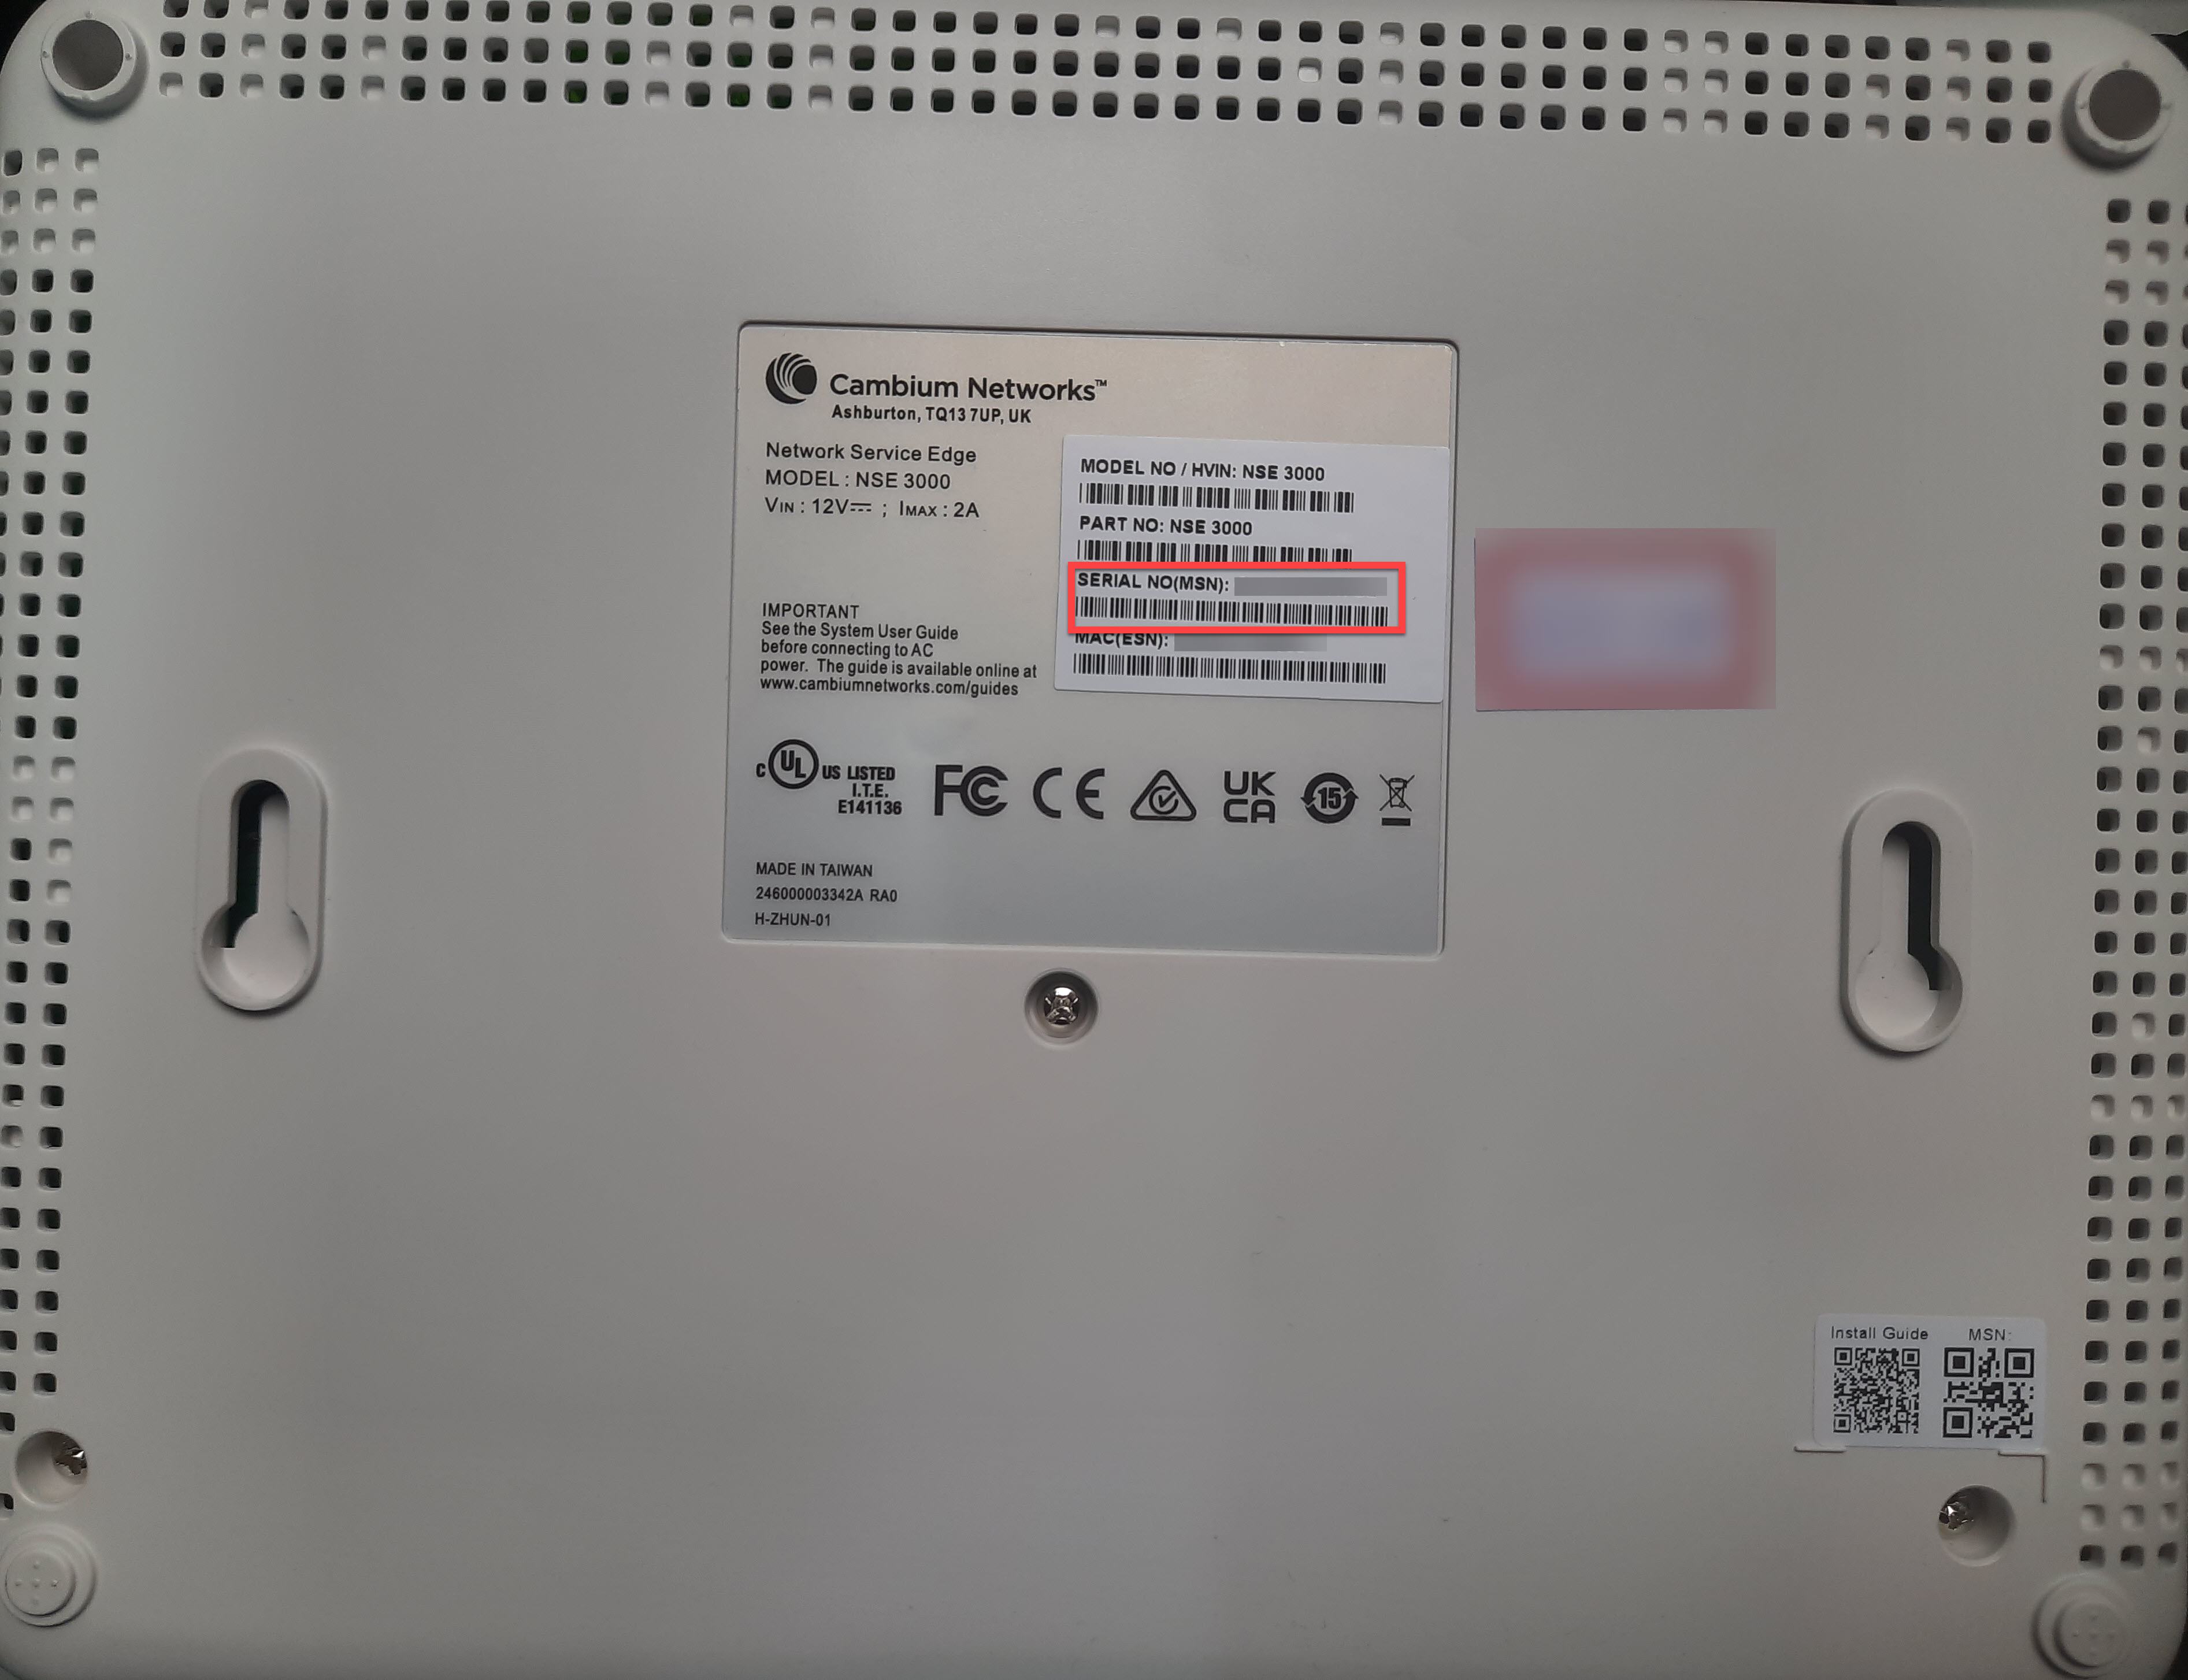
This section describes the onboarding of NSE 3000 to the cnMaestro Cloud X account. The onboarding process requires the device Manufacturing Serial Number (MSN). The MSN of the device can be found at the bottom of the device as shown in Figure 21.
To onboard the device, complete the following steps:
Open a web browser and type the URL https://cloud.cambiumnetworks.com.
The sign in page appears.
Create a new cnMaestro X account or select an existing cnMaestro X account. A tier 30 subscription is required.
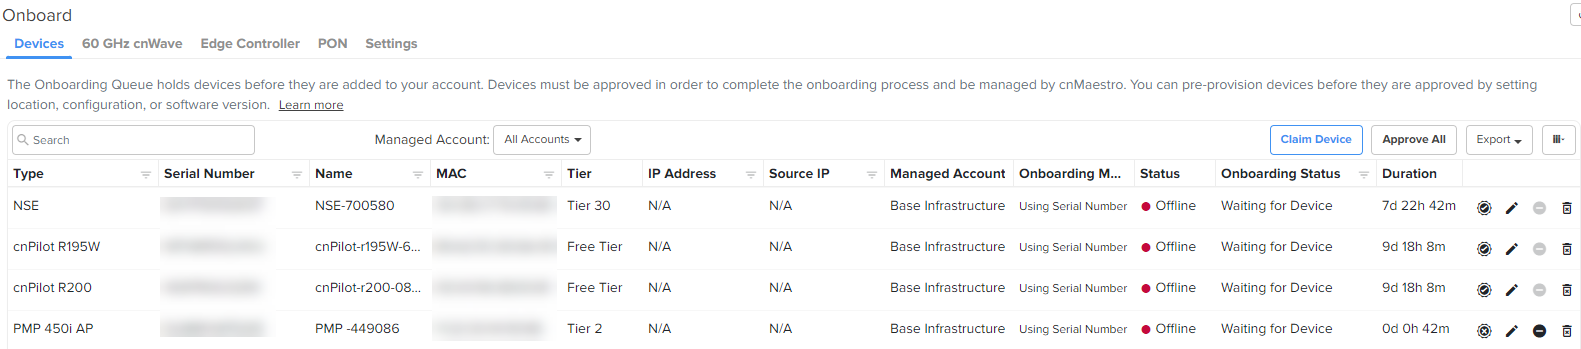
Navigate to cnMaestro Home > Onboard > click Claim Device.
Figure 22 Onboard page
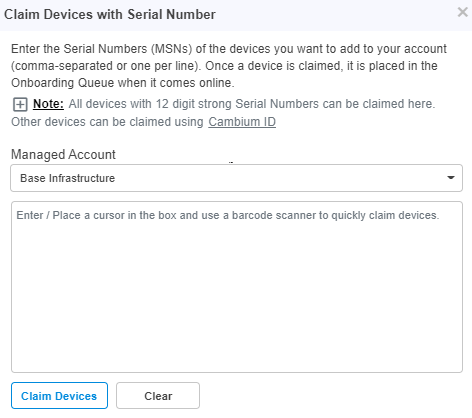
Claim Devices with Serial Number window pops up.
Figure 23 Claim devices with Serial Number

Select the Managed Account from the dropdown.
Enter the Serial Number (MSN) of the device in the text box.
Click Claim Devices.
The device will be listed in the Onboarding Queue.
Click the Approve Device (![]() ) icon or Approve All at the right side of the Onboard page, as shown in
) icon or Approve All at the right side of the Onboard page, as shown in
Figure 24 Approve
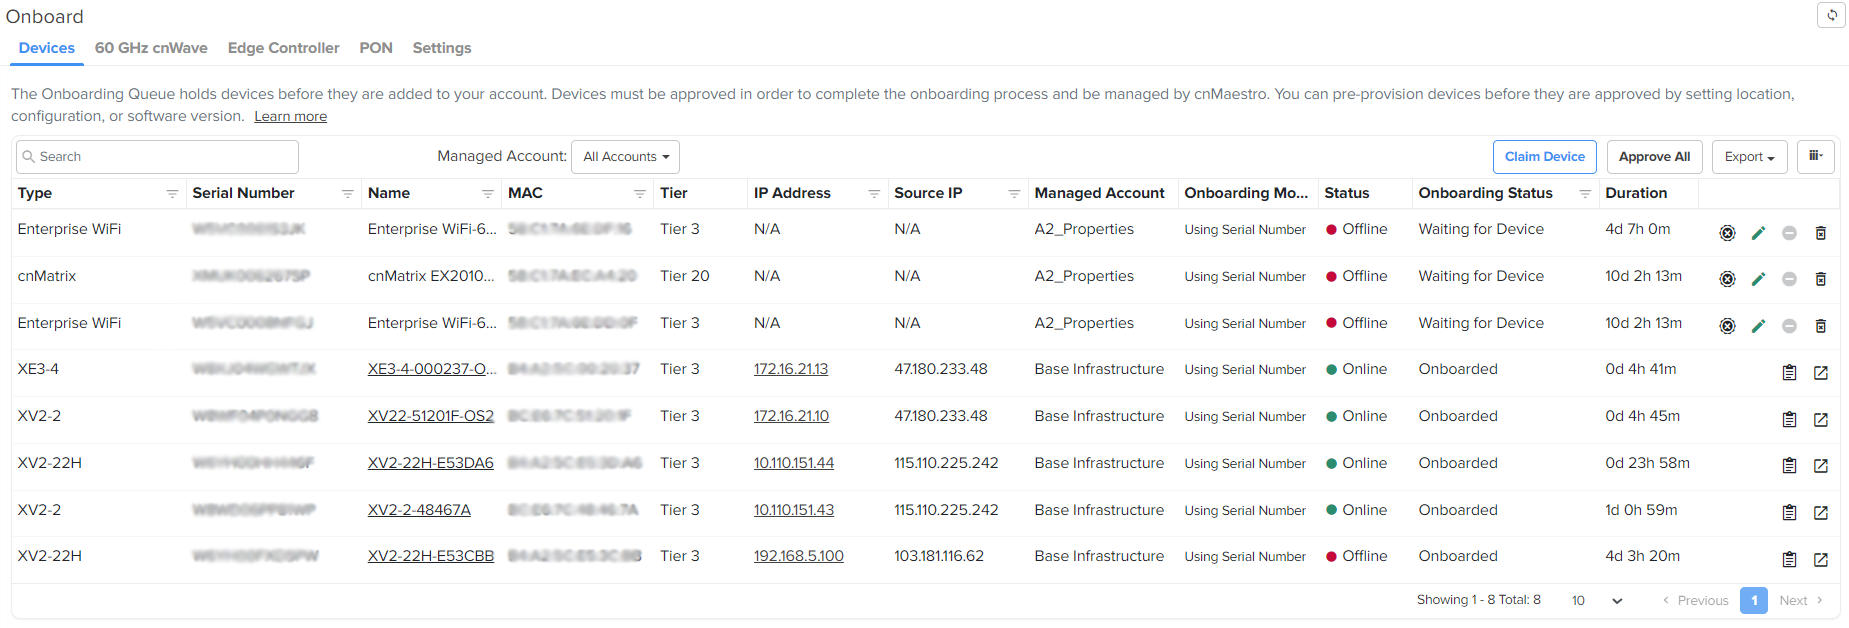
When device is approved appears on the Onboard page as shown below in Figure 25.
Figure 25 NSE 3000 Device Onboard

To onboard the Home Mesh Router to cnMaestro, see Onboarding the Home Mesh Router to cnMaestro.
Claiming the Home Mesh Router on the cnMaestro Cloud's Onboard page is not supported.
This section describes the onboarding of PON devices to the cnMaestro X account. The onboarding process requires the device Manufacturing Serial Number (MSN). The MSN of the device can be found at the bottom of the device as shown in Figure 26.
To onboard the router, complete the following steps:
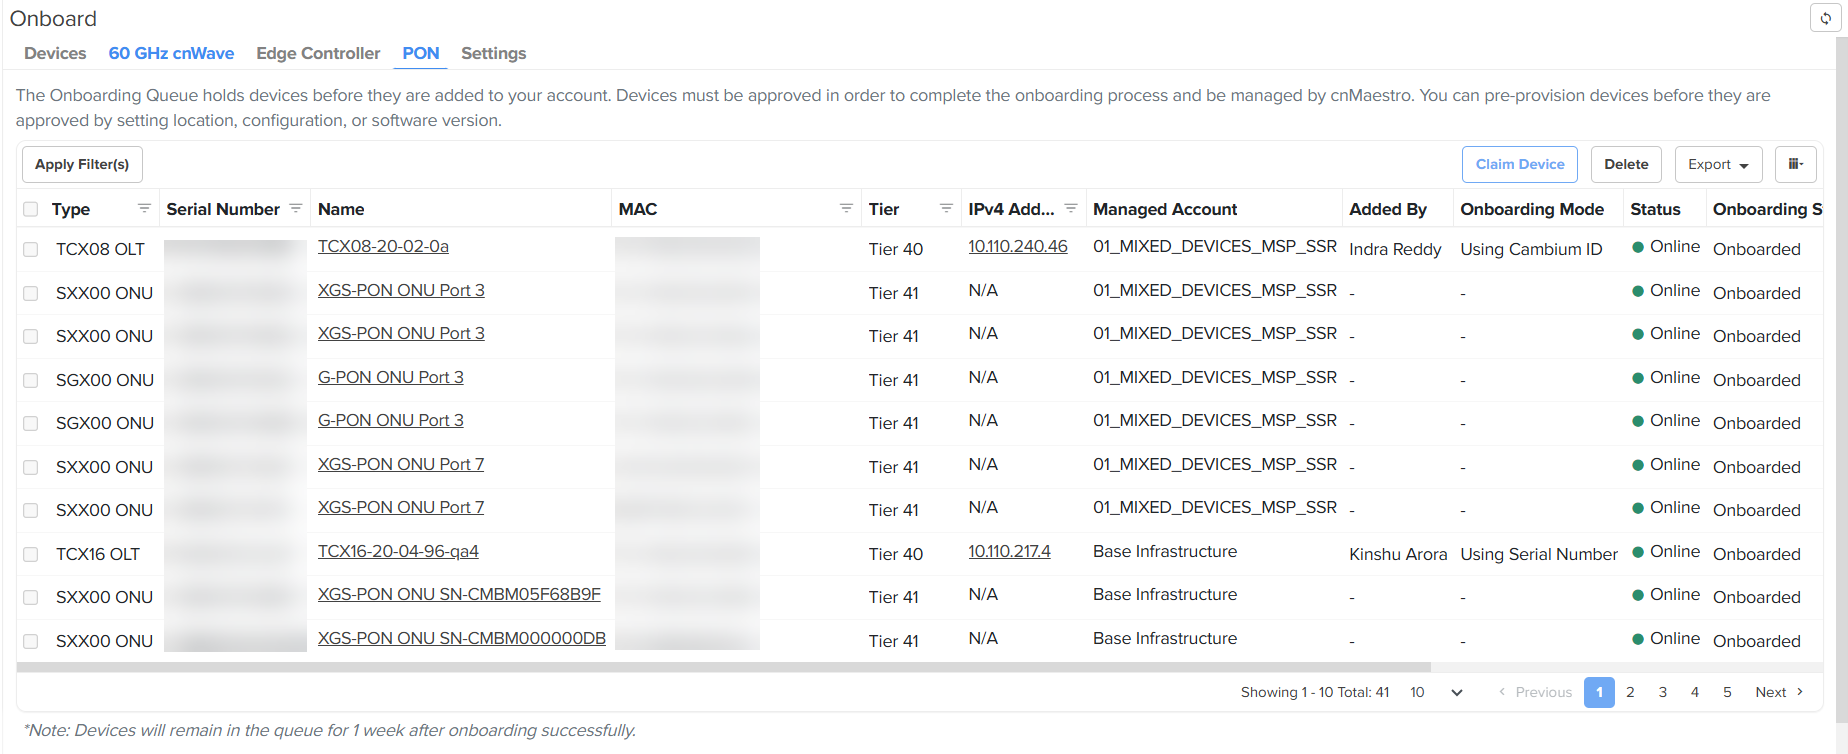
Navigate to cnMaestro Home > Onboard.
Figure 26 Onboard page for PON devices
Click Claim Device.
The Claim Devices with Serial Number window is displayed.
Figure 27 Claim devices with Serial Number
Select the account from the Managed Account dropdown list .
Enter the Serial Number (MSN) of the device in the text box.
Click Claim Devices.
The device will be listed in the Onboarding Queue.
Click the Approve Device (![]() ) icon.
) icon.
You can onboard a 60 GHz device (V1000, V2000, V3000, or V5000) to cnMaestro with the End-to-End (E2E) Controller enabled. E2E Controller handles important management functions such as link bring-up, software upgrades. and configuration
A cnWave network is managed by a central controller called E2E Controller. Each cnWave node (V1000, V2000, V3000, or V5000) rubs minion (client) that connects to the E2E Controller. The controller can run on any host with a route to the cnWave network, including a cnWave node itself.
60 GHz cnWave devices support the following E2E Controllers types:
External E2E Controller: When the controller runs external to mesh, typically in a docker, it is referred as External E2E Controller. This controller type supports up to 500 nodes in a mesh.
Onboard E2E Controller: When the controller runs on a cnWave node that is marked as PoP in the mesh, it is referred as Onboard E2E Controller. Currently, the Onboard E2E Controller is restricted to 31 nodes.
Based on the E2E Controller type hosted on the 60 GHz device, the onboarding process varies. Without the E2E Controller enabled, the onboarding of 60 GHz devices is not supported in cnMaestro.
|
|
Note Before onboarding a 60 GHz cnWave device (V1000, V2000, V3000, or V5000), ensure to complete the following prerequisite tasks:
|
This topic covers the following sections:
To onboard a 60 GHz device with the external E2E Controller, complete the following steps:
Ensure that the 60 GHz cnWave E2E Controller package (OVA file) is installed on a Linux machine or Oracle Virtualbox (which is used for device management).
Set the IP address of the external E2E Controller.
At the console, SSH into the external E2E Controller using its IP address.
The cnWave E2E Controller Terminal UI (TUI) opens.
Navigate to the cnMaestro option.
The Configure cnMaestro Management Server window opens.
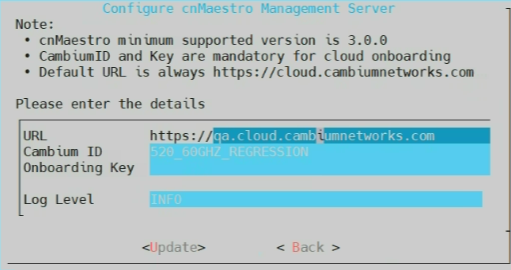
Set appropriate values for the following parameters:
URL: Enter the cnMaestro URL that is used for device management.
Cambium ID: Enter the valid ID that is required for onboarding the 60 GHz cnWave device (with E2E Controller) to cnMaestro.
A Cambium ID is a string that uniquely identifies an account (which you create). It consists of letters, numbers, and underscores. Example: 60GHz_xxx_xxxxxxxxxx. It is used to onboard devices and is assigned to the devices managed by cnMaestro.
Onboarding Key: Enter an appropriate onboarding key (if configured) that is mapped to an individual user account. You can set the onboarding keys for the required user accounts using the Onboard > Settings page in the cnMaestro UI. For more details, check Onboarding Key configuration.
Click Update.
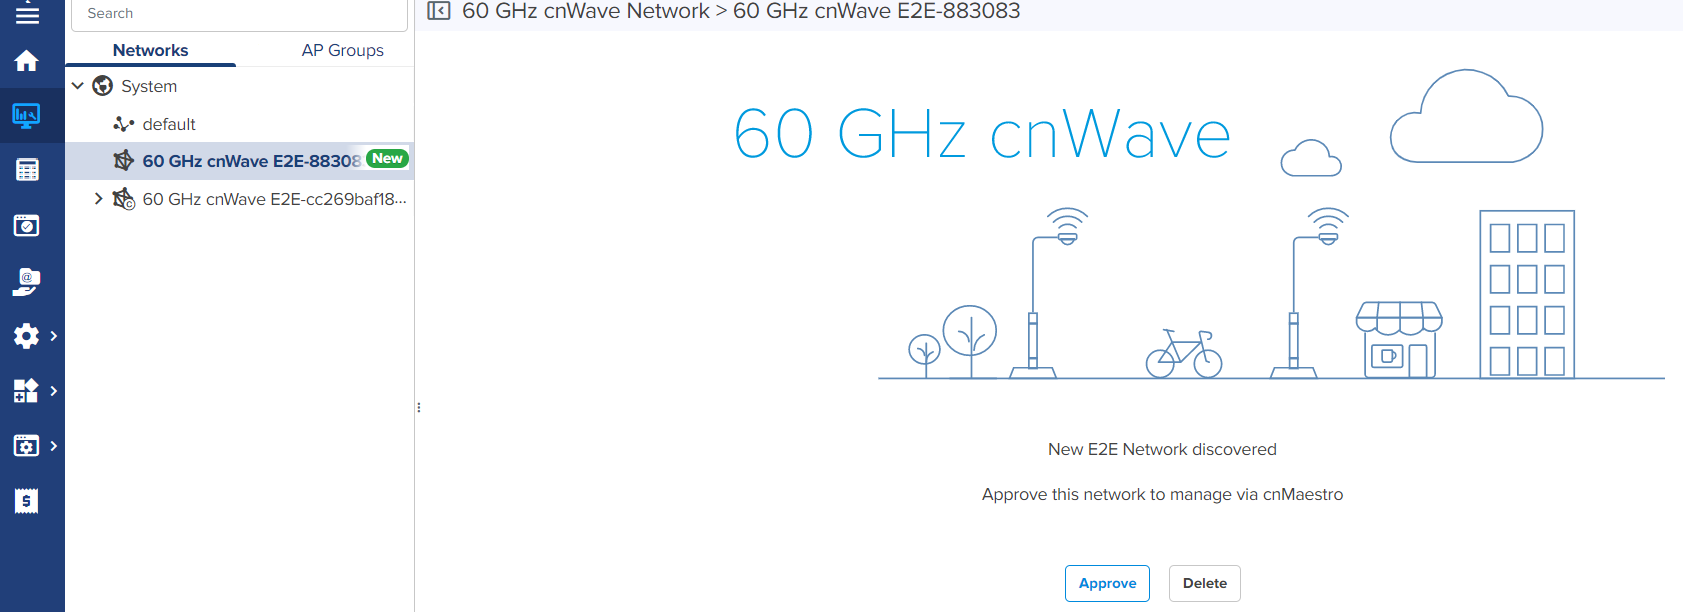
From the home page of cnMaestro UI, navigate to the Monitor and Manage > Network and select a 60 GHz cnWave network. Example: 60 GHz cnWave E2E
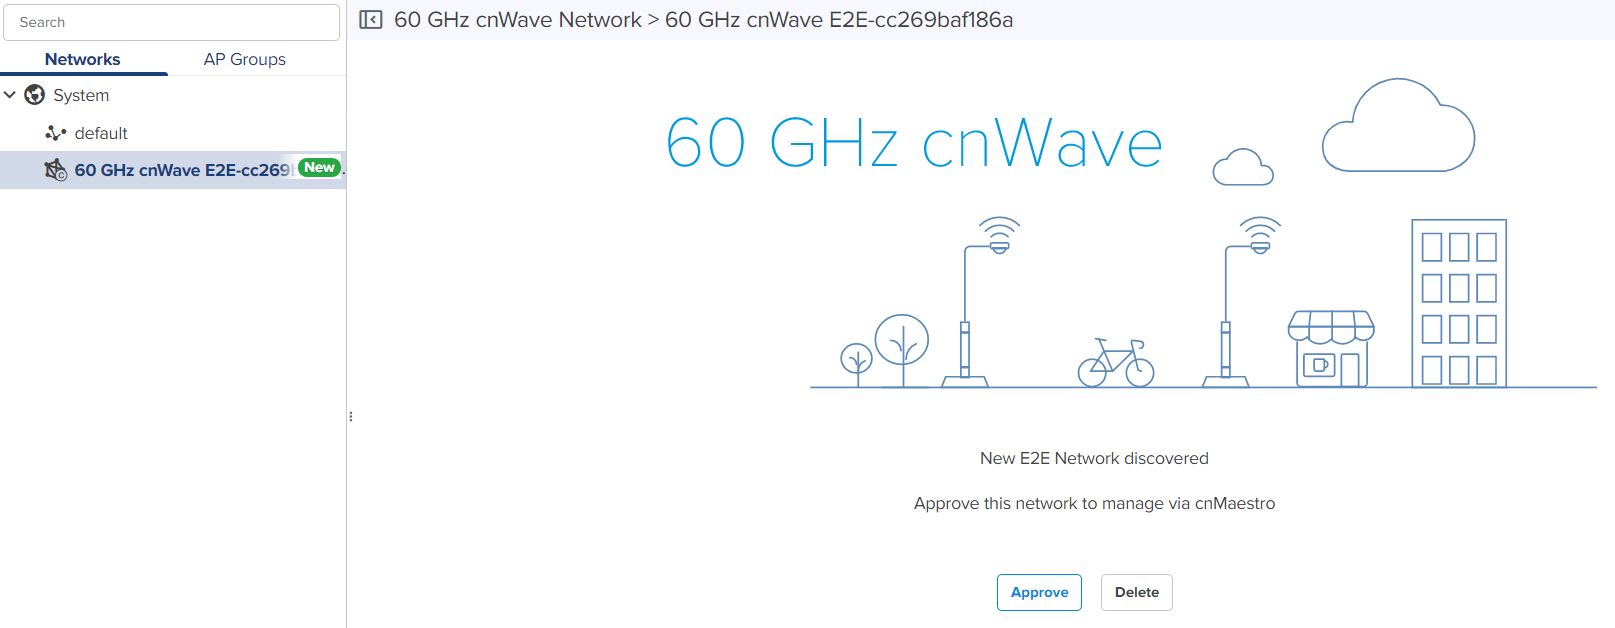
Click Approve.
The 60 GHz cnWave–Network Onboard window appears. By default, Auto-assign is selected. You can select Auto-assign or Manual.
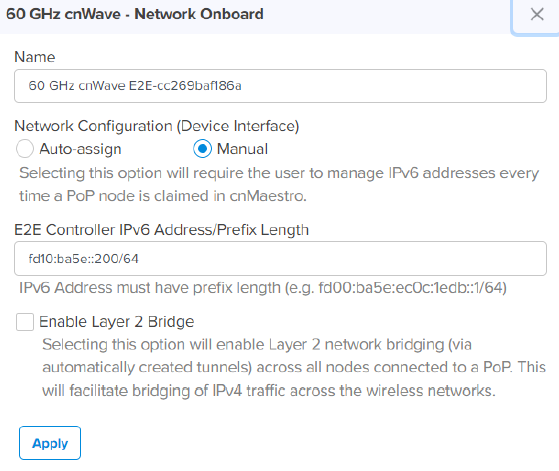
When you select Manual, you can update IPv6 address for the E2E Network. You must wait until the IPv6 address gets updated. If Auto Generate IPv6 Addresses is enabled, the E2E Controller fetches the IPv6 addresses automatically.
Set the required parameters and select the Enable Layer 2 Bridge checkbox, if required.
Click Apply and Wait until the network onboard is successful.
.png)
|
|
Note The Onboard page in cnMaestro UI supports a separate tab for 60 GHz cnWave. Using this 60 GHz cnWave tab, you can check the onboarding queue for E2E Controllers and cnWave devices. Users must approve the60 GHz E2E Controller before it is added to cnMaestro as an E2E Network. The users can approve either through the Onboarding Queue or the Hierarchical Tree (where the E2E Network is placed on the Monitor and Manage page). When the onboarding is approved, the 60 GHz cnWave E2E Network (and its devices) can be managed by cnMaestro. |
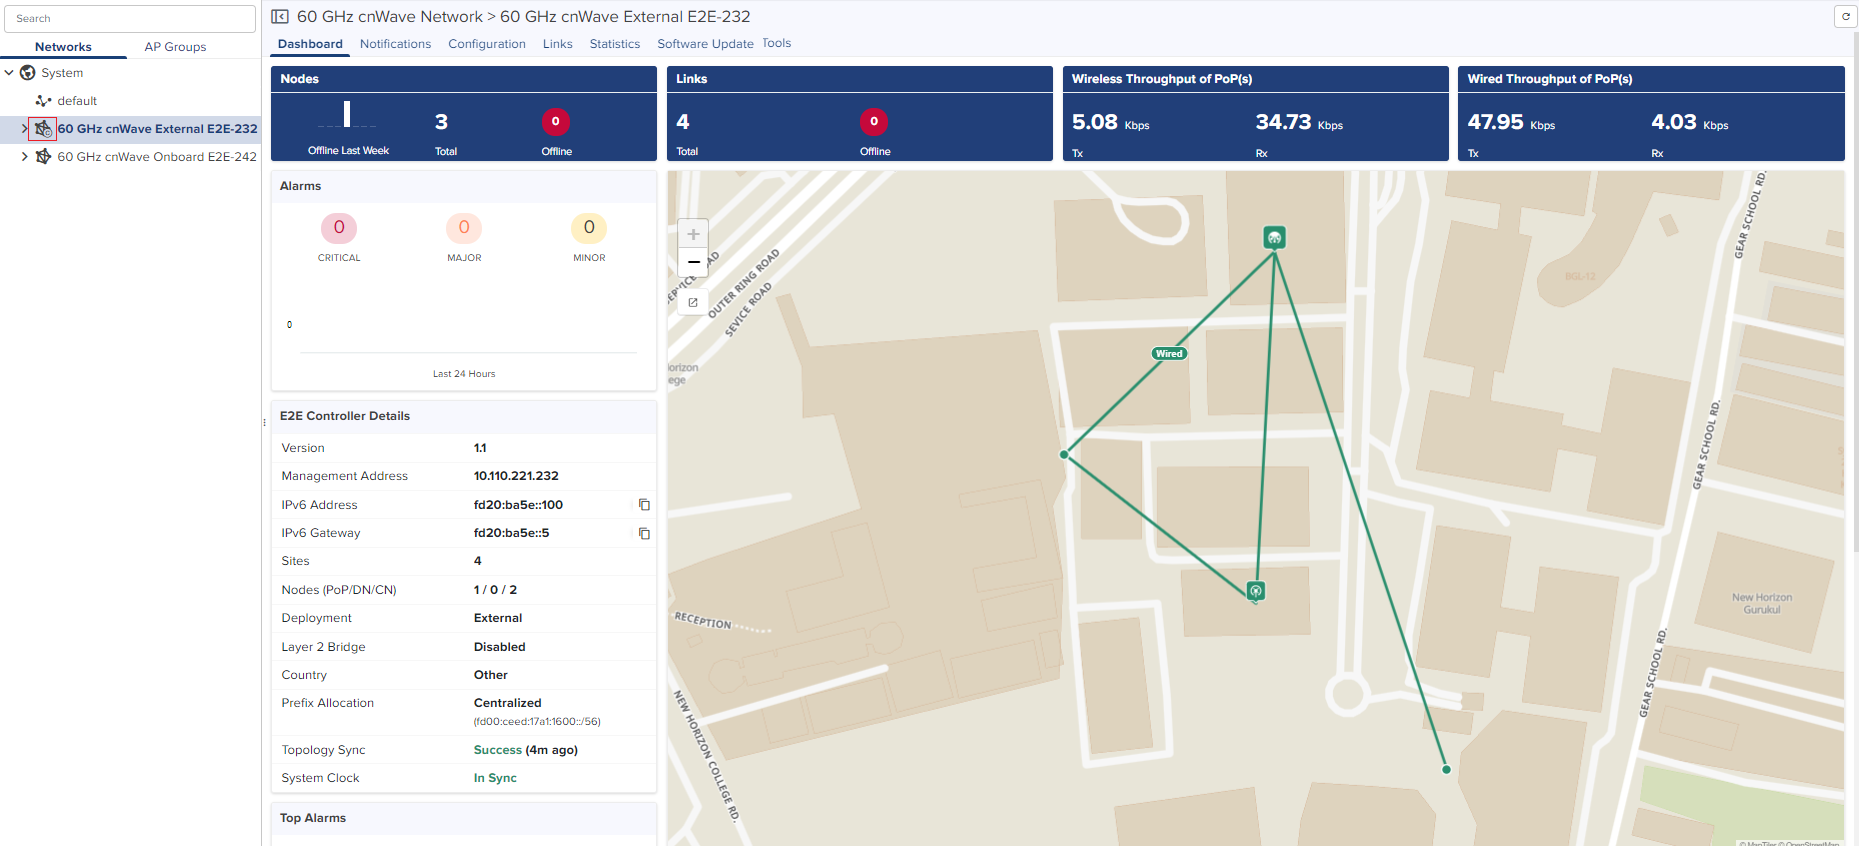
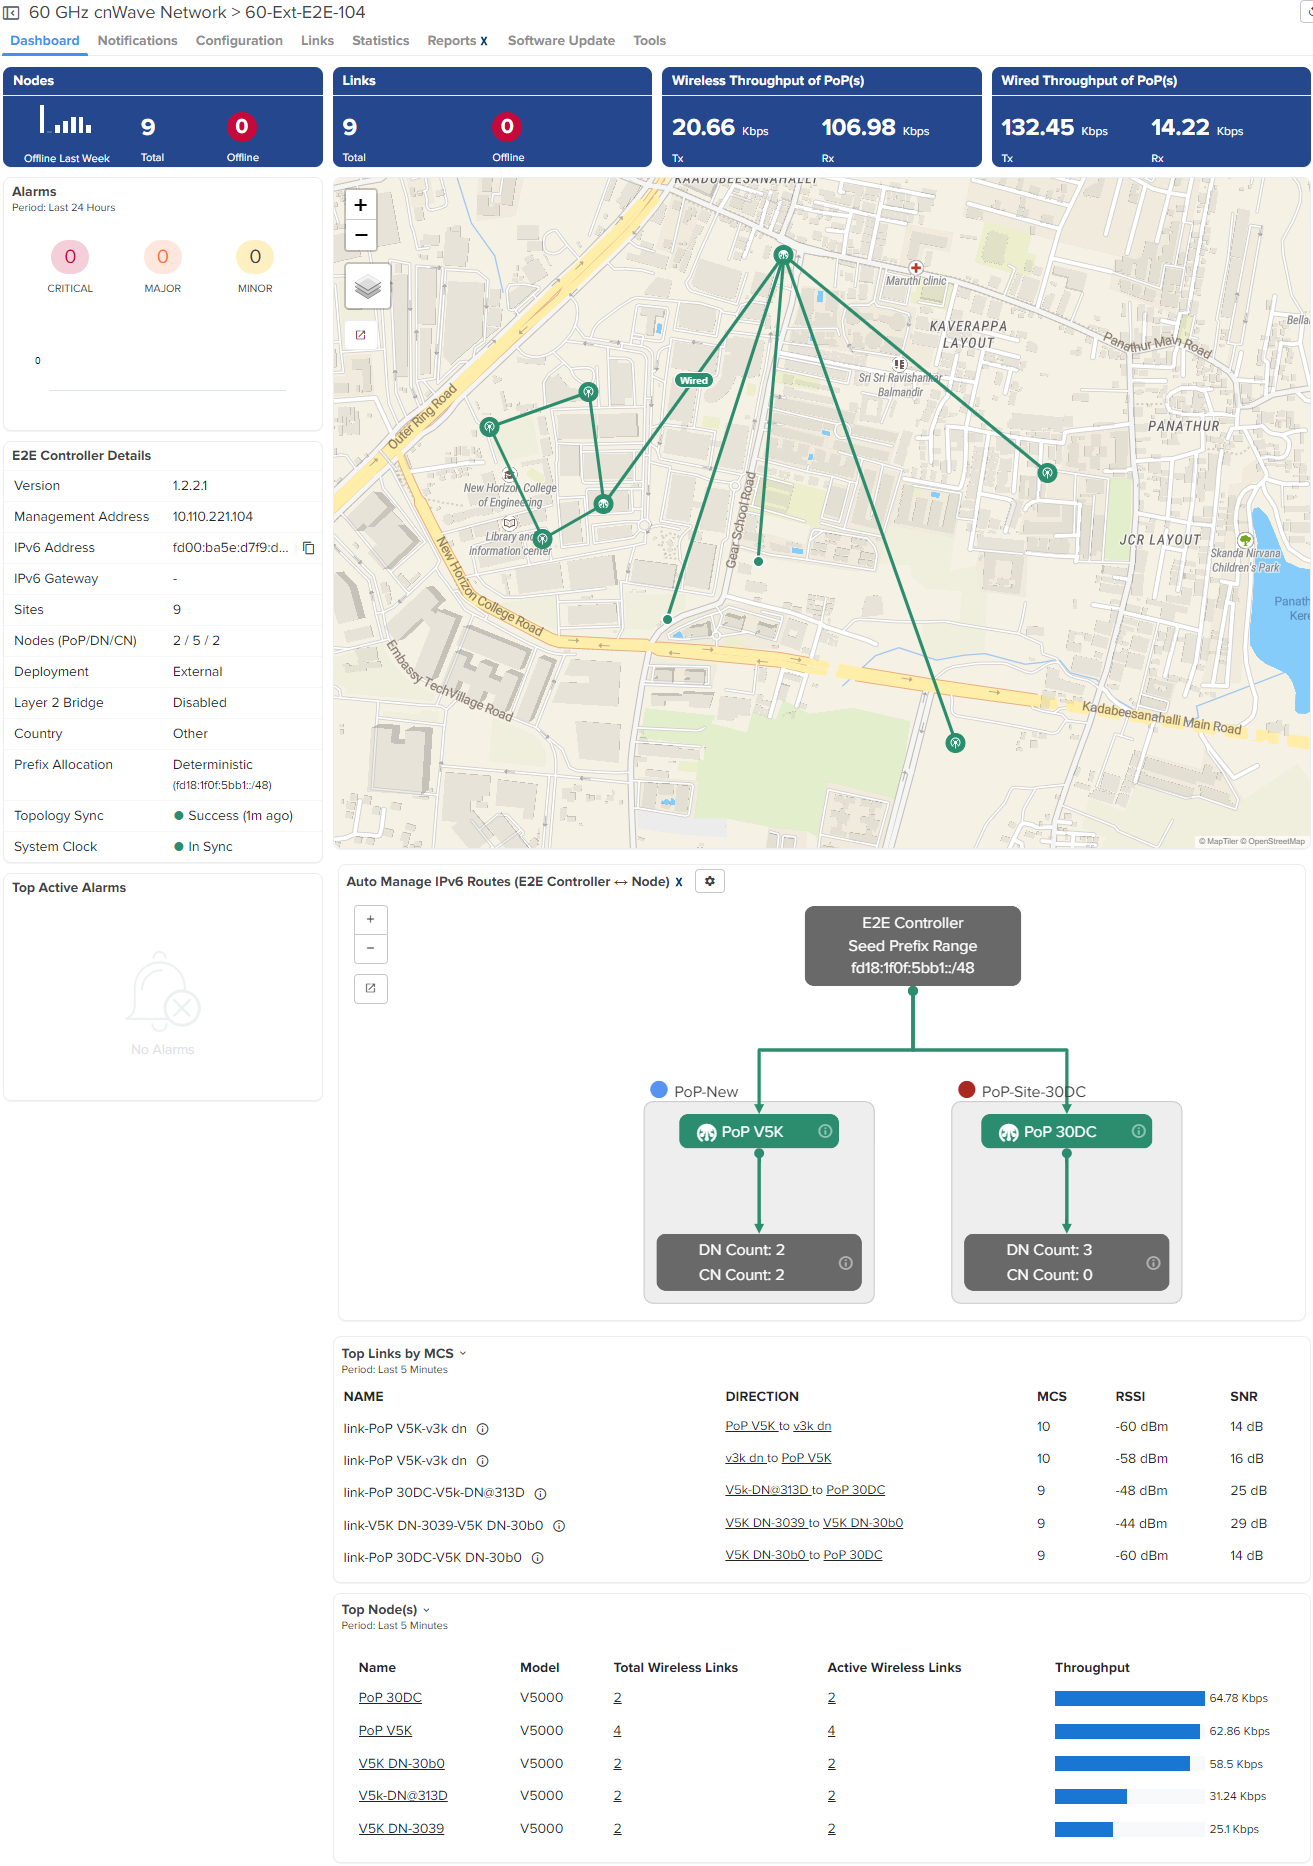
When the onboard is successfully complete, the cnMaestro UI displays the External E2E Network dashboard as shown in the figure below. The  icon indicates the External E2E Controller network.
To onboard a 60 GHz device with the internal Onboard E2E Controller (which is running on the 60 GHz cnWave device), complete the following steps:
Ensure that the external E2E Controller is enabled using the device UI. For details, refer to the 60 GHz cnWave User Guide.
Ensure that the Onboard E2E Controller is enabled using the device UI. You can set the remote management settings, including Cambium URL, Cambium ID, and onboarding key. For details, refer to the 60 GHz cnWave User Guide.
From the home page of cnMaestro UI, navigate to the Monitor and Manage > Network page and select a 60 GHz cnWave network.
Click Approve.
The 60 GHz cnWave - Network Onboard window appears.
.png)
Edit the network name and click Save.
You must wait until the network onboard successful message is displayed.
.png)
When the onboard is successfully complete, the cnMaestro UI displays the Onboard E2E Network dashboard as shown in the figure below.
If a PoP node is running the Onboard E2E Controller, then the  icon indicates the PoP as shown in the figure below.

To onboard the internal running 60 GHz Onboard E2E Controller using its serial number, complete the following steps:
From the home page of cnMaestro UI, select Onboard and click the 60 GHz cnWave tab.
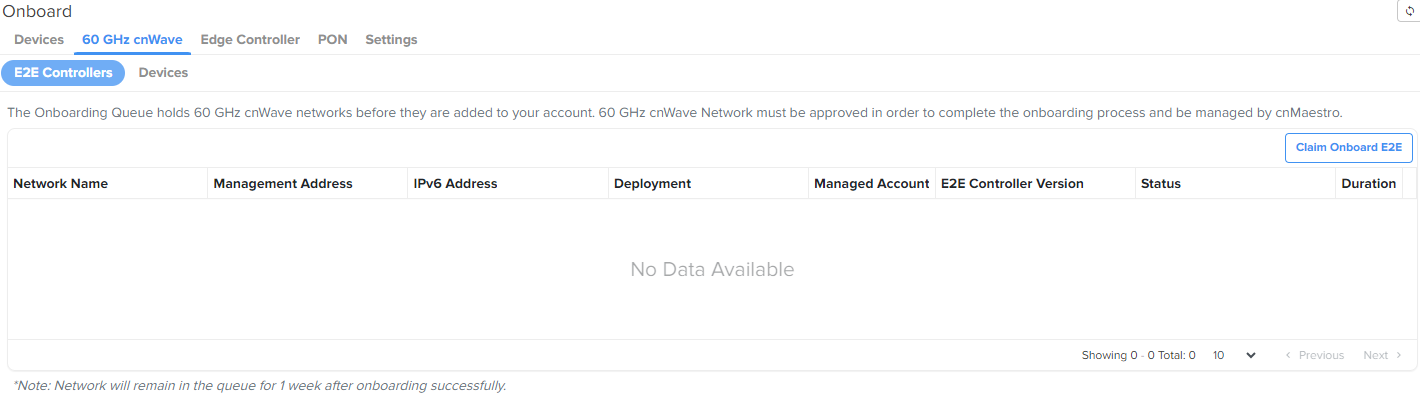
Click on the Claim Onboard E2E button.
The Claim Onboard E2E Network with Serial Number windows appears
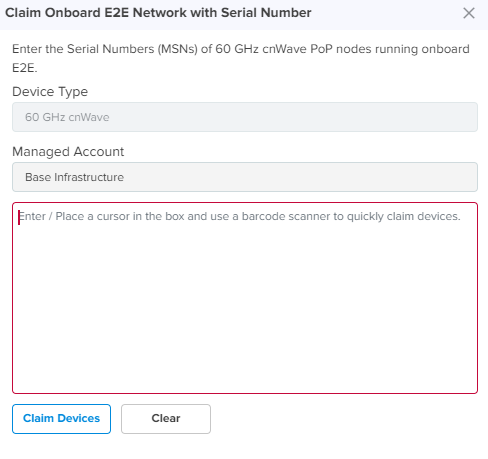
Enter the serial number of the 60 GHz cnWave devices and click Claim Devices.