Citizens Broadband Radio Service (CBRS)
This chapter details cnMaestro support for the Citizens Broadband Radio Service subscription which is required to manage CBRS-compliant devices in the 3.6 GHz band (3550 MHz to 3700 MHz).
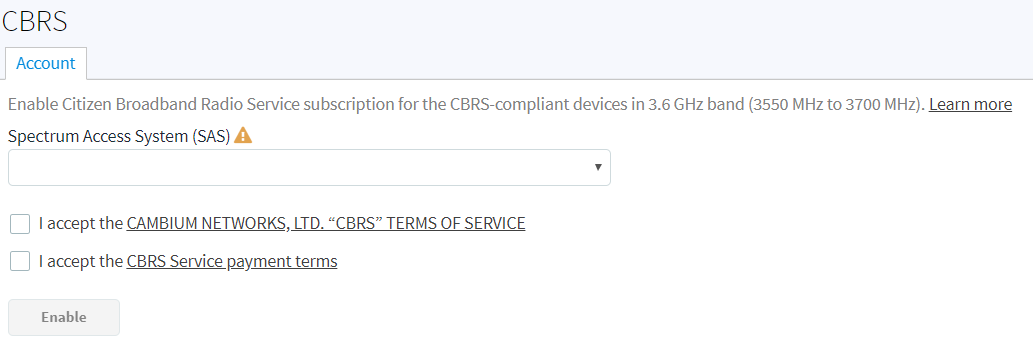
Enabling CBRS in Cloud
|
1.
|
Login to a cnMaestro Cloud NMS account or Cloud Anchor account (if hosting on-premises). |
|
2.
|
Navigate to Services > CBRS page. |
|
3.
|
Select preferred Spectrum Access System (SAS) vendor. |
|
4.
|
Click I accept the CAMBIUM NETWORKS, LTD. "CBRS" Terms of Services and I accept the CBRS Service payment terms to activate Enable button. |
|
6.
|
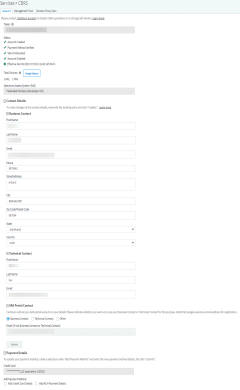
In the Billing Information window pop-up enter the following: |
Business Contact
Technical Contact
Enable Same as Business Contact or enter a separate Technical Contact.
SAS Portal Contact
Cambium Networks creates the SAS portal account on behalf of the operator.

|
7.
|
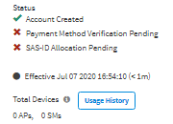
The Account page displays: |
Token used for authenticated communication with SAS through Cambium Domain Proxy. It gets generated automatically once CBRS is enabled for the Cloud account.
|
l
|
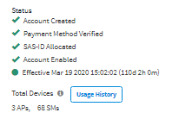
Displays the account status.| Pending Status | Success Status |
|---|
 | 
|
|
|
1.
|
Account Creation: Displays as Account Created once the account is enabled. Refer to Step f for entering contact information and enabling account. |
|
2.
|
Payment Method: Displays as Verified once the Payment Details are approved. Refer to Step g Payment Details. |
|
3.
|
SAS ID: Once the payment details are verified, the SAS ID is allocated automatically.
| NOTE It may take 1 day to get the SAS ID. |
|
|
|
Grey: indicates the Pending Status. |
|
|
Green: indicates Success Status.
|
|
|
Red: indicates the account has been Deactivated. |
|
c.
|
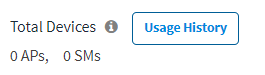
Total Devices: Displays the count of Total Devices registered with the SAS using the Token ID. Usage History provides the list of devices registered with Month and Year. |
|
|
NOTE
Initially the device counts will be 0 APs and 0 SMs.
|
|
d.
|
SAS: Displays the SAS vendor preferred by the operator.
| NOTE Contact Cambium support to disable CBRS operation or to change SAS Vendor. |
|
|
e.
|
SAS: An operator needs to select which SAS vendor they prefer. |
For new CBRS account migrations, this information would have already been entered inEnabling CBRS in Cloud. Review and update if necessary, else refer to Payment Details.
Cambium Networks selectively communicates with both the Business Contact and the Technical Contact with changes of interest: such as SAS administrator updates, CBRS initiative changes from the CBRS Alliance and WInnForum, and announcements of new Cambium Network CBRS features and options.
Business Contact
Cambium Networks communicates with the Business Contact for all commercial aspects of the CBRS Service such as invoicing, payment, change in terms, change in pricing, and other details. This page requires:
Technical Contact
Cambium Networks communicate with the Technical Contact: such as software updates, release notes, learning guides, technical issues, etc.
SAS Portal Contact
Cambium Networks sets up the SAS portal account on behalf of the operator. Please select whether to use the Business Contact, Technical Contact, or Other.
| NOTE Google requires a Gmail address for registration. |

|
|
NOTE
Clicking update the Account Page will overwrite the current entries.
|
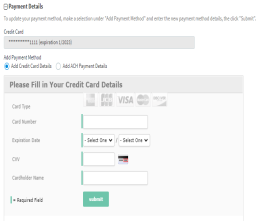
Select one of the payment methods below:

Add Credit Card Detail
Enter the following and click Submit:
|
|
16 digit Credit Card Number. |
|
|
Expiration Date and Year on the card. |
|
|
CVV and Cardholder Name. |
Add ACH Payment Method
Enter the following and click Submit:
|
n
|
Select one of the following for Account Type: |
|
n
|
Bank Name and Account Holder Name. |
_263x204.png)
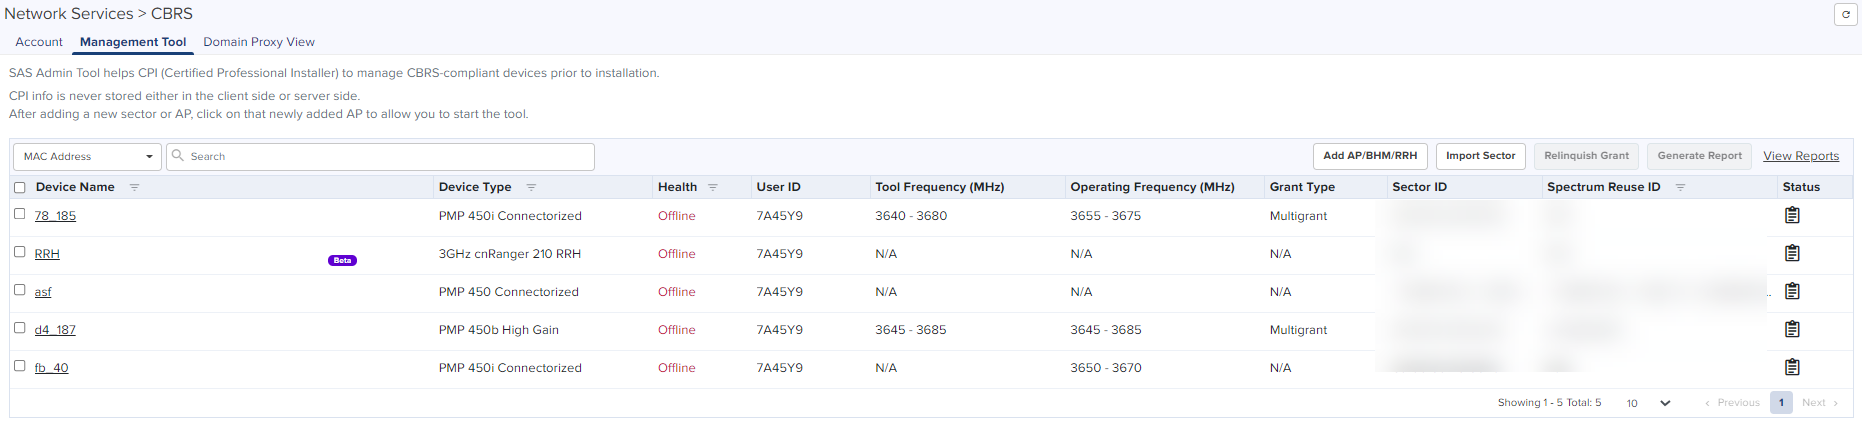
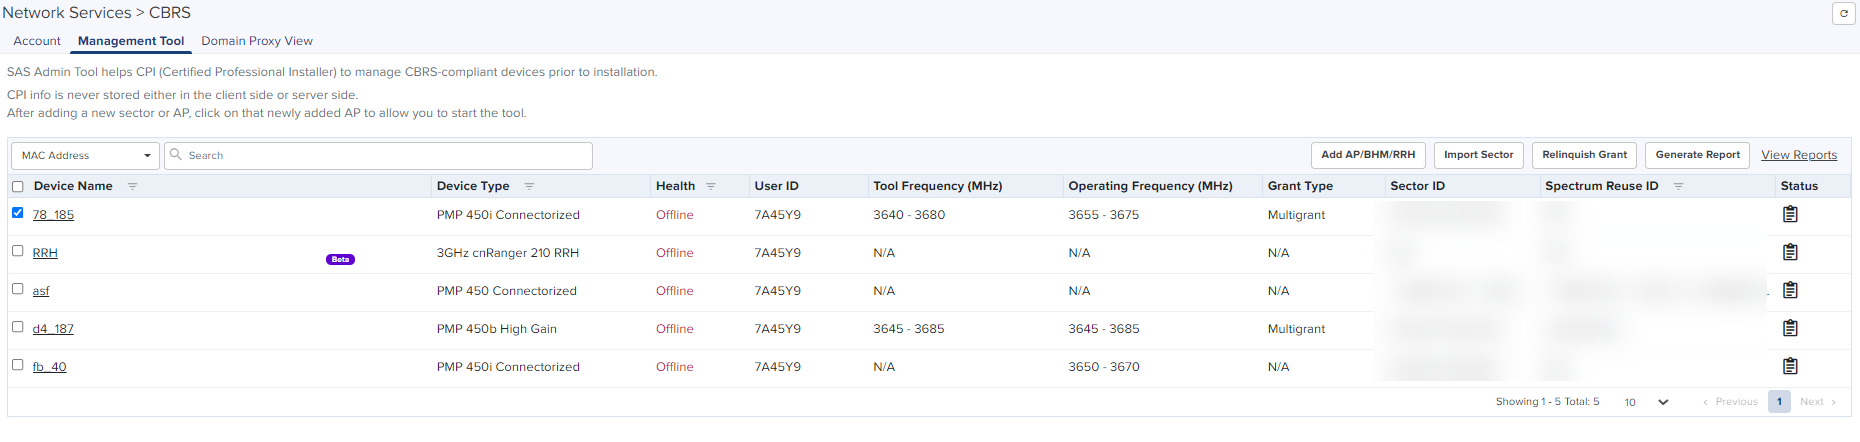
Management Tool
The Management Tool allows one to register CBRS devices to the SAS provider before physically connecting CBRS-complaint devices to the network. The following Cambium CBRS-compliant devices operate in 3.6 GHz band frequency, ranging from 3550 to 3700 MHz:
|
|
NOTE
The CBRS Multi-Grant feature is first supported in cnMaestro 3.0.2 and PMP 20.2.
|
|
|
PMP 450i AP and SM 3 GHz |
|
|
PMP 450 AP and SM 3.6 GHz |
|
|
PTP 450i BHM and BSHS 3 GHz |
|
|
PTP 450 BHM and BHS 3.6 GHz |
|
|
LTE 3 GHz cnRanger 201 SM |
|
|
LTE 3 GHz cnRanger 210 RRH |
The CBRS procedure can be performed by an authorized CPI (Certified Professional Installer). CPIs are required to enter necessary credentials to update the CBRS parameters.
A CBRS sector view is shown below:
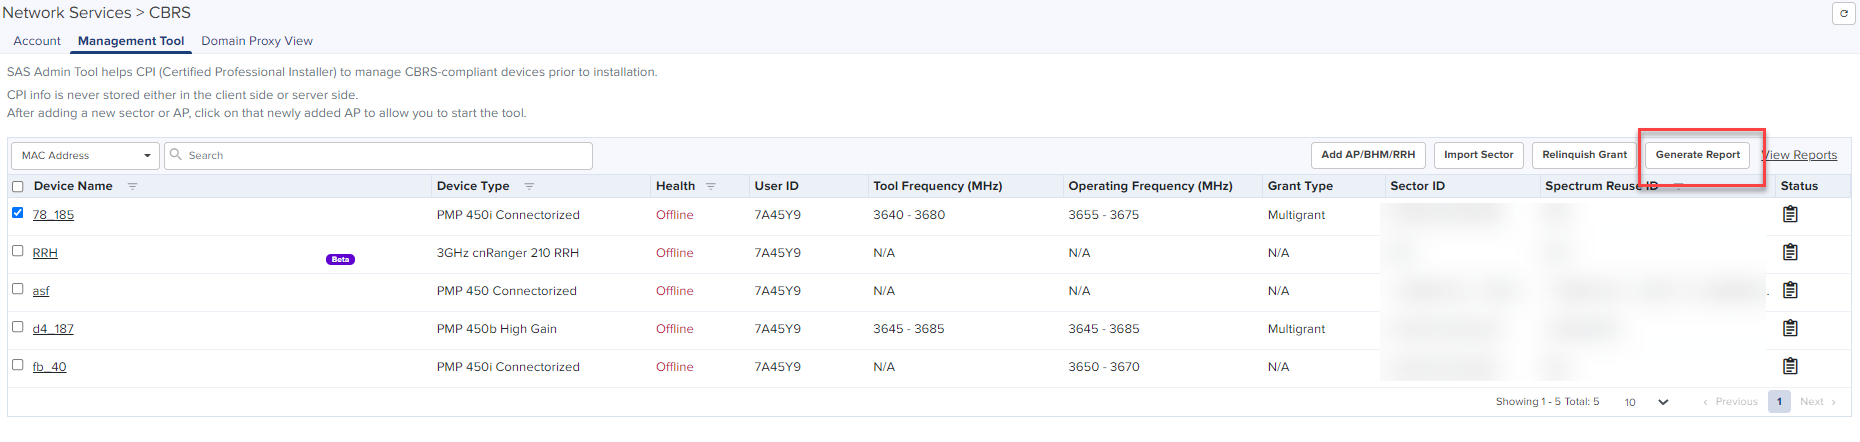
Generate Report
The Generate Report button allows one to download multiple device reports in a .CSV format.
Relinquish Grant
The Relinquish Grant button relinquishes all grants of selected sector and places devices in the Registered state. The device will start the Multi-Grant procedure if the Multi-Grant feature is enabled on the device.
|
|
NOTE
|
|
Relinquish Grant can be performed only for the Config_Synced devices running in Single Grant. |
|
|
PMP devices should be upgraded to release 20.2, which supports the Multi-Grant feature. |
|
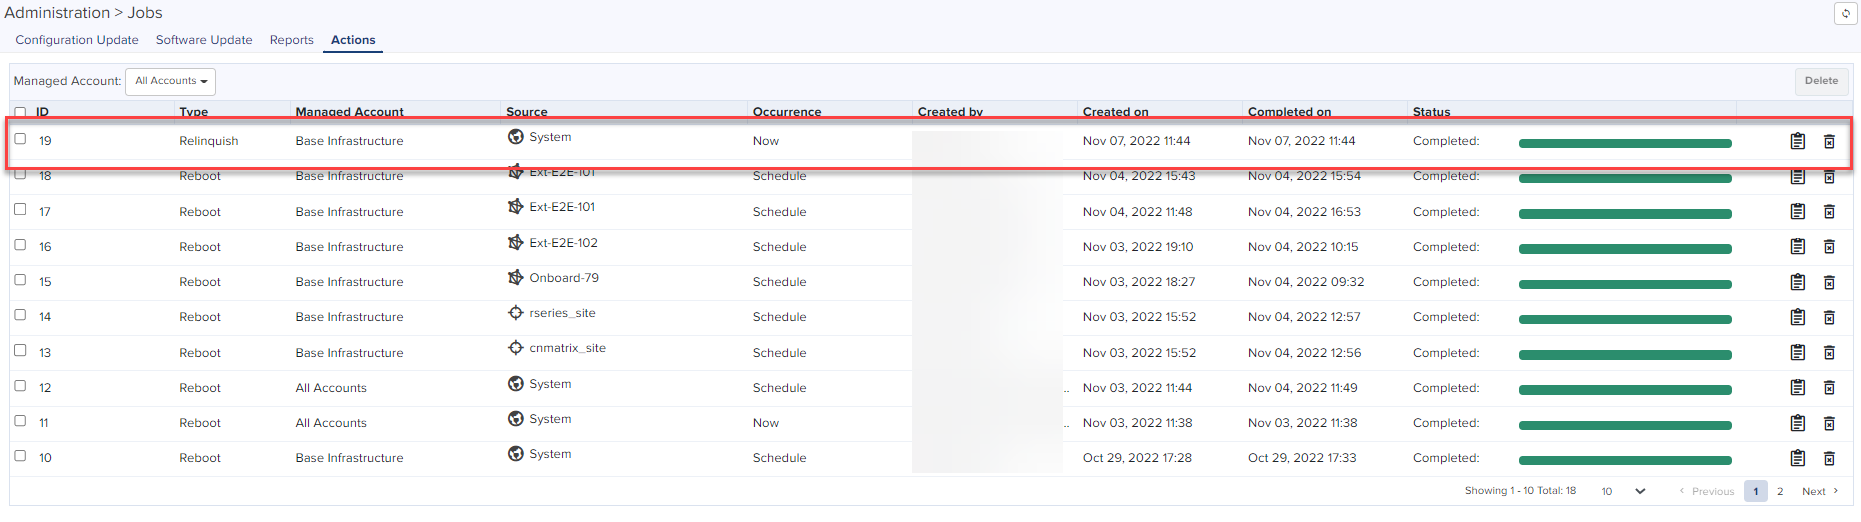
Relinquish grant creates a job in Action page, when relinquish of sector is initiated from Management Tool page.
Creating a Management Tool Sector
A sector can be created by two ways:
|
|
Add AP/BHM/RRH: Add all parameters manually of an AP/BHM/RRH. |
|
|
Import Sector: Upload a file with details from all sector devices. |
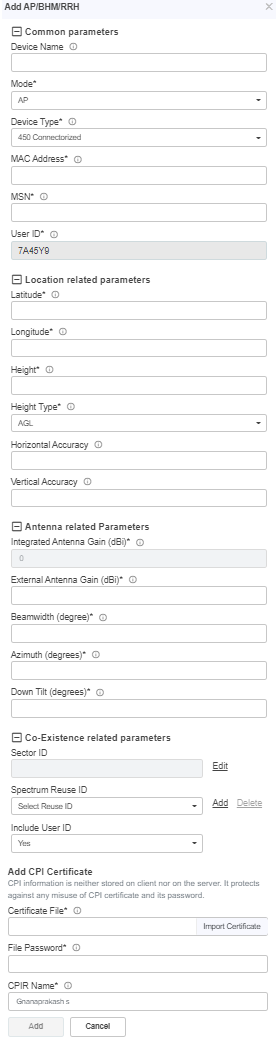
Add AP/BHM
|
1.
|
Navigate to Services > CBRS > Management Tools and click Add AP/BHM/RRH. |
|
2.
|
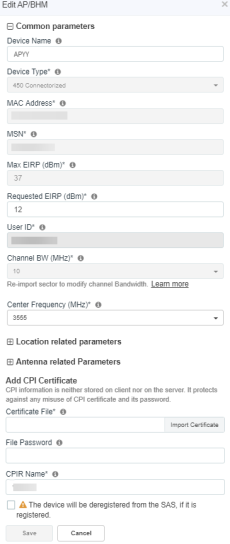
Enter all parameters under the following categories when the user selects the Mode as AP/BHM: |
|
|
Common Parameters: Device Name, Mode, Device Type, MAC Address, and MSN. |
|
|
Location Related Parameters: Latitude, Longitude, Height, and Height Type, Horizontal Accuracy, and Vertical Accuracy. |
|
|
Antenna Related Parameters: External Antenna Gain, Beamwidth, Azimuth, and Down Tilt. |
|
|
Co-Existence Related Parameters: Sector ID, Spectrum Reuse ID, and Include User ID. |
|
|
NOTE
|
|
Include User ID is applicable only for PMP devices, when SAS is Federated Wireless. |
|
|
Select Yes or No to Include user ID. |
|
|
|
Add CPI Certificate: Certificate File, File Password, CPIR Name. |
|
|
Click Add to add a sector. |
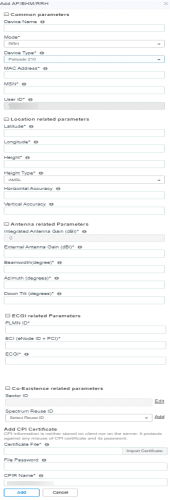
Add RRH
|
1.
|
Navigate to Services > CBRS > Management Tools and click Add AP/BHM/RRH. |
|
2.
|
Enter all parameters under the following categories when the user selects the Mode as RRH: |
|
|
Common Parameters: Device Name, Mode, Device Type, MAC Address, and MSN. |
|
|
Location Related Parameters: Latitude, Longitude, Height and Height Type, Horizontal Accuracy, and Vertical Accuracy. |
|
|
Antenna Related Parameters: External Antenna Gain, Beamwidth, Azimuth, and Down Tilt. |
|
|
ECGI Related Parameters: PLMN ID, ECI (eNode ID + PCI), and ECGI. |
|
|
Co-Existence Related Parameters: Sector ID and Spectrum Reuse ID. |
|
|
Add CPI Certificate: Certificate File, File Password, CPIR Name. |
|
3.
|
Click Add to add a sector. |
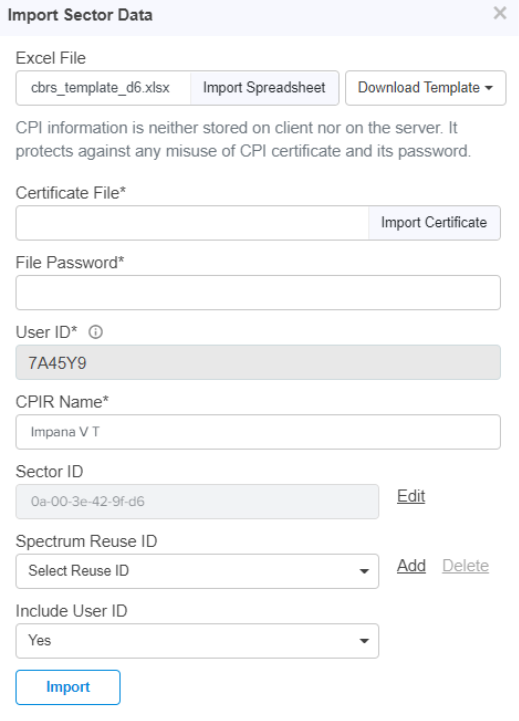
Import Management Tool Sector
To import a sector:
|
1.
|
Navigate to Services > CBRS > Management Tool and click Import Sector button. |
|
2.
|
Click Download Template if user does not have an Import Sector template. Users can download two different template formats: |
|
3.
|
Click Import Excel to select Import Sector template file. File must be Microsoft Excel format (.xlsx) or OpenDocument Spreadsheet (ods) format. |
|
4.
|
Enter CPI credentials: |
|
a.
|
Upload CPI Certificate File by clicking Import Certificate. |
|
b.
|
Enter CPI File Password. |
|
c.
|
Enter CPI Registered Name. |
|
6.
|
Select Spectrum Reuse ID from the drop-down. |
|
7.
|
Select Include User ID. |
|
|
Selecting Yes to Include User ID prefixes the User ID to the Sector ID and Spectrum Reuse ID in the registration message of the SAS. |
|
|
NOTE
|
l
|
Include User ID is applicable only for PMP devices, when SAS is selected as Federated Wireless. |
|
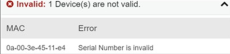
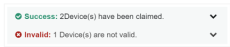
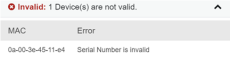
Import status is displayed as Success, Info, and Invalid.

|
9.
|
Details of Success, Info, and Invalid section can be seen by clicking arrow ( ). ). |
|
10.
|
If the device is already claimed, it can be onboarded by clicking the onboard link. |

Management Tool Sector Statistics
To view Sector Statistics:
|
1.
|
Navigate to Services > CBRS > Management Tool. |
|
2.
|
Click View Sector Statistics  under Status. under Status. |

|
3.
|
Sector Statistics window pops up. |

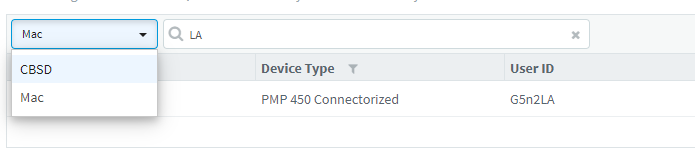
Search Management Tool Sector
To search for a sector:
|
1.
|
Navigate to Services > CBRS > Management Tool. |
|
|
For CBSD: Search by CBSD ID. |
|
|
For MAC: Search by MAC Address. |
|
3.
|
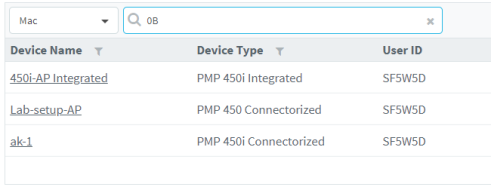
Enter text in search box to display filtered records. |
|

|
NOTE:
|
|
If an AP device is entered into Search, it displays both AP devices and the related SM devices. |
|
|
If an SM devices is entered into Search, it displays only SM devices. |
|
|
4.
|
Filter AP or sectors can be cleared by clicking  or Clear button. or Clear button. |
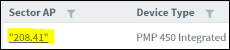
Sector View
|
1.
|
Click a sector from the Sector AP column to get the list of devices. |
|
2.
|
All devices of the sector are displayed. |

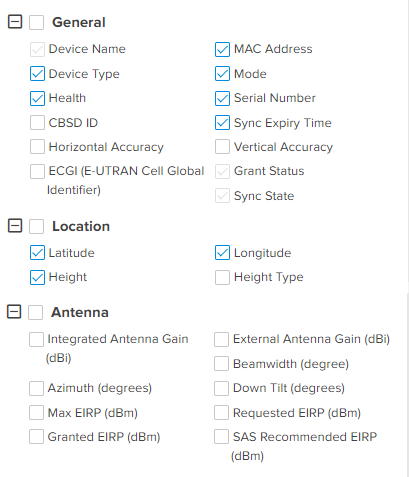
Sector Details View
|
|
The Sector Details view displays the following fields by default: |
|
|
Device Name, Device Type, Mode, Health, MSN, Latitude, Longitude, Sync Expiry Time, Height, Registered, Sync State, Actions. |

|
|
NOTE:
If the device is Config_Synced, the CBSD state of the device will be updated from the device in real-time.
|
|
|
SM can be added in the sector by manually entering all parameters using Add SM button or uploading a file containing all SM details using Import SMs button. |
|
|
Action column can edit or delete any device in the sector. Edit and Delete buttons are available depending upon the device state. Refer to Edit device and Delete device for more details. |
|
|
To include additional fields to be displayed in the Sector Details view, by select required fields in the column selector( ). ). |
|
|
User can use following button to control the CBRS procedure: |

|
|
Start and Stop: manage to start and stop CBRS procedure of a sector. |
|
|
Reinitialize: restarts the CBRS procedure and reinitializes the devices. |
|
|
Deregister: deregisters the device (single or multiple). |
|
|
Spectrum Inquiry: checks the availability of frequencies. |
|
|
Delete: deletes the device (single or multiple). |
|
|
Unblock: clears the de-registered state on an LTE, allowing a registration or reregistration request. |
|
|
Export: exports the sector data in .xlsx format. |
|
|
Import: imports the SM in the sector. |
|
|
Relinquish Grant: relinquishes grants generated in Wide-Grant mode. |
|
|
Once the sector is authorized (AUTHORIZED state),  button transfers grant details from the Management Tool to real devices. button transfers grant details from the Management Tool to real devices. |
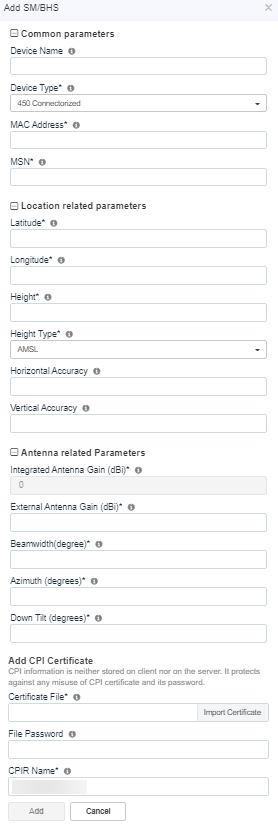
Add SM or BHS
|
1.
|
Navigate to Services > CBRS > Management Tool > select a sector. |
|
2.
|
Click Add SM or BHS to add SM in a sector. |
|
3.
|
Enter all parameters under following categories: |
|
a.
|
Common: Device Name, Device Type, MAC Address, and MSN. |
|
b.
|
Location: Latitude, Longitude, Height and Height Type, Horizontal Accuracy, and Vertical Accuracy. |
|
c.
|
Antenna Parameters: Integrated Antenna Gain, Beam width, Azimuth, and Down Tilt. |
|
d.
|
Add Certificate: Certificate File, File Password, and CPIR Name. |
|
4.
|
Click Add to add an SM. |
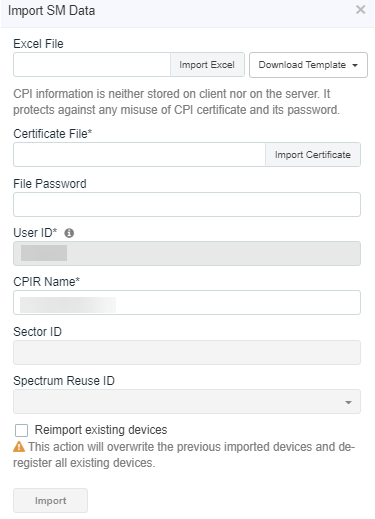
Import SMs
|
1.
|
Navigate to Services > CBRS > Management Tool and select a sector. |
|
2.
|
Click Import button to import SMs into a sector. |
|
3.
|
Enable the ReImport Devices to overwrite the previous imported data and deregister all existing devices. |
|
4.
|
Click Download Template if user does not have Import Sector template. Users can download two different template formats: |
|
5.
|
Click Import Excel to select Import Sector template file. File must be Microsoft Excel format (.xlsx) or Open Document Spreadsheet (ods) formats. |
|
6.
|
Enter the following CPI credentials: |
|
|
Upload CPI Certificate File by clicking Import Certificate button. |
|
|
Enter CPI File Password. |
|
|
Enter CPI Registered Name. |
Import status will be shown under Success, Info, and Invalid sections.
|
8.
|
Details of Success, Info and Invalid can be seen by clicking . |
|
9.
|
If the devices is already claimed, it can be onboarded by clicking the onboard link. |

|
10.
|
Once the user clicks Import, a job is scheduled. |

Export Sector
|
1.
|
Navigate to Services > CBRS > Management Tool and then select a sector. |
|
2.
|
Click Export button to export the sector (export as xlsx). |

|
3.
|
Once the user clicks Export, a job is scheduled. |

|
4.
|
Once the Job status is Completed, Download the Sector xlxs. |

|

|
NOTE:
Download button is enabled only for two hours after the export job completes.
|
|
5.
|
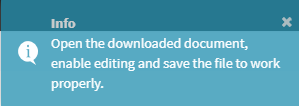
User can use the .xlxs file for importing back into the sector. To import, save the file as shown in the below figure. |
Edit Device
|
1.
|
Navigate to Services > CBRS > Management Tool and select a sector. |
|
2.
|
Click Stop button if the CBRS procedure is running. |
|
3.
|
Click Edit button to edit device parameters. |
|
4.
|
Enter CPI credentials: |
|
|
Upload CPI Certificate File by clicking Import Certificate button. |
|
|
Enter CPI File Password. |
|
|
Enter CPI Registered Name. |
|
5.
|
After editing the device. The device should go to derigestered state. |
Delete Device
|
1.
|
Navigate to Services > CBRS > Management Tool and select a sector. |
|
2.
|
Click Stop button if the CBRS procedure is running (the CBRS procedure is running if the START procedure described below has been invoked, and if all devices in AUTHORIZED state). |
|
|
Select SM to deregister if it is not in UNREGISTERED state (Refer to the Live Status Update) |
|
4.
|
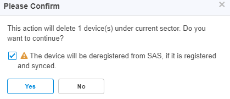
Once the SM selected click Delete and display popup All or Selected. click Selected: |
|
|
All :deletes the complete registered SM devices. |
|
|
Selected :deletes the selected single device. |

|
6.
|
Once the user clicks Yes, a job will be scheduled. |

|
|
All SMs of the sector must be deregistered and deleted before deleting the AP. Refer to the Deregistration procedure to deregister all SM devices. |
|
|
Select AP of the sector to delete. |
|
|
NOTE:
If the procedure is started for the device and it is registered, then, while deleting the device, Deregister checkbox should be selected otherwise the deletion fails.
|
Unblock Device
|
1.
|
Navigate to Services > CBRS > Management Tool and select a sector. |
|
2.
|
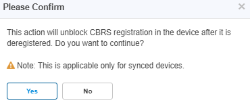
If LTE device is Config Synced, and if device deregister flag is enabled, unblock removes the deregistartion flag on the device. |
|
3.
|
Once the device is selected, click Unblock and choose All or Selected from the drop-down. |
|
|
All :unblock the complete registered devices. |
|
|
Selected :unblocks the selected single device. |

|
4.
|
Click Selected display the Please Confirm window. |
|
5.
|
Click Yes to confirm the action. |
Start CBRS Procedure
The Start button starts the CBRS procedure for a sector.
|
1.
|
Navigate to Services > CBRS > Management Tool and select a sector. |
|
2.
|
Click Start to start CBRS procedure of a sector. |
|
3.
|
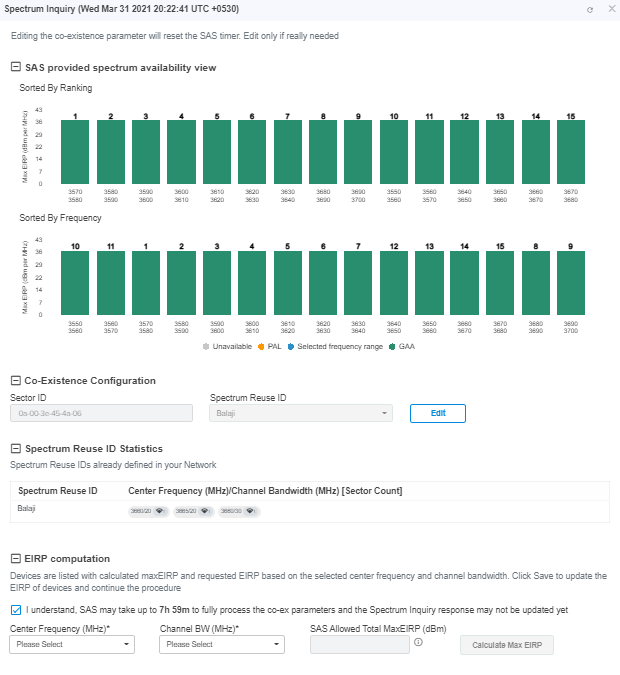
Once the user clicks start, the Spectrum Inquiry window pops up. |

|

|
Note:
|
l
|
Multi-Grant is enabled by default. |
|
l
|
Sorted By Ranking is applicable for users selecting Google or Federated Wireless SAS. |
|
l
|
User can enable or disable the multigrant only if the device version is less than 21, if device version is 21 and above only multigrant is possible. |
|
|
4.
|
User can disable the Multi-Grant feature by disabling the checkbox This feature will enable multi grant on the tool. For more details refer Multiple Grant. |
|
5.
|
Click Edit to edit Co-Existence Configuration and EIRP Computation. |
|
|
Spectrum Reuse ID Statistics displays the devices running on different sector, channels, and bandwidth based on the Spectrum Reuse ID. |
|
6.
|
Once the Spectrum Inquiry is verified, click Save. |
The Sector is created displays as shown below:

|
|
NOTE:
|
|
If the device is already synced with the Management Tool, the CBRS Start and Stop procedures are not applicable for all the synced devices. |
|
|
If user does not see the Start button, it means the CBRS procedure is already running. |
|
|
If all devices of the sector are in AUTHORIZED or HALT status and the user tries to start the CBRS procedure, the Start button will go to Stop state (as CBRS procedure is completed for all devices). |
|
Multi-Grant
Multi-Grant feature divides selected channel bandwidth into multiple of 10 MHz channels. If the selected channel bandwidth is 5 MHz or low/high frequency contains 5 MHz raster, the slice would be in 5 MHz channel. Each slice will initiate a separate Grant procedure.
To enable Multiple Grant for a new sector:
|
1.
|
Navigate to Services > CBRS > Management Tool and select a sector. |
|
2.
|
Click Start to start CBRS procedure of a sector. |
|
3.
|
Once the user clicks Start. |
The Spectrum Inquiry window pops up as shown below.
|

|
NOTE:
|
l
|
Multi-Grant is enabled by default. |
|
l
|
Include User ID is applicable only for PMP devices, if user selects SAS is either Federated Wireless. |
|
|
4.
|
Click Edit to edit Co-Existence Configuration and EIRP Computation. |
|
5.
|
Accept the checkbox process of the Co-Existence parameters. |
|
|
NOTE:
The Federated Wireless or Google SAS might need hours to fully process the Co-Existence parameters in the Registration, (before they are properly reflected in the Spectrum Inquiry Response). For more details see the CBRS Standalone Procedures Guide.
|
|
6.
|
Once the Spectrum Inquiry is verified, click Save. |
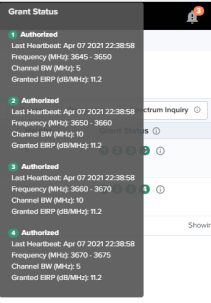
A Sector created with Multiple Grants will be displayed as shown below:

To view the Grant Status click the info icon  .
.
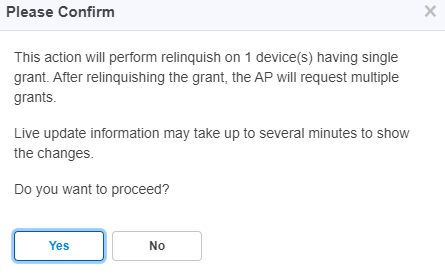
Relinquish Grant
Relinquish Grant relinquishes all grants of selected sector. This will make devices enter the Registered state. The device will start Multi-Grant procedure if Multi-Grant feature is enabled on it.
To Relinquish Grant Perform as follows:
|
1.
|
Navigate to Services > CBRS > Management Tool and select a sector with Single Grant. |
|
2.
|
Once the SM is selected, click Relinquish Grant to display All or Selected. Click Selected. |
|
|
All: relinquish all the registered devices. |
|
|
Selected: relinquish the selected device. |

|
3.
|
Click Yes to confirm the action. |
|
|
NOTE:
Live update information may take upto several minutes to display the changes of reflected relinquish status.
|
Once the user clicks Yes, Wider Grant gets converted to the Multiple Grants as shown below:

Stop CBRS Procedure
The Stop button stops the CBRS procedure for a sector.
|
1.
|
Navigate to Services > CBRS > Management Tool and select a sector. |
|
2.
|
Click Stop button to stop CBRS procedure.
| NOTE: | | If the device is already synced with the Management Tool, the CBRS Start and Stop procedures are not applicable to the synced devices. |
| | If user does not see the Stop button, it means the CBRS procedure is already in stopped state, Start and Stop are toggles. |
| | If all devices of the sector are in AUTHORIZED state, the CBRS procedure will automatically stop. |
|
|
Reinitialize CBRS Procedure
The Re-init button allows the user to start the CBRS procedure for a sector and reinitialize selected devices (Reinitialize = Start of sector + Reinitialization of user selected devices). At least one device must be selected in order to enable the Re-init button. Clicking Re-init reinitializes selected devices to UNREGISTERED (irrespective of previous CBRS state).
|
1.
|
Navigate to Services > CBRS > Management Tool and select a sector. |
|
2.
|
Click Stop if the CBRS procedure is already running. |
|
3.
|
Select one or more devices to be reinitialized.
| NOTE: You might notice some delay in enabling Re-init button after pressing Stop. It is due to a delay in properly stopping the CBRS procedure. |
|
|
4.
|
Click Re-init to start the reinitialization procedure |
|
5.
|
Confirmation window pops up: |
|
|
NOTE:
|
|
Synced devices cannot be reinitialized. |
|
|
Reinitialize modifies or corrects the parameters. For example, if a device is in HALT state due to a parameter error, the user can stop the CBRS procedure and reinitialize the device after modifying device parameters. |
|
Deregistration
The deregistration procedure allows user to deregister the devices from the SAS server .
|
1.
|
Navigate to Services > CBRS > Management Tool and select a sector. |
|
2.
|
Click Stop button if the CBRS procedure is already running. |
|
3.
|
Select one or many devices which need to be deregistered. |
|
4.
|
Click Deregister button to deregister selected devices. |
|
5.
|
Once the user clicks Deregister, a job will be scheduled. |

|
6.
|
If deregistration fails, the reasons will be indicated under  . . |
Spectrum Inquiry
|
1.
|
Navigate to Services > CBRS > Management Tool and select a Sector. |
|
2.
|
Click Spectrum Inquiry button. |
|
3.
|
Spectrum Inquiry status button is enabled once the device is registered (REGISTERED state) to the SAS. |
|
|
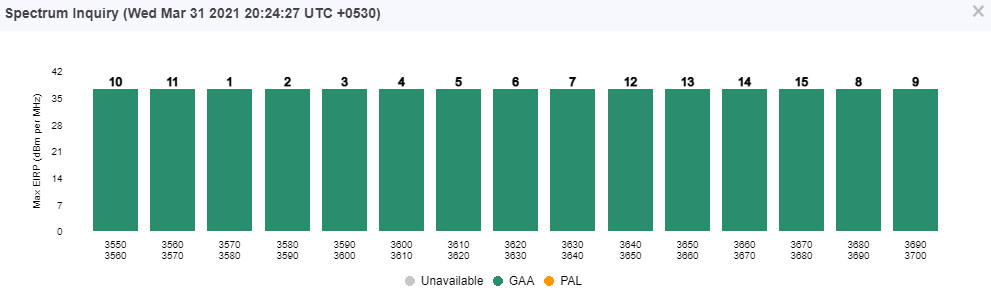
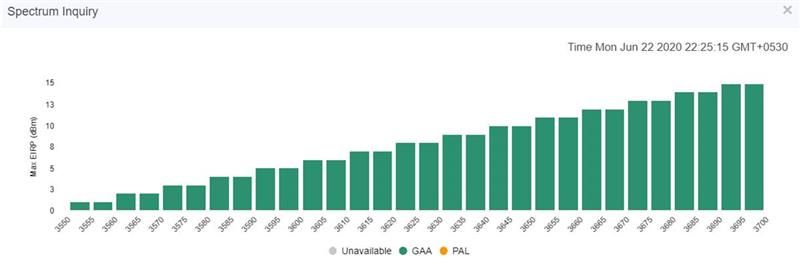
If the selected SAS is not Google, EIRP is unsupported, and Spectrum Inquiry is displayed as shown below: |
|
|
If the users is selected SAS is Google, it supports EIRP. Spectrum Inquiry displays as below: |
|
|
GAA: General Authorized Access |
|
|
PAL: Priority Access License |
Spectrum availability can be checked by hovering over frequencies.
Device Sync
The Sync procedure allows user to transfer grant information from Management Tool to respective device.
For a PMP sector, the Sync action can only be performed on an AP or BHM. The SM and BHS gets synced automatically when it comes online.
For an LTE sector, which supports a Cambium SM with a 3rd party BBU and RRH, the sync action will sync the Cambium SMs in this sector.
|
1.
|
Navigate to Services > CBRS > Management Tool and select a sector. |
|
2.
|
Click Sync button to perform sync procedure. |
|
3.
|
Click Yes on the pop-up or click NO to cancel the sync procedure. |
Once Yes is clicked, the Management Tool will check the accessibility of AP/BHM before proceeding with sync.
|
|
NOTE:
|
|
PMP SM cannot be manually synced. It is only synced automatically. |
|
|
Once the device is synced, for both PMP and LTE devices, primary management is transferred from the tool to the device itself. However, some actions and procedures are still supported on the tool. See the CBRS Consolidated Procedures Guide for more details. |
|
|
Sync procedure copies complete CBRS parameters to device and enables CBRS to transmit with configured parameters. |
|
Live Status Update
Once the device is Config synced, CBRS details like CBSD ID, Grant ID, CBSD Grant State, and Last Heartbeat Time are read from the device every 5 minutes.

It displays the possible single Grant state such as:
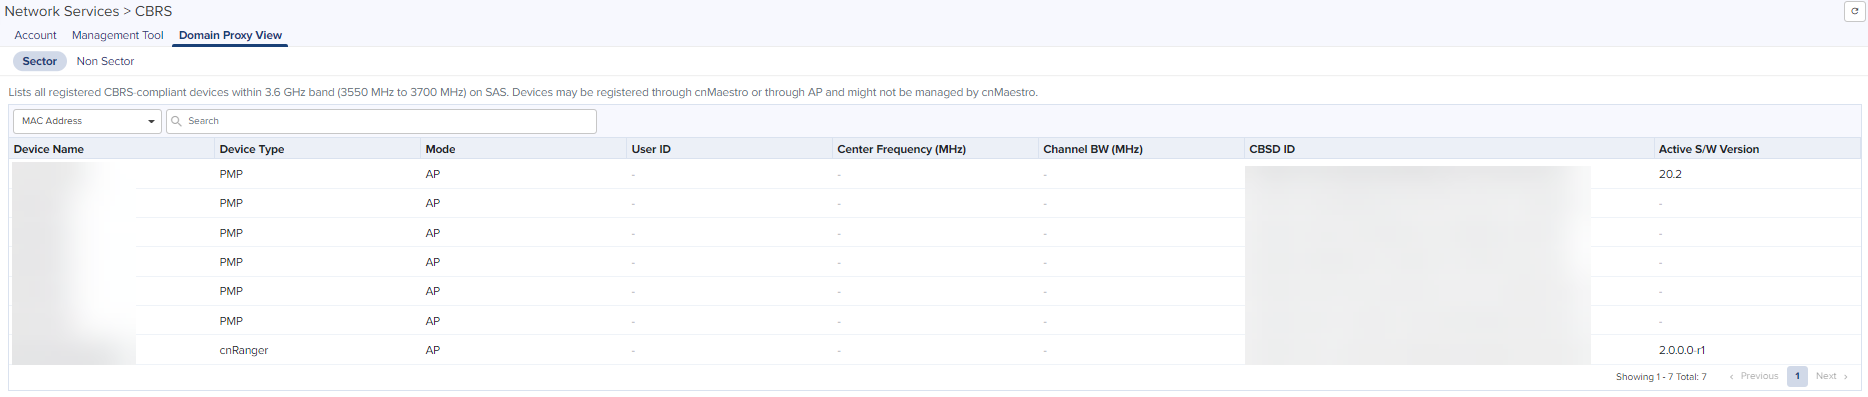
Domain Proxy View
In Domain Proxy view, Sectors and Non-Sector page helps check CBRS-complaint devices connected through this server and On-Premises server using the token ID of this server. This page displays all the devices connected to CBRS.
|
|
Sectors Page: displays the devices according to the parenting AP list. |
|
|
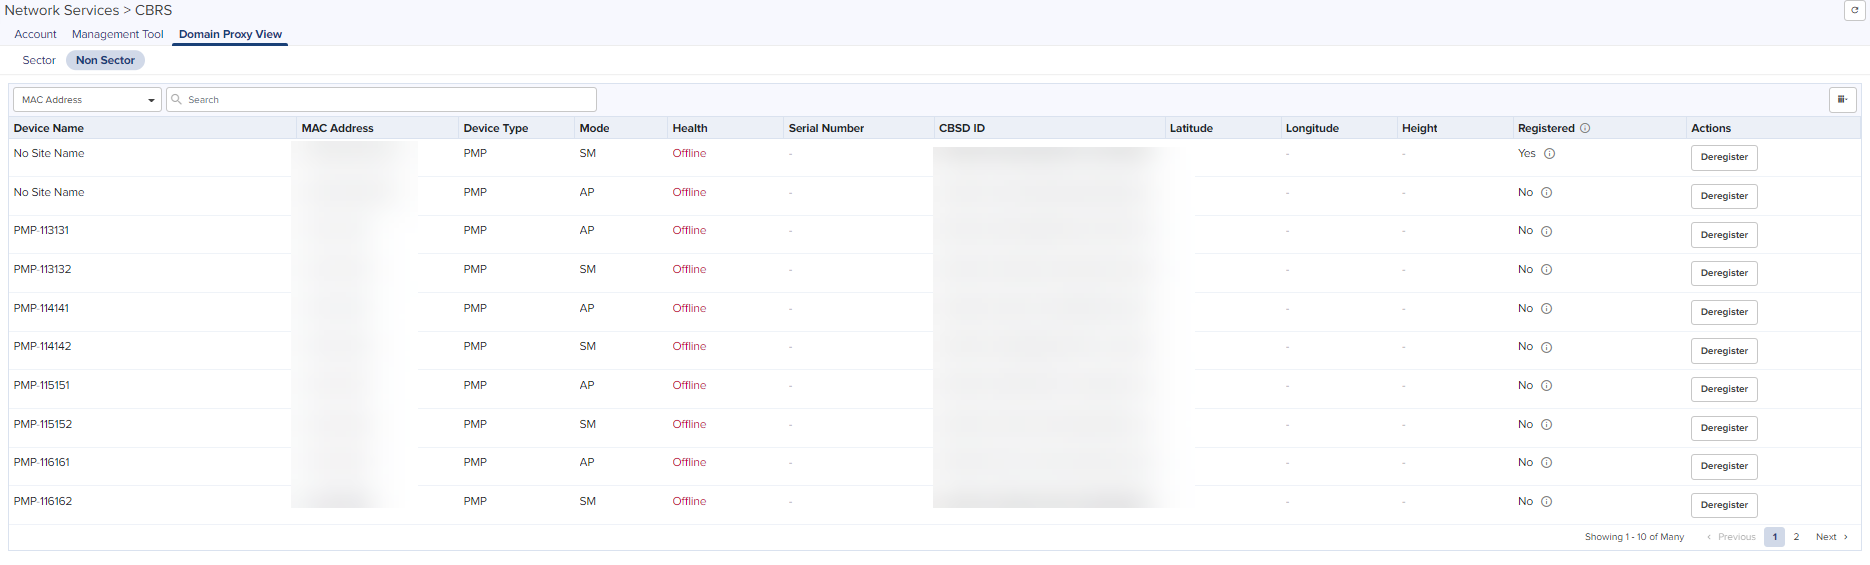
Non-Sector Page: displays each individual AP and SM of LTE and PMP. |
Searching a Domain Proxy Sector
To search a sector:
|
1.
|
Navigate to Services > CBRS > Domain Proxy View > Sector page. |
|
2.
|
Select search option CBSD or MAC. |
|
|
For CBSD: Search by CBSD ID |
|
|
For MAC: Search by MAC ID. |
|
3.
|
Enter text in search box.
| NOTE: | | If AP device is entered , it displays the both AP devices and the related SM device in the search result. |
| | If SM devices is entered , it displays only the SM devices in the search result. |
|
|
|
4.
|
Filtered device can be cleared by clicking Clear button. |
Domain Proxy Sector view
|
1.
|
Click a Sector from Sector AP column to get the list of devices. |
|
2.
|
All the devices of the sector will be displayed. |

|
3.
|
CBSD state shows current status of device and whether it is registered or deregistered with SAS. |
|
4.
|
User can use the click Deregister button to Deregister the device from CBRS. |
|
5.
|
The Sectors view displays the following columns by default: |
Device Name, Device Name, Mode, Health, MSN, Latitude, Longitude, Height, Status, and Actions.
| NOTE: User can select the additional columns by clicking on top bar Column Chooser to include additional fields. |
Searching a Domain Proxy Non Sector View
To search for a Non sector:
|
1.
|
Navigate to Services > CBRS > Domain Proxy View > Non Sector page. |
|
2.
|
Select search option CBSD or MAC. |
|
|
For CBSD: search by CBSD ID |
|
|
For MAC: search by MAC ID. |
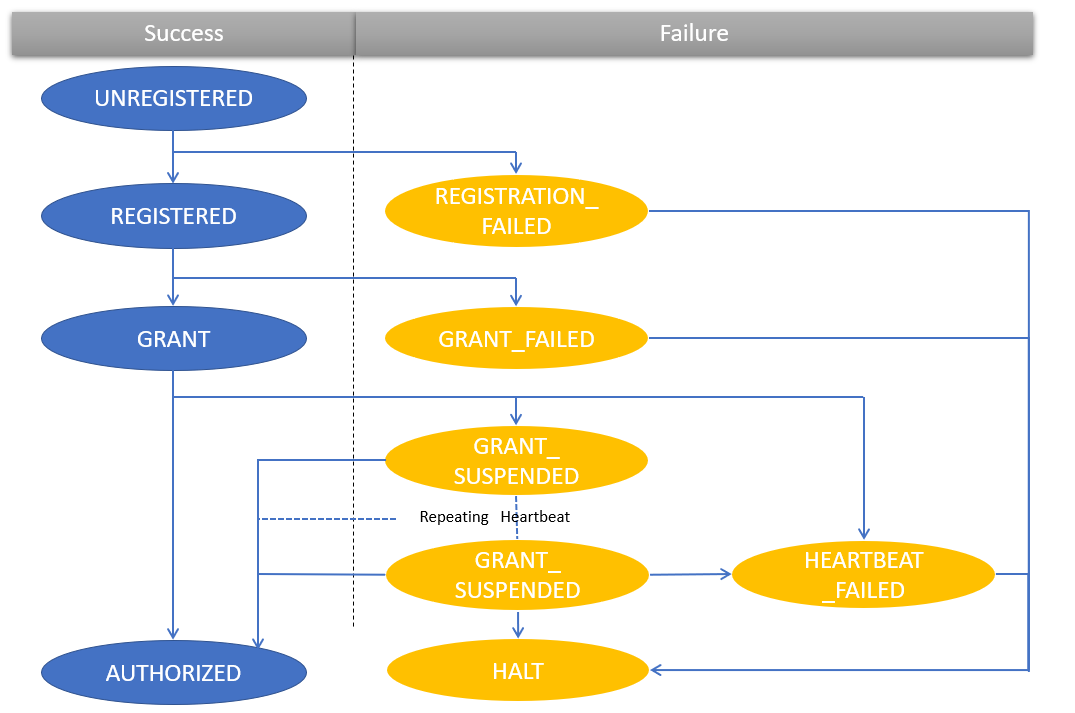
CBRS State Diagram
|
|
NOTE:
GRANT_SUSPENDED is a temporary suspend state where HEARTBEAT message will be sent for an extended period of time prior to getting AUTHORIZED.
|
The CBRS procedure has the following states:
CBRS Device Parameters
| Category |
Parameter |
Details |
|
Common
|
Channel BandWidth (MHz) |
Channel Bandwidth of AP or BHM in MHz. |
| Center Frequency (MHz) |
Center frequency of AP or BHM in MHz. |
| Device Name |
Name given to device on SAS Admin (max 120 characters. It does not get copied to the device via sync. |
| Device Type |
Drop-down selection of supported devices types. |
| MAC Address |
MAC address of the device. |
| MSN |
Serial number of device. |
| User ID |
Unique identifier is assigned by the SAS. The User ID is part of the registration request message. The wrong User ID leads to REGISTRATION_FAILED. |
|
Location
|
Height |
Device antenna height in meters. |
| Height Type |
Should be AGL or AMSL as follows:
|
|
AGL height is measured relative to the ground level. |
|
|
AMSL height is measured relative to the mean sea level. |
|
| Horizontal Accuracy |
A positive number in meters to indicate the accuracy of the device antenna horizontal location. |
| Latitude |
Latitude of the device antenna location in degrees. |
|
| Longitude |
Longitude of the CBSD antenna location in degrees. |
|
| Vertical Accuracy |
A positive number in meters to indicate the accuracy of the device antenna vertical location. |
|
Co-Existence Related Parameters
|
Sector ID
|
The default AP MAC address (allows editing the default MAC).
|
|
Spectrum Reuse ID
|
The Spectrum Reuse ID defined in the network.
|
| Include User ID |
Prefixes the User ID to the Sector ID and Spectrum reuse ID. |
|
ECGI Related Parameters
|
PLMN ID
|
Public and Mobile Network Identifier.
|
|
ECI
|
E-UTRAN Cell Identifier. It is a length of 28 bits and contains the eNodeB-ID.
|
|
ECGI
|
Enter the both PLMN ID and ECI parameters and it displays in the ECGI field.
|
|
Antenna Parameters
|
Azimuth (degrees) |
Boresight direction of the horizontal plane of the antenna in degrees with respect to True North. |
| Beamwidth (degree) |
3-dB antenna beam width of the antenna in the horizontal-plane in degrees. |
| Downtilt (degrees) |
Antenna downtilt in degrees. |
| External Antenna Gain (dBi) |
Peak gain of external antenna connected to device in dBi.
|
| Integrated Antenna Gain (dBi) |
Peak gain of integrated antenna in dBi.
|
|
Add Certificate
|
Certificate File |
CPI (Certified Professional Installer) certificate. |
| CPIR Name |
CPI registered name. |
| File Password |
CPI private password. |
Actions for Existing CBRS On-Premises Users
Current CBRS On-Premises customers maintain their CBRS billing and SAS configuration in an NMS Account. This must be updated to support Anchor accounts. To create an anchor account, refer to Manage Instances.
If an action is required for existing Cloud NMS users, the UI will display the following notification:

After clicking the notice, navigate to Services.
|
|
Link an Anchor Account to this Account: Select if managing CBRS devices in both Cloud and On-Premises. It creates an Organization that shares configuration between a Primary NMS account and a Secondary Anchor account (without deregistering existing CBRS devices). |
|
|
Convert this Account to Anchor Account: Select only if managing devices On-Premises and NMS do not have any devices. It converts the existing NMS Account to an Anchor Account. |
.png)
Link an Anchor Account to this Account
Select this to manage CBRS devices in both Cloud and On-Premises. An Anchor account must be created to manage the CBRS On-Premises devices without deregistration.
|
|
NOTE:
Cambium recommends selecting this option when the user is managing devices in both cnMaestro Cloud and On-Premises.
|
Before linking an Anchor account, please do the following:
|
|
Ensure the cnMaestro Anchor account is linked to the cnMaestro On-Premises instance(s). |
|
|
Add the Anchor account as a Secondary account to Primary NMS account. Refer to Create Organization. |
To convert the existing account:
|
1.
|
Navigate to Services > CBRS > Account page. |
|
2.
|
Select Anchor Account from the drop-down list. |
|
|
NOTE:
Users are allowed to select only one Anchor account from the drop-down list.
|
|
3.
|
Enable I authorize Cambium Networks to make changes to the selected account. |
|
4.
|
Click Request Support and a Success window pops up. |
|
|
NOTE:
The Cambium Support team validates the request and creates an Organization from the NMS and Anchor accounts within 24 hours. Alternately, you can create the Organization yourself using the directions specified earlier in this document.
|
Convert this Account to Anchor Account
Select this to manage CBRS devices in On-Premises only. It converts an existing NMS account to an Anchor account.
|
|
NOTE:
Cambium recommends selecting this option when the user only plans to manage devices using cnMaestro On-Premises. Cloud account devices must be deregisted and deleted from the NMS account and registered back to On-Premises before the conversion.
|
To convert the existing account:
|
1.
|
Navigate to Services > CBRS > Account page. |
.png)
|
2.
|
Select Convert this Account to Anchor Account. |
|
|
NOTE:
|
|
Deregister and remove all devices from the NMS account before the conversion. |
|
|
All NMS configuration will be lost when the account is converted to Anchor, including: |
|
|
Performance Graph Data, etc. |
|
|
The process of converting an NMS account to an Anchor account cannot be reversed. |
|
|
3.
|
Enable I authorize Cambium Networks to make changes to the selected account. |
|
4.
|
Click Request Support and a Success window pops up. |
|
|
NOTE:
The Cambium Support team validates the request and create an Organization from the NMS and Anchor accounts within 24 hours.
|
