Adding a subscriber (end-customer)

To enable a subscriber to manage the router using the Android or iOS application, you must add a subscriber profile in cnMaestro and send an invitation to the subscriber.

Adding a subscriber service profile

  1. Navigate to the Manage Service Providers > Managed Subscribers > Subscriber Service Profiles tab.
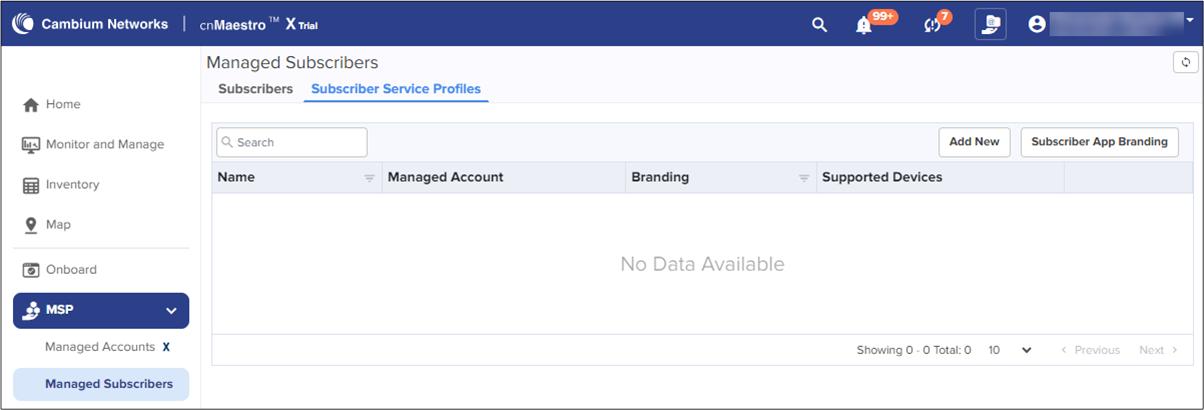
  2. Click Add New.

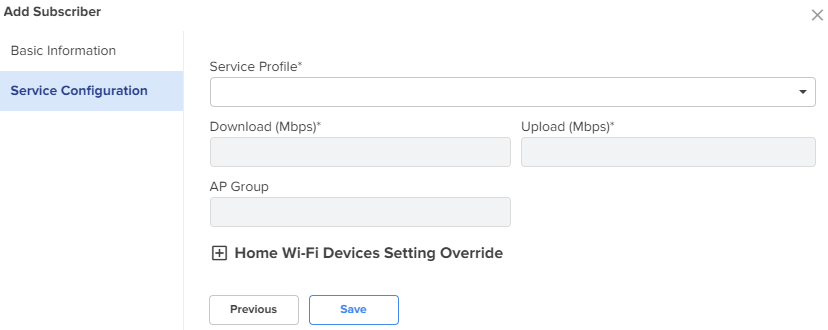
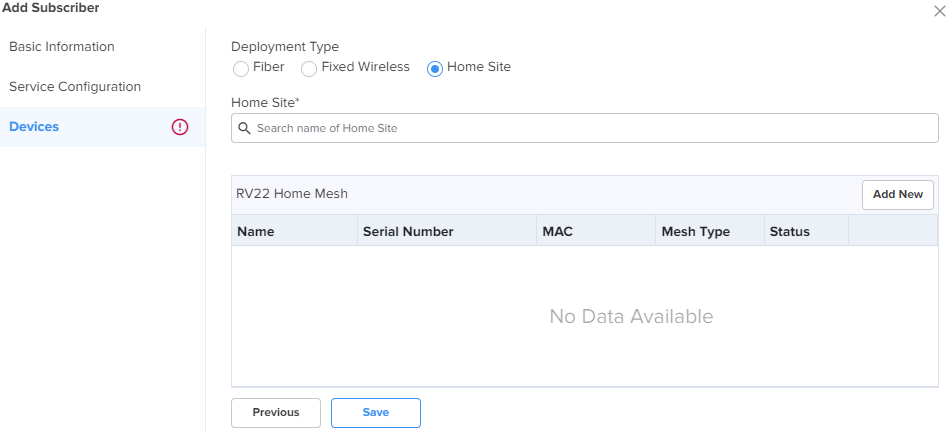
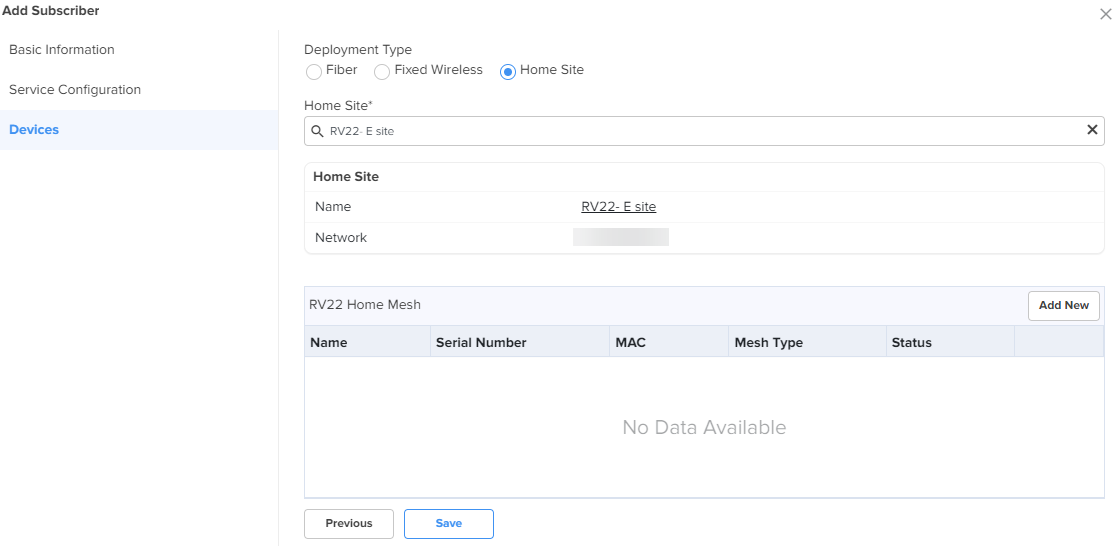
    Enter the details in the Add Subscriber Service Profile window and select the Home Mesh Router configuration to which you want to associate with the subscriber service profile.

    Configure the following parameters:

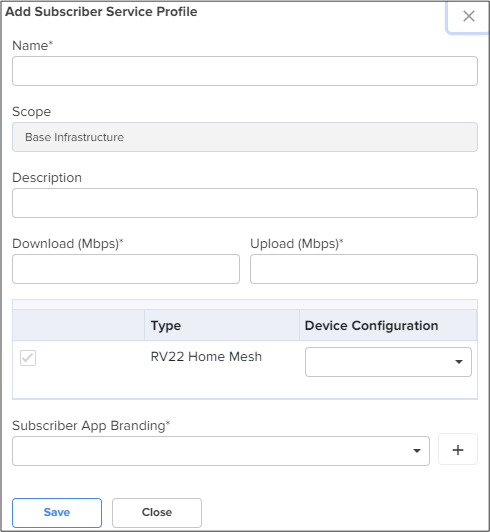
    Table 1: Subscriber Service Profile parameters

    Parameter

    Description

    Name

    Name of the subscriber service profile.

    Scope

    Specifies the availability of the subscriber service profile across managed accounts.

    The following values are supported:

    • Base Infrastructure—Subscriber service profile is available only for the global account. It is not shared with other managed accounts.

    • Shared—Subscriber service profile is shared across all managed accounts. It can be mapped to devices in the managed account, but it cannot be modified. To modify the configuration, it must be copied into the managed account and then updated.

    • Managed Account—Subscriber service profile is available only for that specific managed account.

    Note: Once the scope has been configured on a subscriber service profile, it cannot be modified.

    Description

    Brief description for the subscriber service profile.

    Download (Mbps)

    Download speed (in Mbps) configured for the profile.

    Subscribers that are onboarded to this profile will be restricted to this download speed.

    Upload (Mbps)

    Upload speed (in Mbps) configured for the profile.

    Subscribers that are onboarded to this profile will be restricted to this upload speed.

    Type

    Displays the device type as RV22 Home Mesh.

    This field cannot be modified.

    Device Configuration

    Specifies the Wi-Fi AP group (created for Home Mesh Router) that must be associated with the service profile.

    Select the group from the drop-down list.

    Subscriber App Branding

    Specifies the cnMaestro Subscriber application branding that must be used in this profile.

    All routers sent to subscribers in this service profile will have the selected branding logo and information.

    Select the required branding from the drop-down list.

    If no branding is proesent, create one by clicking the add () icon. See cnMaestro Subscriber application branding for more information.

  3. Click Save.

Adding a subscriber

  1. Click the Subscribers tab on the Managed Subscribers page.

  2. Click Add New.

  3. In the Add Subscriber window, configure the details of the subscriber in the Basic Information section.

    Table 2: Subscriber > Basic tab parameters

    Parameter

    Description

    Full Name

    Name of the subscriber.

    Scope

    Specifies the availability of the subscriber across managed accounts.

    The following values are supported:

    • Base Infrastructure—Subscriber is available only for the global account. It is not shared with other managed accounts.

    • Shared—Subscriber is shared across all managed accounts. It can be mapped to devices in the managed account, but it cannot be modified. To modify the configuration, it must be copied into the managed account and then updated.

    • Managed Account—Subscriber is available only for that specific managed account.

    Note: Once the scope has been configured on a subscriber, it cannot be modified.

    Email ID

    Email address of the subscriber.

    Phone Number

    Phone number of the subscriber.

    Customer ID

    Unique ID for the subscriber.

    Address

    Address of the subscriber where the routers will be installed.

  4. Click Next.

    The Service Configuration tab is displayed.

    Select the subscriber service profile to be associated with this subscriber from the Service Profile drop-down list.

  5. Click Save.

    A new tab, Devices appears, where you can link (or claim) the Home Mesh Router to the subscriber. See Claiming the Home Mesh Router.

    The cnMaestro Subscriber application invitation email is sent to the subscriber with the link to join the account.

    After the email is sent, you must follow the steps in Logging in to the cnMaestro Subscriber application to accept the invitation and join the account to manage the routers in the cnMaestro Subscriber application.

  6. Click Devices.

  7. Select one of the following options in the Deployment Type field:

  8. Before linking the Home Mesh Router to the subscriber, click Save.

Claiming the Home Mesh Router

After adding a subscriber profile and a subscriber, you must now associate the Home Mesh Router to the subscriber by claiming the router in cnMaestro.

To claim the router, complete the following steps:

  1. Navigate to the Manage Service Providers > Managed Subscribers > Subscribers tab.

  2. In the list of subscribers, click the subscriber name for which you want to associate the Home Mesh Router.

  3. Click the Devices tab.

  4. In the RV22 Home Mesh section, click Add New.

    The Link Subscriber window appears.

  5. In the Link Subscriber window, link the Home Mesh Router to the subscriber by any of the following methods:

  6. Click Assign.

    The assigned router appears in the Devices section.

    Note

    Click the unlink () icon to unlink the router from the subscriber.