Onboarding is the process of adding a device into cnMaestro Cloud management.
This section includes the following:
The Onboarding flow includes claiming the device (which maps it to the correct management account) and optionally pre-provisioning the device by selecting its software image and configuration. It also supports setting Device Name, Location, Software Version, and Configuration. When the onboarding process completes, the device will be under full cloud management.
A device is claimed when it is explicitly added to Cloud management using the Serial Number or Cambium ID. The difference between the two is the Serial Number is entered through the Cloud management UI and Cambium ID is entered via the Device UI or through SNMP.
|
|
Note
|
All claimed devices are placed in the onboarding queue. The devices need to be approved in order to become fully managed.
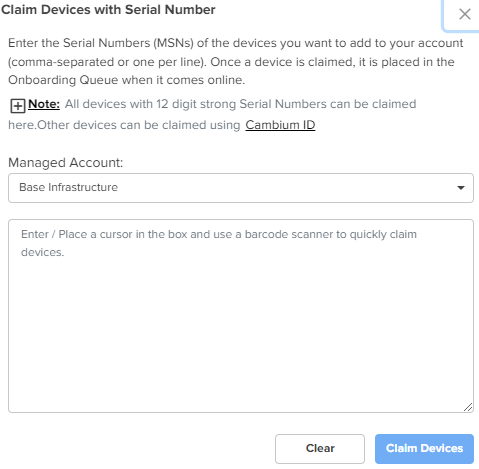
Claiming with Serial Number means entering the serial numbers of devices, one per line, and clicking the button. The system prompts the user to validate the devices before applying them. When complete, they will be placed into the onboarding queue, where they can be pre-provisioned to update software or configuration before onboarding.
Figure 1 Claiming Devices with Serial Number
To claim a device using the Serial Number:
Navigate to page > click .
with Serial Number window appears.
|
|
Note The user must manually select a PON network before approving the device. |
Enter the serial number of the device.
Click
|
|
Note Slot availability is available only for cnMaestro X account users. |
The device appears on the onboarding page.
While in the onboarding queue, the devices can be pre-provisioned with the following settings:
Figure 2 Onboarding Queue Edit Device Configuration - Basic Details
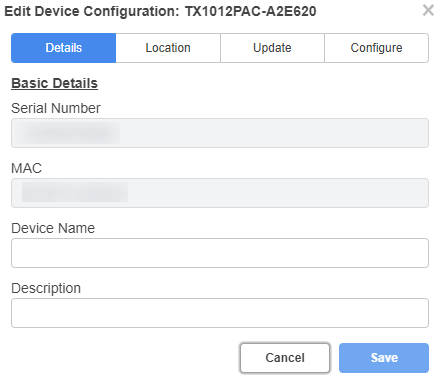
Details—Displays basic details of the device, such as Serial Number, MAC address, device name and description.
You can edit only the device name and description parameters.
Location—Displays details, such as network, tower/site to which you want to assign the device, and the location information.
You can edit all parameters in this tab.
Update—Update the software version on the device in this tab.
Configure—Decides the configuration type that must be used for configuring the device.
Click .
If slots are available, then cnMaestro approves the devices and automatically onboards the devices. However, if there are no slots available, then a corresponding error message is displayed in the Subscription Status column.
New devices periodically query cnMaestro Cloud to see if they have been claimed (it generally takes between 1 to 15 minutes to show up in an account, depending upon when the device was last rebooted). Once a device has been added to a Cloud management account, it will be visible in the Onboarding Queue.
|
|
Note Devices must be able to access https://cloud.cambiumnetworks.com to be claimed and onboarded. HTTPS proxies are currently not supported. If your device is not showing up in the Cloud management UI, you should verify network connectivity and reboot the device to prompt more frequent connection attempts. |
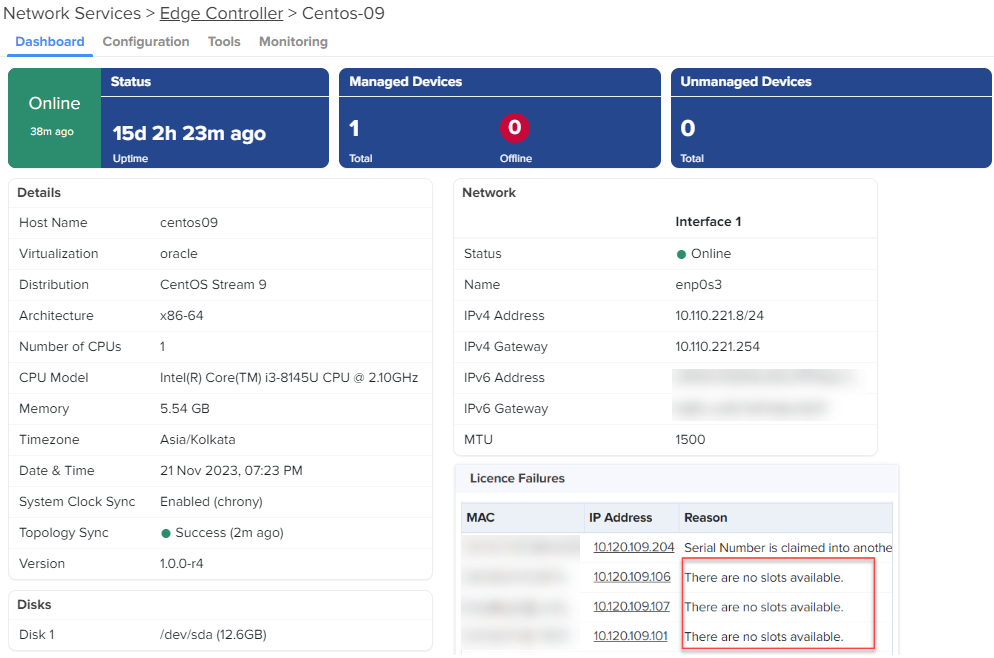
Not Enough Slots available in PTP 820/850 devices
User receive the license failure message in PTP 820/850 device dashboard, when no slots are available.
Devices in the Onboarding Queue must be approved before they are updated and added to the Cloud Management. Click the approval button in the device to onboard. Unapproved devices will remain in the Onboarding Queue indefinitely.
|
|
Note
|
Devices that have completed onboarding remain in the Onboarding Queue for one week.
The Cambium ID is defined when the Cloud management is created. You can view it on the page; it uniquely identifies the account.
To claim a device with Cambium ID, you need to have access to the device. Cambium ID claiming is required for devices that do not have a 12-character Serial Number, and it is optional for devices with a 12-character Serial Number. There are two ways to claim a device with Cambium ID.
|
Type |
Description |
|---|---|
|
Device UI |
Enter the Cambium ID/Onboarding Key directly into the device UI. This prompts the device to access Cambium Cloud and be placed in the onboarding queue. |
|
Device SNMP |
The Cambium ID/Onboarding Key can also be entered into the device over SNMP. This allows one to quickly onboard existing devices using an SNMP manager. The correct OID will be dependent upon the device type. The string entered into the OID should be of the format “<Cambium ID>:<Onboarding Key>”. |
The directions for each specific device type are presented later in this chapter. Once devices are added to the Onboarding Queue using Cambium ID, the administrator must approve them prior to them being onboarded.
You must configure the Cloud Manager to support Cambium ID onboarding. Once enabled, Cambium ID onboarding will work for all device types.
Figure 3 Cambium ID Configuration
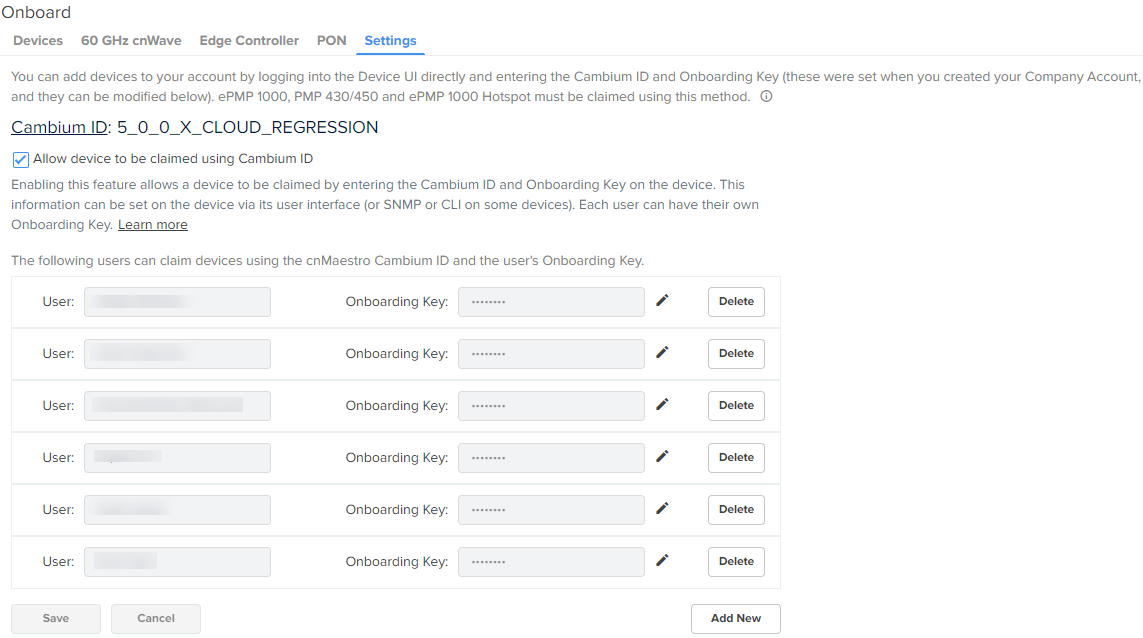
An Onboarding Key must be associated with a Cambium ID before onboarding. This provides security and tracking benefits for onboarded devices. The Onboarding Key can be configured at Onboard > Settings.
Each onboarding key is mapped to an account administrator. This allows Cambium Cloud to know who is onboarding a device. Onboarding Keys can also be revoked if needed.
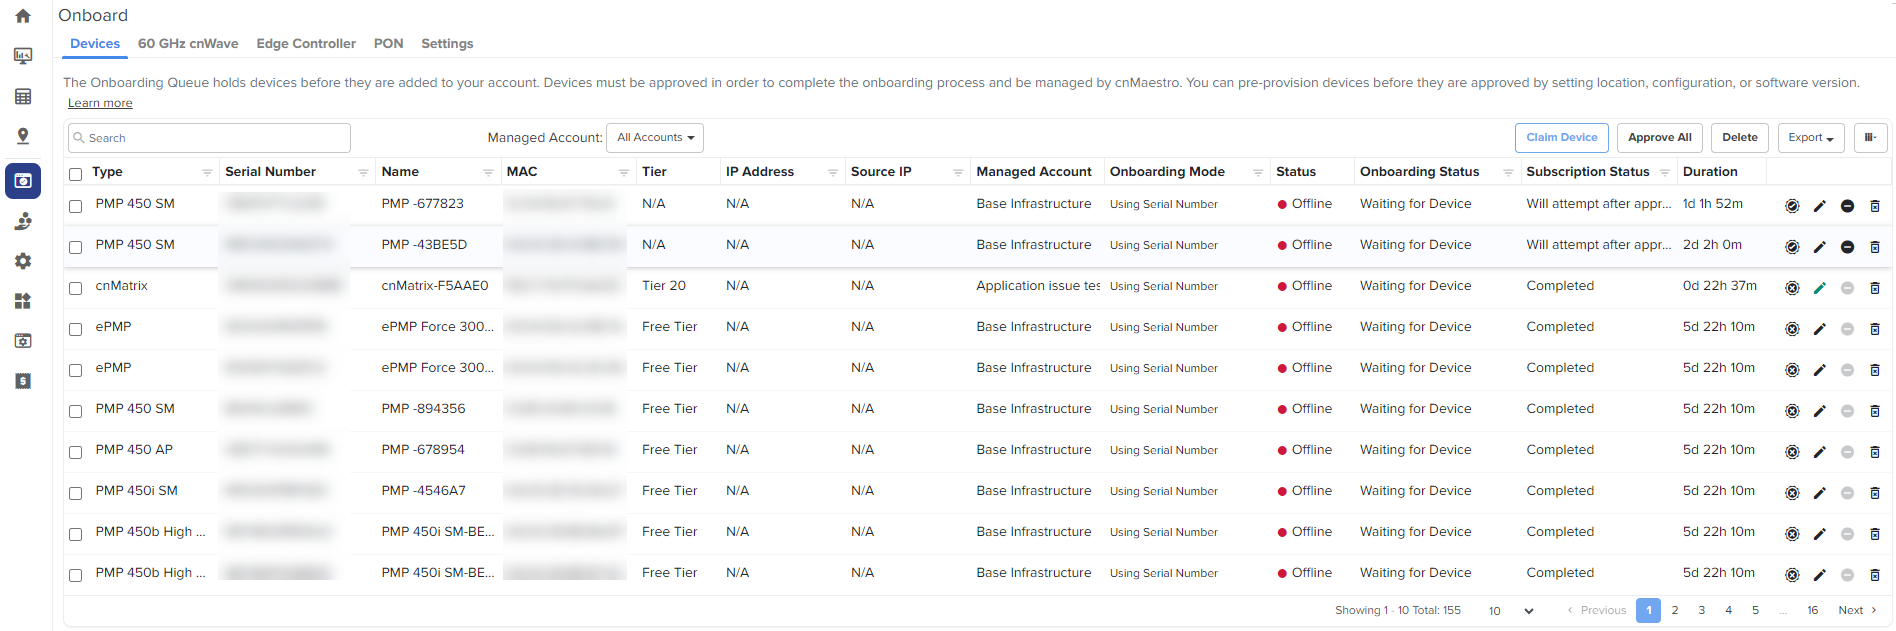
The Onboarding Queue holds a list of pending and recent (last 24 hours) device onboards. It allows the administrator to pre-provision device software and configuration, as well as signal a device is ready to be onboarded. The process flows for how the Onboarding Queue is used are slightly different based upon how the device was claimed.
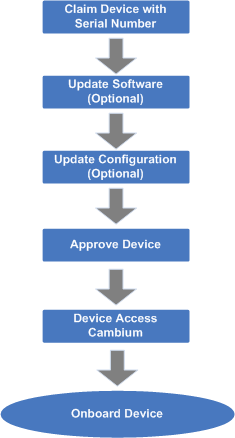
When onboarding with Serial Number, the device can be fully provisioned before it contacts Cambium Cloud and is placed in the Cloud Management. This allows it to be added immediately upon connection.
Figure 4 Serial Number flow
|
|---|
|
|
Note When a user onboards using a Serial Number, the software update and configuration can be defined even before the device physically accesses the account. |
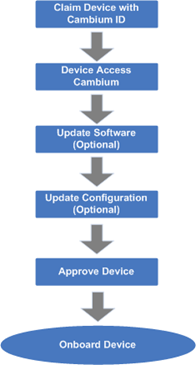
The flow is a little different when using Cambium ID. Here devices must connect to Cambium Cloud before they are added to Cloud Management. The administrator needs to then approve them in the Onboarding Queue after optionally updating the software version and device configuration.
Figure 5 Claiming Devices Using Cambium ID
|
|---|
The following table details the columns in the Onboarding Queue. Some of these fields will be unknown or uncertain until the physical device has contacted Cloud Management.
|
Parameter |
Description |
|---|---|
|
Actions |
Before a device is onboarded, it must be approved. There are two buttons available:
|
|
Added By |
The user who added this device for onboarding. Note: If the Device is claimed by a tenant user, the user information is not shown on the Onboarding page. |
|
Configure |
This highlights configuration that is applied to the device before onboarding. It is presented as a set of icons that represent: software update, configuration update, and map placement. The icons have the following colors:
|
|
Device |
The name of the device. This is set manually, or, if unset, it will be read from the device. |
|
Duration |
Displays when the status last changed for the device. |
|
IP Address |
The IP address of the device. This is only available after the device contacts cnMaestro. |
|
MAC Address |
The MAC address of the device (if known). |
|
Serial No |
The Serial Number of the device. |
|
Status |
The current status of onboarding:
|
|
Type |
The type of the device (if known or manually configured). |
Before a device has been approved, the administrator can pre-provision the device. This is presented through a set of icons (depicted below), which represent configuration update, software download, and device map position.
The color icon indicates the following:
: No changes are made to the device configuration ( ).
).
: Changes are applied successfully ( ).
).
|
|
Note Onboarding configuration can be modified until the onboarding process has begun. The approval however needs to be turned off before any changes can be made. |
The basic configuration includes Serial Number, MAC, Device Name, Mode, and Description. A Comment can also be specified to provide additional context to the device.
Configure Device follows the standard template system (see the section on Template Configuration for full details). The administrator can select an existing configuration template and set any required variables.
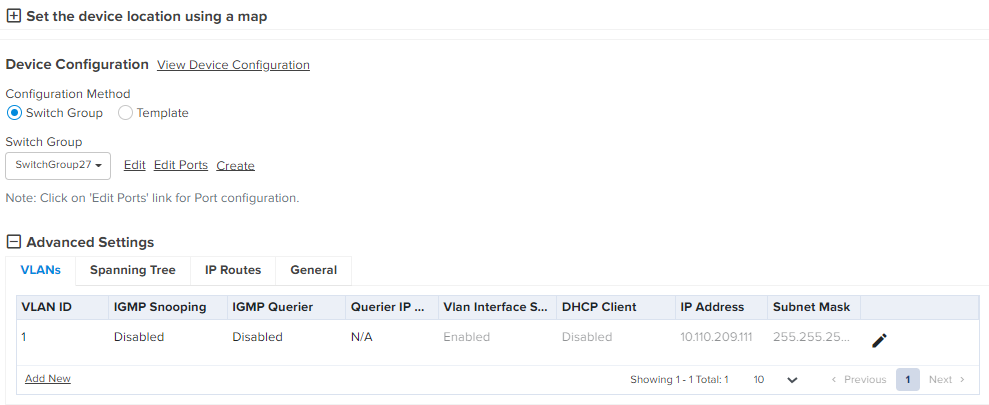
The administrator can select configuration method with the existing template or Switch Group.
User can configure the following Switch Group options while onboarding the devices:
General
IP Routes
Spanning Tree
VLANs
Software Update pushes a software image to the device. The administrators can select an image version and push to all ePMP (AP or SM) device selected in a job.
The Device location configuration includes Network, Tower, Latitude, and Longitude on a map.
An administrator needs to approve devices before onboarding can begin. This is done by selecting Approve. As soon as a device is approved, it is eligible to start the onboarding process. This occurs immediately with connected devices. Any changes to the Onboarding Configuration need to be completed before Onboarding begins; the Approval check must also be disabled.
Devices deleted from the Onboarding Queue are removed from Cloud management. They can then be added to other accounts. See below for how to delete devices that have already onboarded.
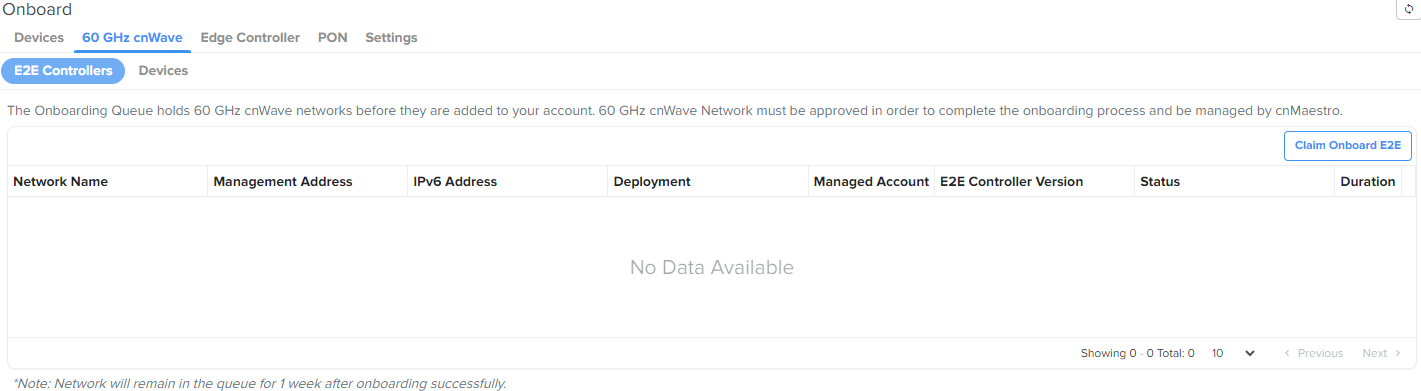
The Onboarding Queue has a separate tab for 60 GHz cnWave E2E Controllers, which must be approved by the user before they are added to cnMaestro as an E2E Network and can manage 60 GHz cnWave devices. This approval can be done either through the Onboarding Queue or the Hierarchical Tree (where the E2E Network is placed).
Once the onboarding is approved, the 60 GHz cnWave E2E Network (and its devices) can be managed by cnMaestro.
|
|
Note If Auto Generate IPv6 Addresses is enabled, E2E Controller fetches the IPv6 addresses automatically. |
For information on how to onboard E2E devices, refer to 60 GHz E2E Controller Onboarding.
For details on how to onboard Edge Controller and PTP 820/850, refer to Onboard Edge Controller
The header bar in cnMaestro displays the following UI controls:
![]()
These UI controls are located on the top right side of the UI page. The Search UI control allows you to provide keywords and search for the required knowledge base information (for example, onboarding devices to cnMaestro) available in Cambium community. The Notifications UI control provides the count of major alarms. The Out of sync devices UI control provides the count of devices that are out of sync. The Administrator UI control supports a drop-down list, which you can use to search and view account names, create account, edit profile, and log out.
Zero Touch Configuration allows PMP SMs and also ePMP SMs to automatically appear in the Onboarding Queue, provided parent AP is already onboarded.

Irrespective of the account type, the option has been introduced to simplify the Wi-Fi AP deployment. This option allows the claiming of Wi-Fi APs. This option is available when no APs have been claimed for your device.
Consider the following points for using the option:
For the access and backhaul account type, navigate to the Wi-Fi AP Group tree view. You can see this option for claiming your first Wi-Fi AP.
For the Wi-Fi account type, the Wi-Fi AP Groups tree menu (available on the Monitor and Manage page) is launched with the option automatically (as shown in Figure 6).
For Cloud users who want to claim Wi-Fi AP for a single device (after onboarding the device for the first time and if no AP has been claimed), navigate to the main Home page. You can locate the widget on the right side of the Home page (as shown in Figure 7).
Figure 6 The Claim Your First Wi-Fi AP option
.png)
Figure 7 The Claim Your First Wi-Fi AP widget on the Home page

If there are any APs claimed already for the Wi-Fi devices, this Claim Your First Wi-Fi AP option is not available on Home and Monitor and Manage UI pages
To claim your first Wi-Fi AP for a single device, perform the following steps:
On the main Home page, locate the widget on the right side of the page and click Get Started (as shown in Figure 7).
The Claim Wi-Fi Access Point screen appears.
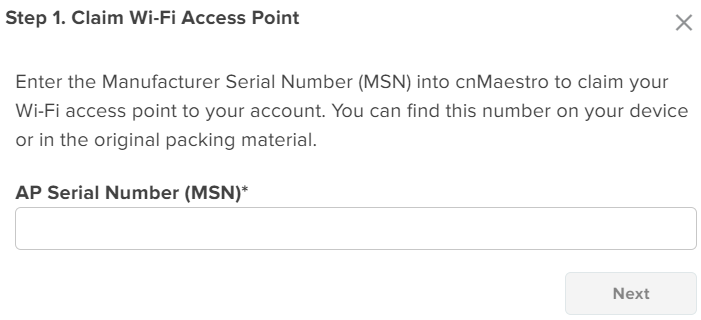
Enter a valid value in the AP Serial Number (MSN) text box (for example, AxCx4040Q2V8) and click Next.
The Configure Wireless LAN (Optional) screen displays multiple settings, which are applicable to Wi-Fi APs (home and enterprise Wi-Fi).
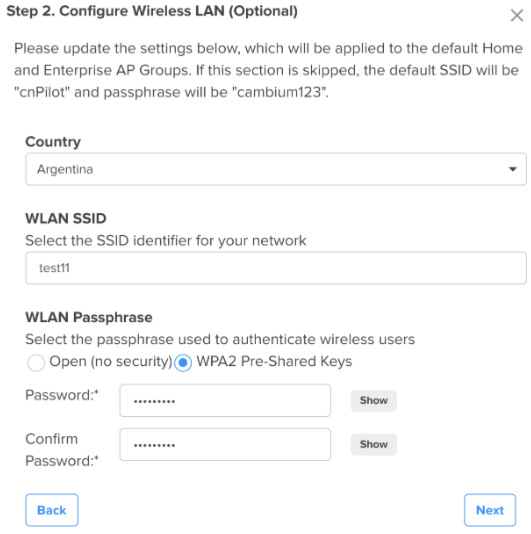
You can update the following settings based on your requirements.
Country: Name of the country (used for the regulatory purpose).
WLAN SSID: Unique name or ID that identifies your wireless network. Do not leave this field blank.
WLAN Passphrase: The passphrase is supported only if the WPA2 Pre-Shared Keys option is selected as the security method. The minimum length of the passphrase is eight characters.
If you skip configuring this settings section, the default SSID and the security configuration of the device are retained.
Click Next.
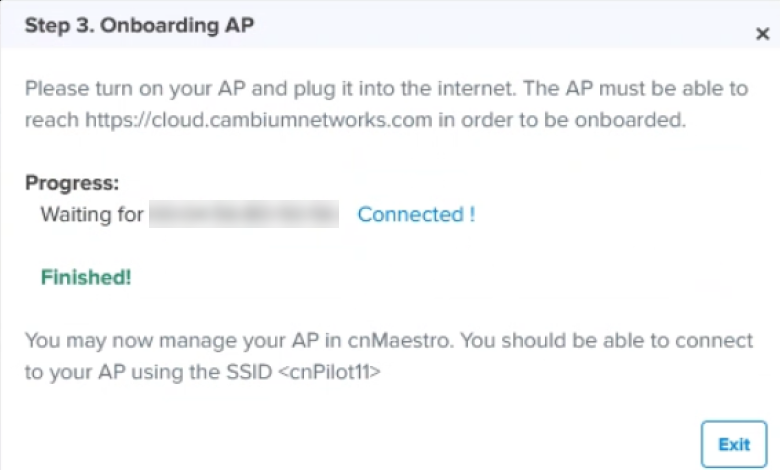
The Onboarding AP screen displays the onboarding status (for example, waiting) for the device. If the device is successfully onboarded, the Onboarding AP screen displays the following message:
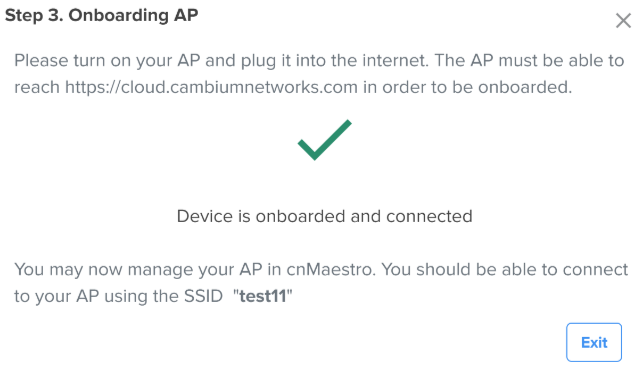
If the onboarding fails, the Onboarding AP screen displays a message indicating the failure status.
To :
Navigate to Monitor and Manage > Wi-Fi AP Groups tree menu, and click (as shown in Figure 6).
The Claim Wi-Fi Access Point screen appears.
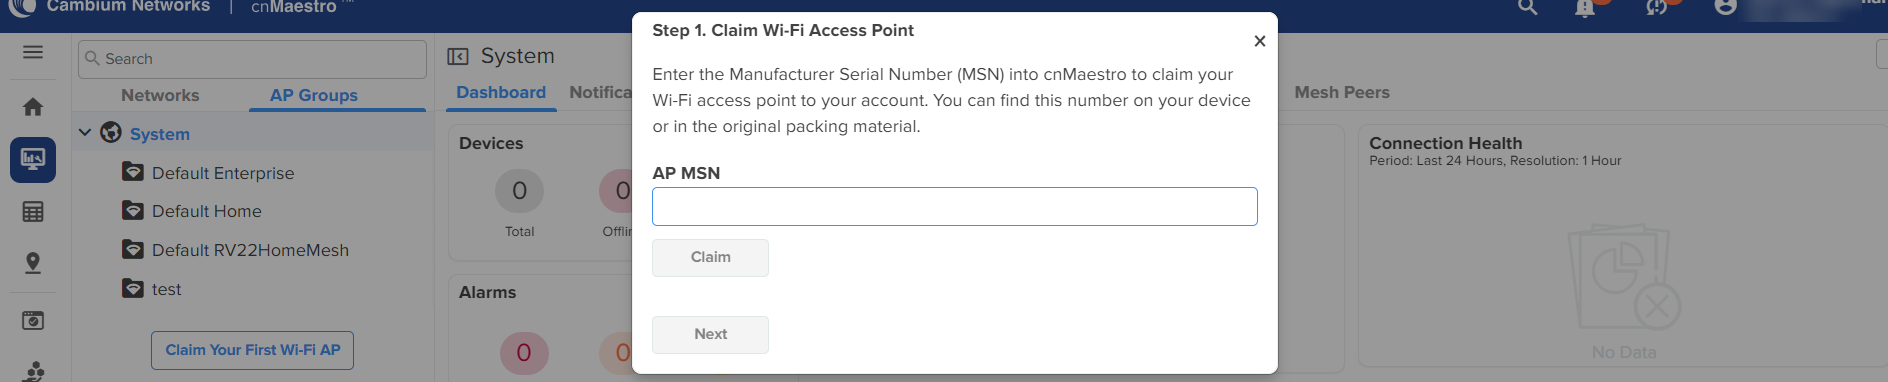
Enter a valid value in the AP MSN text box and click Claim.
The device is successfully claimed.
Click Next.
The Configure Wireless LAN (Optional) screen displays the following fields for configuration: Country, WLAN SSID. and WLAN Passphrase.
Enter the configuration details.
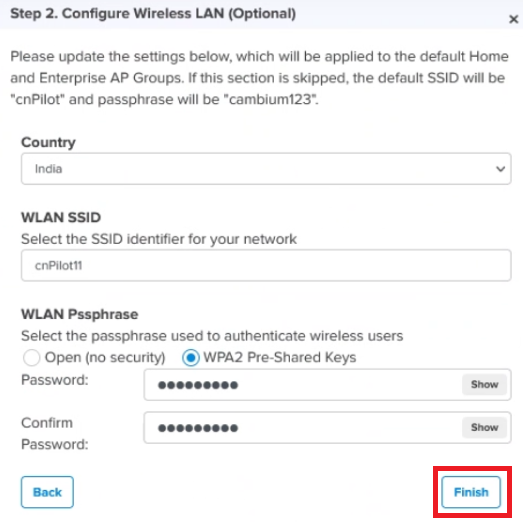
You can configure the following settings based on your requirements:
Country: Name of the country (used for the regulatory purpose).
WLAN SSID: Unique name or ID that identifies your wireless network. Do not leave this field blank.
WLAN Passphrase: The passphrase is supported only if the WPA2 Pre-Shared Keys option is selected as the security method. The minimum length of the passphrase is eight characters.
If you skip configuring this settings section, the default SSID and the security configuration of the device are retained.
Click Finish.
The Onboarding AP page displays the onboarding status and configured actions for the device.
The device is mapped to the default Wi-Fi AP Group, and the configuration is updated in the Default Enterprise WLAN.
To claim multiple Enterprise Wi-Fi APs from the AP Groups tree view, complete the following steps:
Navigate to the AP Groups tree view and click the actions (![]() ) icon for the selected AP group.
) icon for the selected AP group.
Click Claim Device(s).
In the Claim Enterprise Wi-Fi Devices pop-up dialog select the Network and Site under which these devices should be placed and by default devices claimed under this group will have its configuration settings.
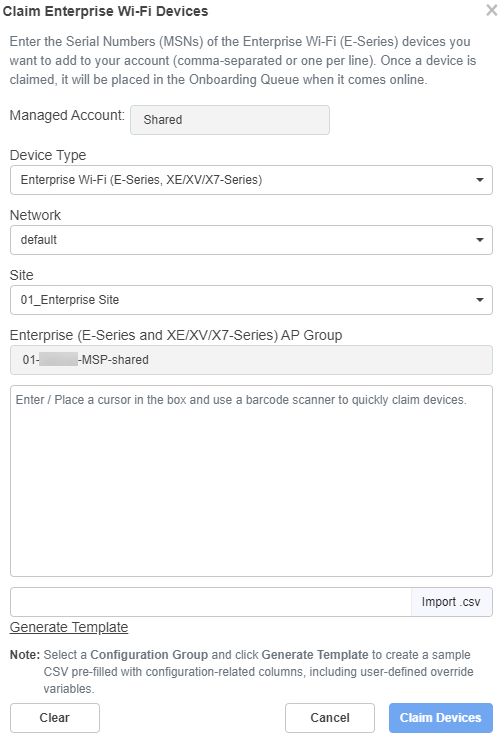
Specify the Manufacturing Serial Numbers (MSNs) of the devices line-by-line or comma-separated, or click Import .csv to import the MSNs of the devices from a CSV file.
The CSV file can also include User-Defined variables that you configure in the AP Group. For more information, see Claiming multiple Enterprise devices using CSV import.
|
|
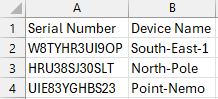
Note You can include the device host name in the CSV file while claiming Enterprise devices through the import CSV option. Figure 8 Example CSV file to include the device name
|
Click to add to the selected AP Group with the configuration applied.
|
|
Note In cnMaestro On-Premises the procedure is the same as Cloud, but instead of MSN, the user should use the Device MAC Addresses. |
To claim multiple Enterprise devices (NSE, cnMatrix, Wi-Fi AP) from the Site Dashboard, perform the following steps:
Navigate to Monitor and Manage > Networks tree view.
Click the actions (![]() ) icon for the required site and click .
) icon for the required site and click .
The Claim Enterprise Devices window is displayed.
Figure 9 Claim Enterprise Devices window
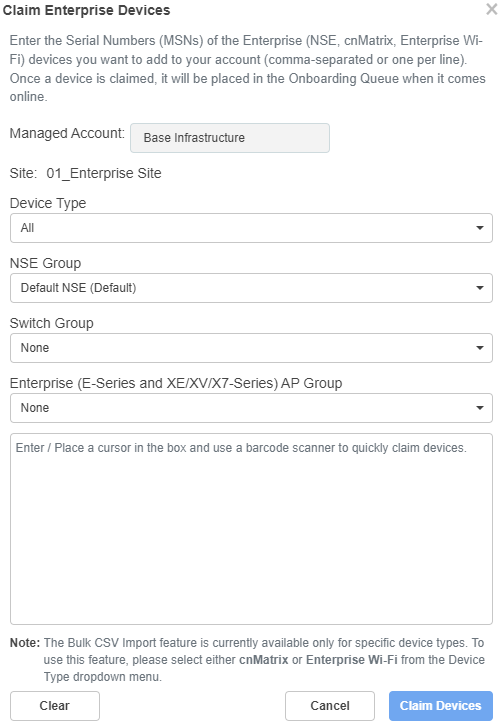
In the Claim Enterprise Devices window select the NSE group, Switch group, or the Enterprise AP Group that must be applied for the Enterprise devices.
The devices claimed under this site will have the configuration settings from the selected device group (NSE, switch, or AP).
Specify the MSNs of the devices line-by-line or comma-separated, or click to import the MSNs of the devices from a CSV file.
Click Download Template to download a sample CSV file.
For more information on claiming Enterprise devices using CSV files, see Claiming multiple Enterprise devices using CSV import.
|
|
Note You can include the device host name in the CSV file while claiming Enterprise devices through the import CSV option. Figure 10 Example CSV file to include the device name
|
Click to add the devices to the selected device group and click Apply Configuration.
You can claim multiple Enterprise devices from an Enterprise site or from the AP group by either entering the serial numbers of the devices in the box provided, or by uploading a CSV file with the required information.
|
|
Note
|
When claiming devices using the CSV files, by default, only the serial number and device name is allowed. However, if you select a particular device type (cnMatrix or Enterprise Wi-Fi) and a corresponding switch or AP group, you can also add additional details in the CSV file, based on the parameters that are present in the User-Defined Overrides section of the respective group.
For example, if the selected AP group contains parameters defined in the User-Defined Overrides section of the AP group, then these parameters appear in the CSV file as shown in the following image. The name of the selected AP group also is displayed in the CSV file.

The CSV import option for cnMatrix and Enterprise Wi-Fi APs is available from the following locations in the cnMaestro UI:
Both cnMatrix and Wi-Fi AP devices
Monitor and Manage > Networks tab > <Enterprise-site-name> > Claim Device(s) (from the actions (![]() ) menu)
) menu)
Only Wi-Fi APs
Monitor and Manage > Networks tab > <Enterprise-site-name> > Devices tab > Claim New AP
Monitor and Manage > AP Groups tab > <AP-group-name> > Claim Device(s) (from the actions (![]() ) menu)
) menu)
Monitor and Manage > AP Groups tab > <AP-group-name> > Devices tab > Claim New AP
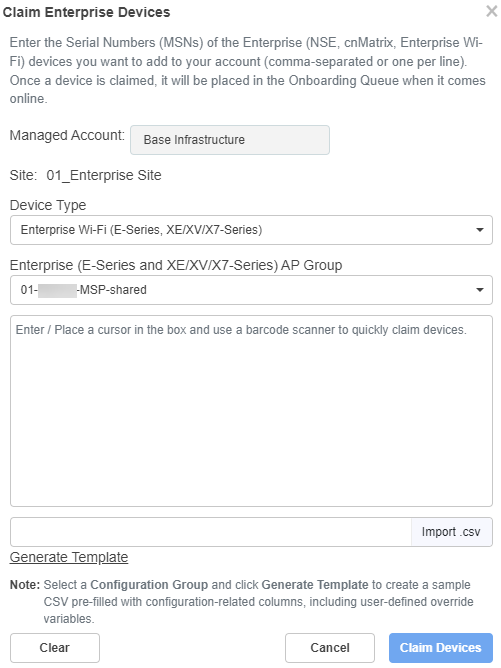
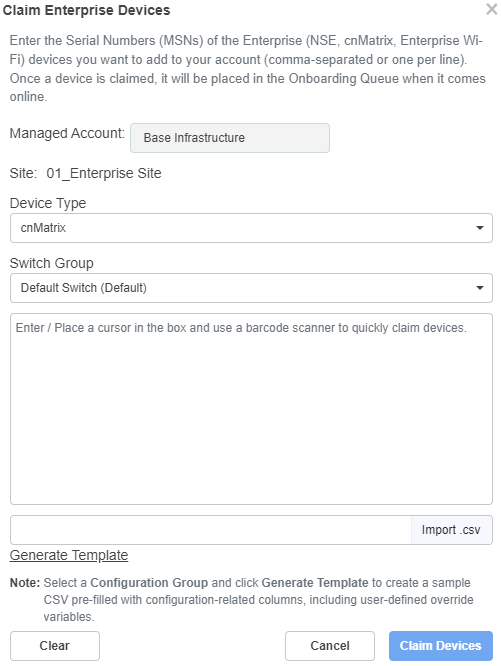
To import multiple Enterprise devices using the CSV import option, complete the following steps:
Navigate to any one of the pages mentioned above.
The Claim Enterprise Devices window is displayed as shown in the following images.
At the enterprise site-level:
Wi-FI APs
cnMatrix devices
At the AP group-level:
Select the appropriate options at the site- or AP group-level:
At the enterprise site-level—Select the options from the Device Type and Enterprise (E-Series and XE/XV/X7-Series) AP Group dropdown lists.
At the AP group-level—Select the options from the Device Type, Network, Site, and Enterprise (E-Series and XE/XV/X7-Series) AP Group dropdown lists.
Generate the CSV file with all selected columns, by clicking Generate Template and save the CSV file.
The CSV file contains columns corresponding to the variables that are defined in the User-Defined Overrides section of the switch or AP group, respectively.
|
|
Note If no switch or AP group is selected, then CSV file will contain only the Serial Number and Device Name columns, which are the default columns. |
Only one AP group per CSV file is allowed. The same AP group is applied to all devices listed in the CSV file.
Including multiple AP groups in the same CSV file causes an error.
Invalid values (for example, unsupported channel numbers) will be accepted while uploading the CSV import, but the values will not be applied.
Only hyphens (-) and underscores (_) are allowed in the Device Name column. All other special characters are not allowed.
If user-defined variables are empty in the CSV file, and if the AP group configuration contains default values for these variables, then those values are assigned where applicable.
You must specify the values for user-defined variables either in the CSV file or in the AP group (under User-Defined Overrides section).
The value of the variables must not be empty.
When onboarding completes, the device will no longer be managed through the Onboarding Queue. Instead, Configuration and Software Upgrade must be performed through the standard cnMaestro UI sections.
While a device is in the Onboarding Queue, it can be removed from the account by deleting it from the queue. After Onboarding, the device needs to be manually deleted. The device can be deleted either by right-clicking the device node in the tree and selecting the Delete option or from the Inventory page.
When a device is sold to a third-party, the device ownership needs to be transferred. This is done by deleting the device in one account, thereby opening it up to be claimed by another.